ศิลปะ
ความงามและสุขภาพ
งานฝีมือ
วัฒนธรรมและประวัติศาสตร์
ความบันเทิง
สิ่งแวดล้อม
อาหารและเครื่องดื่ม
วิศวกรรมย้อนรอย
วิทยาศาสตร์
กีฬา
เทคโนโลยี
อุปกรณ์สวมใส่
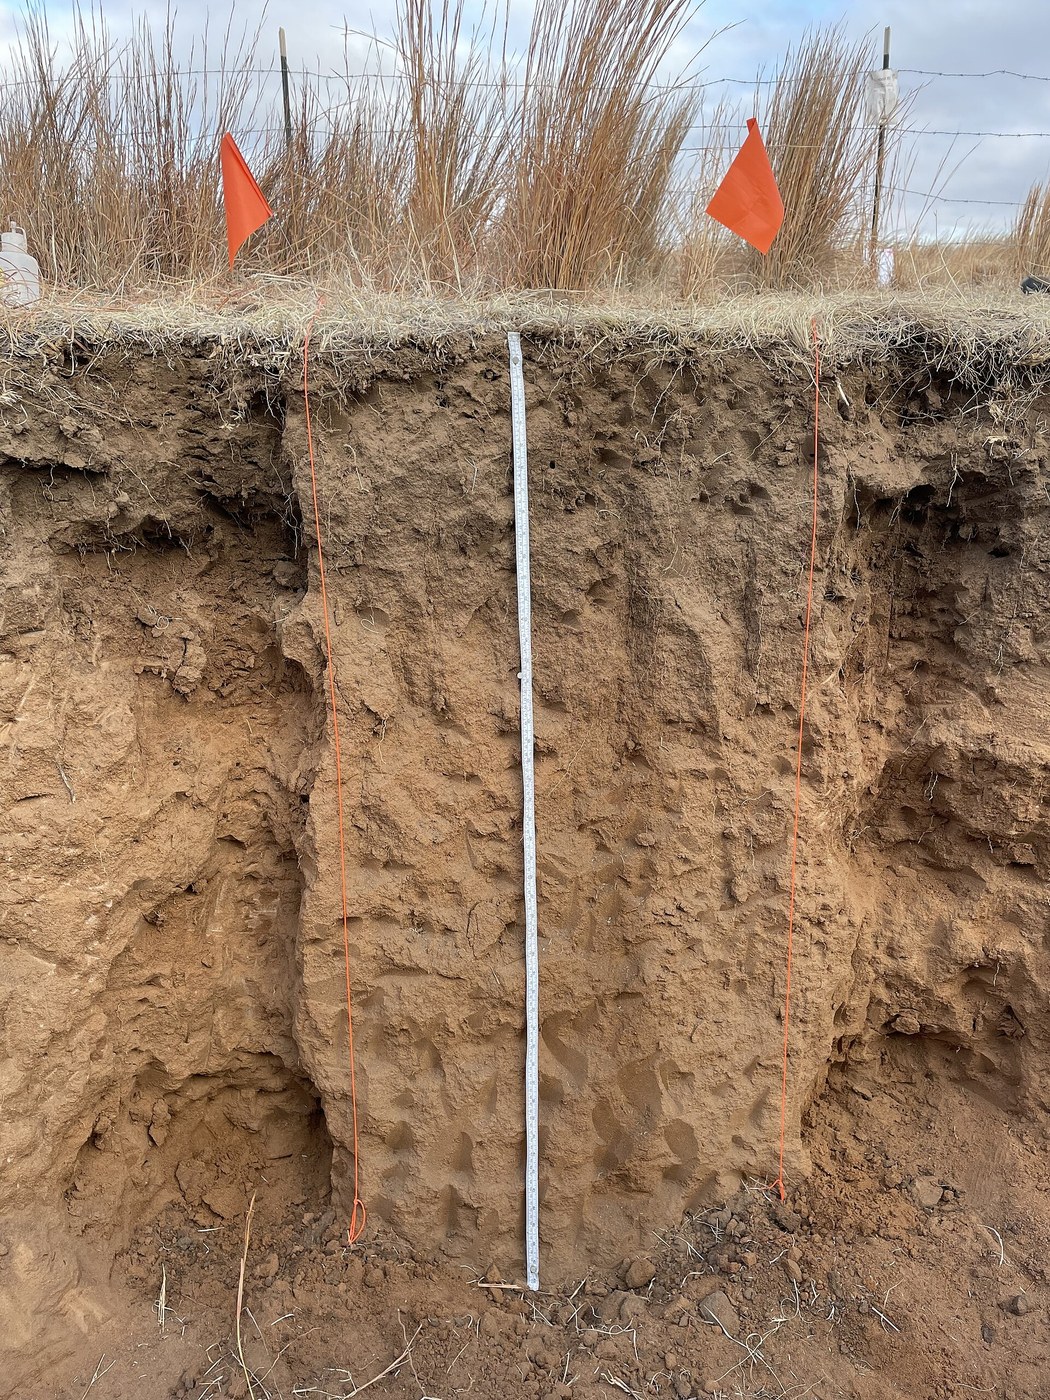


The Soil Pit: Texture, Structure and What It Will Grow
A soil test, already published here, tells you the chemistry of a scoop of earth. It cannot tell you that there is a compacted pan at 25 centimetres stopping every root, or that the water table rises into the rooting zone each winter — and those decide far more than pH does.
The answer is to dig a hole and look at the side of it. A soil profile shows the layers, their colours, where the roots stop and why, and how the structure crumbles in your hand. Every one of those is read by eye and finger, with no equipment beyond a spade.
It is the cheapest diagnostic in land management and the most consistently skipped. An hour with a spade routinely explains a problem that three seasons of fertiliser did not.
เริ่มต้น
1 day
คำแนะนำ
1
1
Dig a pit with one clean vertical face
Dig a pit with one clean vertical face
Dig down to at least 60 cm — deeper if you can — keeping ONE face vertical, clean and undisturbed, and stack the soil from each depth separately so you can put it back in order.
Work in the shade of your own body and face the light. Never dig a pit deeper than waist height without battering the sides back, and never work in a deep narrow hole alone: soil collapses without warning and a pit is heavy. For most questions 60 cm answers them.
เครื่องมือที่ต้องใช้:
 พลั่ว
พลั่ว ถุงมือไนไตรล์
2
2
Find the horizons by colour and feel
Find the horizons by colour and feel
Scrape the face lightly with a trowel and look for changes in colour and texture. Mark each boundary with a nail and measure its depth.
Typically you will see dark topsoil rich in organic matter over paler subsoil, over weathered parent material. Record the depth of each boundary and whether it is sharp or gradual. A sharp, flat boundary at a spade's depth is usually a PLOUGH PAN — man-made, not natural — and it is often the whole answer to a drainage or rooting problem.
วัสดุสำหรับขั้นตอนนี้:
 ตะปูชุบสังกะสี10 ชิ้น
เครื่องมือที่ต้องใช้:
 เกรียงพรวนดิน
 ตลับเมตร
 สมุดบันทึกภาคสนาม
3
3
Determine texture by hand, the standard way
Determine texture by hand, the standard way
Take a walnut-sized lump from each horizon, moisten it to a putty, and work it: does it stain the fingers, does it feel gritty or silky, will it roll into a thread, will the thread bend into a ring without cracking?
Gritty and will not roll is SAND. Silky and rolls a little is SILT. Sticky, polishes when rubbed and rolls into a ring is CLAY. This hand texturing is the field standard worldwide and an experienced hand matches laboratory results closely — the notebook gives the full decision sequence.
วัสดุสำหรับขั้นตอนนี้:
 น้ำกลั่น1 ลิตร
เครื่องมือที่ต้องใช้:
สมุดบันทึกภาคสนาม4
4
Read the roots, and the colours they sit in
Read the roots, and the colours they sit in
Note the depth roots reach, whether they turn sideways at a layer, and whether they are fine and branched or few and thick.
Roots turning abruptly horizontal mark a barrier. Grey or blue-grey soil with orange mottles means water sits there for long periods and the iron has been chemically reduced — a record of waterlogging that persists even in a dry summer. The plants have already surveyed the soil for you; the pit lets you read their answer.
เครื่องมือที่ต้องใช้:
 แว่นขยายสมุดบันทึกภาคสนาม
5
5
Texture, water and what will actually grow
Texture, water and what will actually grow
กำลังโหลดสมุด Jupyter…
วัสดุสำหรับขั้นตอนนี้:
 โหลแก้ว2 ชิ้น
 กระบอกตวง1 ชิ้น
เครื่องมือที่ต้องใช้:
 ไม้บรรทัด
6
6
Fill it back in, in order
Fill it back in, in order
Return the soil in the reverse order you removed it — subsoil first, topsoil last — and tread it back firmly in layers.
Tipping the heap back mixed puts subsoil on the surface and buries the biologically active topsoil, and that patch will be visibly different for years. Photograph the clean face before you fill, with a tape in shot for scale: the photograph is the permanent record, and the hole is not.
เครื่องมือที่ต้องใช้:
พลั่วตลับเมตรวัสดุ
4- 10 ชิ้นตัวยึดตำแหน่ง
- 1 ลิตรตัวยึดตำแหน่ง
- 2 ชิ้นตัวยึดตำแหน่ง
- 1 ชิ้นตัวยึดตำแหน่ง
บลูพริ้นท์ที่เกี่ยวข้อง
บลูพริ้นท์เหล่านี้แบ่งปันความรู้ — เทคนิค วัสดุ หรือหลักการ

CC0 สาธารณสมบัติ
พิมพ์เขียวนี้เผยแพร่ภายใต้ CC0 คุณสามารถคัดลอก แก้ไข แจกจ่าย และใช้งานผลงานนี้เพื่อวัตถุประสงค์ใดก็ได้ โดยไม่ต้องขออนุญาต
สนับสนุนเมกเกอร์โดยซื้อสินค้าผ่านพิมพ์เขียวของพวกเขา ซึ่งพวกเขาจะได้รับ ค่าคอมมิชชันเมกเกอร์ ที่ผู้ขายกำหนด หรือสร้างเวอร์ชันใหม่ของพิมพ์เขียวนี้และรวมเป็นการเชื่อมต่อในพิมพ์เขียวของคุณเพื่อแบ่งรายได้