ศิลปะ
ความงามและสุขภาพ
งานฝีมือ
วัฒนธรรมและประวัติศาสตร์
ความบันเทิง
สิ่งแวดล้อม
อาหารและเครื่องดื่ม
วิศวกรรมย้อนรอย
วิทยาศาสตร์
กีฬา
เทคโนโลยี
อุปกรณ์สวมใส่
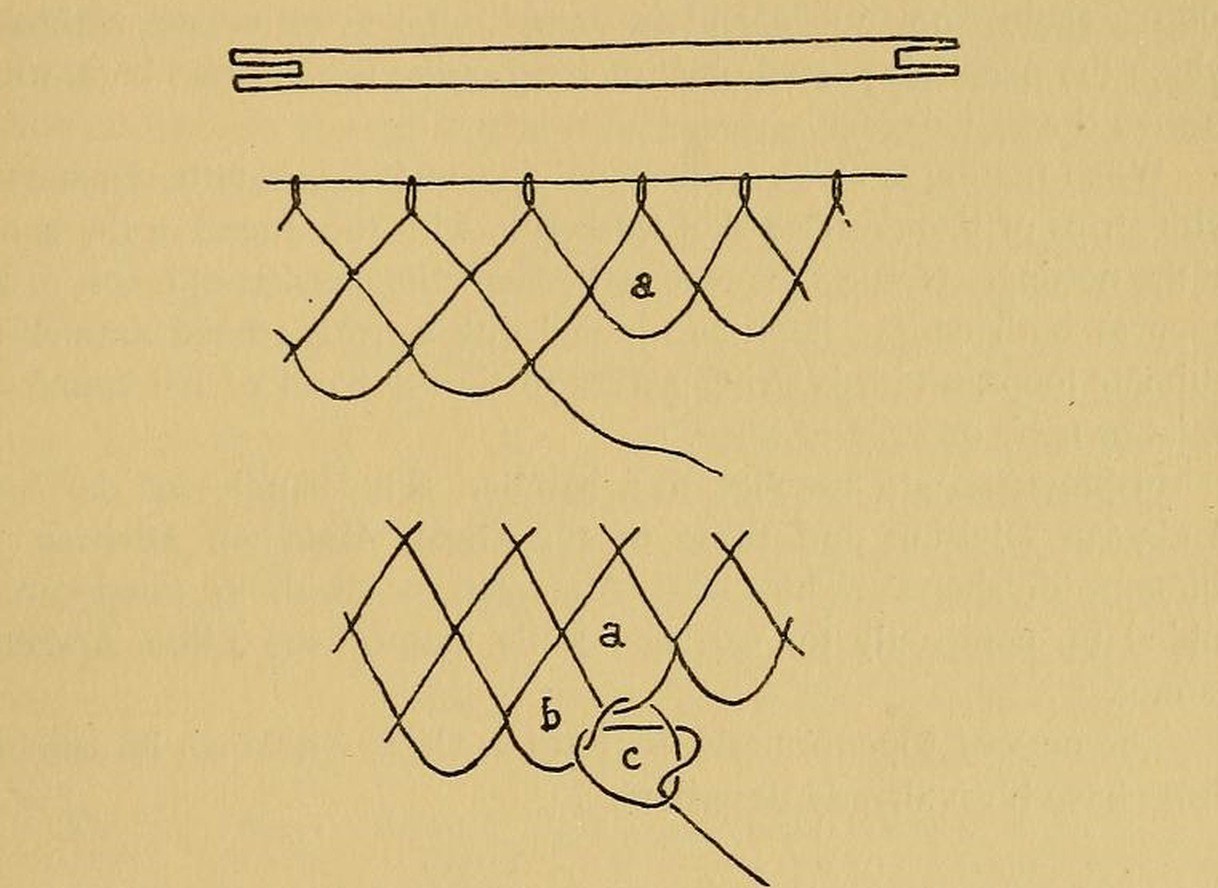


Wooden Netting Needle and Mesh Gauge
Hand nets are knotted with sheet bends from a netting needle holding the twine, round a gauge that keeps every mesh the same size. Carve a flat needle forked at both ends to wind the twine on, and a smooth gauge stick half as wide as the mesh.
The picture: a forked netting needle and the method of netting, from an old textbook figure.
เริ่มต้น
Two hours
คำแนะนำ
1
1
Cut the blanks
Cut the blanks
Saw a flat strip about 20–25 cm long for the needle, a little narrower than the gauge (step 4), and a second strip for the gauge.
วัสดุสำหรับขั้นตอนนี้:
 แถบไม้เนื้อแข็ง2 ชิ้น
เครื่องมือที่ต้องใช้:
 เลื่อยสันแข็ง
 ไม้บรรทัด
2
2
Fork the needle
Fork the needle
Saw a slot about 2 cm deep into each end and round the prongs with the knife, so twine wound lengthwise sits in the forks.
เครื่องมือที่ต้องใช้:
 ปากกาจับชิ้นงานหน้าโต๊ะ
 เลื่อยฉลุ
 มีดสโลยด์
3
3
Smooth them
Smooth them
Rasp and sand both pieces smooth with rounded edges so the twine slides without catching. Rub in a little oil.
วัสดุสำหรับขั้นตอนนี้:
 น้ำมันลินสีด0.01 ลิตร
เครื่องมือที่ต้องใช้:
 ตะไบหยาบสำหรับไม้
 กระดาษทราย
4
4
Sizes
Sizes
กำลังโหลดสมุด Jupyter…
วัสดุ
2- 2 ชิ้นตัวยึดตำแหน่ง
- 0.01 ลิตรตัวยึดตำแหน่ง


บลูพริ้นท์ที่เกี่ยวข้อง
บลูพริ้นท์เหล่านี้แบ่งปันความรู้ — เทคนิค วัสดุ หรือหลักการ

CC0 สาธารณสมบัติ
พิมพ์เขียวนี้เผยแพร่ภายใต้ CC0 คุณสามารถคัดลอก แก้ไข แจกจ่าย และใช้งานผลงานนี้เพื่อวัตถุประสงค์ใดก็ได้ โดยไม่ต้องขออนุญาต
สนับสนุนเมกเกอร์โดยซื้อสินค้าผ่านพิมพ์เขียวของพวกเขา ซึ่งพวกเขาจะได้รับ ค่าคอมมิชชันเมกเกอร์ ที่ผู้ขายกำหนด หรือสร้างเวอร์ชันใหม่ของพิมพ์เขียวนี้และรวมเป็นการเชื่อมต่อในพิมพ์เขียวของคุณเพื่อแบ่งรายได้