සහයෝගීතාව
කලාව
රූපලාවණ්ය සහ සුවතාව
ශිල්පය
සංස්කෘතිය සහ ඉතිහාසය
විනෝදාස්වාදය
පරිසරය
ආහාර සහ පාන
ප්රතිලෝම ඉංජිනේරු
විද්යාවන්
ක්රීඩා
තාක්ෂණය
පැළඳිය හැකි
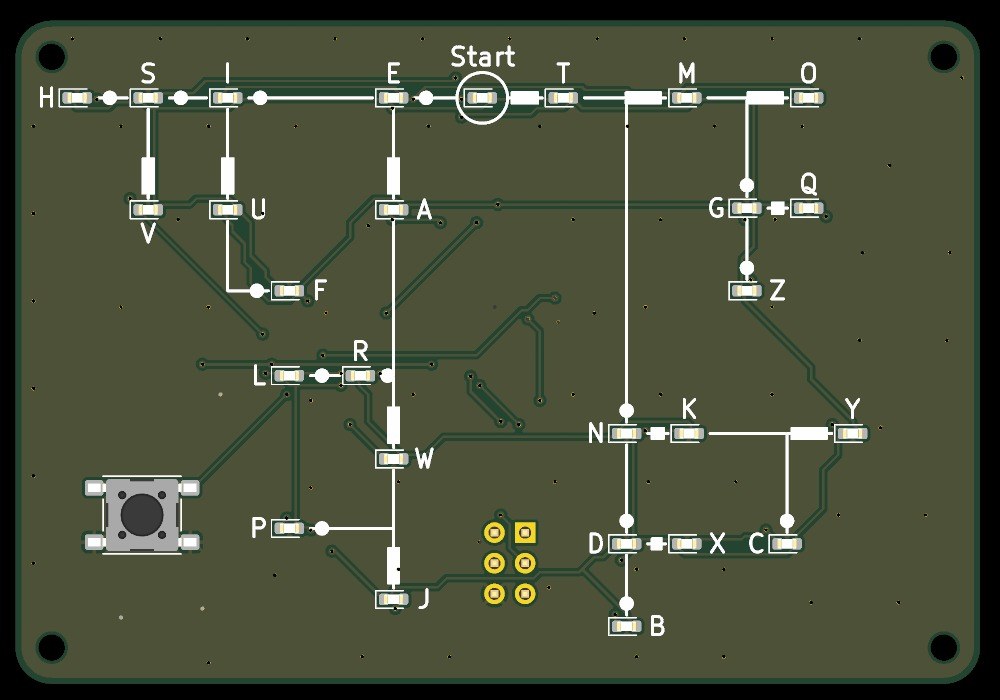


Pocket Morse Code Learning Board - v.1
A pocket board, 80 x 55 mm, that teaches you to read Morse code. Its front is Dave Nathanson's Morse decoding chart: from Start, dots run one way and dashes the other, and every letter sits where its dots and dashes lead. Here every letter has its own LED. Press the key short for a dot and long for a dash, and the LED of the letter you have reached lights; pause, and it blinks.
It runs on one CR2032 coin cell and sleeps between uses. The board was drawn with Youblob's Draw PCB, and its checks pass, but it has not been built yet.
උසස්
About 1 day, plus board delivery
උපදෙස්
1
1
LED current and keying speed
LED current and keying speed
Jupyter සටහන් පොත පූරණය වෙමින්…
2
2
The code it decodes
The code it decodes
This board reads the International Morse code letters as ITU-R M.1677-1 gives them.
3
3
Read the chart
Read the chart
Dave Nathanson (KG6ZJO) drew his decoding chart in 2010: "Start with your finger at "Start Here". Then move your finger to track the Morse dots & dashes. You will arrive at the correct letter!" On this board the LEDs do the tracking. ITU-R M.1677-1: "A dash is equal to three dots."
4
4
The schematic
The schematic
ATmega328P on its internal 8 MHz clock, straight from the coin cell; 27 LEDs charlieplexed on PC0-PC5 through six 330 Ω resistors; the key on INT0; a 2x3 ISP footprint.
KiCanvas නරඹනය පූරණය වෙමින්...
වෘත්තීය PCB නිර්මාණ නරඹනය
5
5
The board
The board
Two layers, 80 x 55 mm. The chart, LEDs and key on the front; the chip, resistors, capacitors and cell holder on the back.
KiCanvas නරඹනය පූරණය වෙමින්...
වෘත්තීය PCB නිර්මාණ නරඹනය
6
6
Order the board
Order the board
Open the board in KiCad and plot Gerber and drill files (File > Fabrication Outputs). Order a two-layer board, 1.6 mm thick, from any board maker that takes Gerbers.
මෙම පියවර සඳහා ද්රව්ය:
 මුද්රිත පරිපථ පුවරුව1 කැබැල්ල
අවශ්ය මෙවලම්:
 Arduino IDE සහිත පරිගණකය
7
7
Solder the parts
Solder the parts
Back first: paste and reflow U1, R1-R7, C1-C3 and the cell holder BT1 with hot air. Then the front: the 27 red LEDs D1-D27 with pad 1 (cathode) as the board's assembly drawing shows, and the key SW1. Leave J1 empty. Clean off the flux, then test each LED's direction with the meter's diode test.
මෙම පියවර සඳහා ද්රව්ය:
 ATmega328P ක්ෂුද්ර පාලකය1 කැබැල්ල
 චිප් LED27 කැබලි
 චිප් ප්රතිරෝධකය7 කැබලි
 සෙරමික් චිප් ධාරිත්රකය3 කැබලි
 තල්ලු බොත්තම1 කැබැල්ල
 බැටරි දරණය1 කැබැල්ල
 පෑස්සුම් පේස්ට් (ඊයම් රහිත)1 කැබැල්ල
 පාස්සන ඊයම් කම්බිය1 කැබැල්ල
අවශ්ය මෙවලම්:
 උණුසුම් වායු අලුත්වැඩියා ඒකකය
 පෑස්සුම් කූරු
 තියුණු තුඩු අඬු
 ෆ්ලක්ස්
 විශාලන කාච
 බහුමානකය
 අයිසොප්රොපයිල් ඇල්කොහොල් 99 %
8
8
The firmware
The firmware
pocket_morse_decoder_az.ino: every timing is a named constant at the top of the sketch. Board in the Arduino IDE: Arduino Pro or Pro Mini, ATmega328P (3.3V, 8 MHz).
pocket_morse_decoder_az.inoarduino
9
9
Set the fuses and upload
Set the fuses and upload
Do not use Burn Bootloader: the Pro board setting expects a crystal, and this board has none. Hold an ISP programmer's 2x3 pins on J1 and set the internal 8 MHz clock: avrdude -c usbasp -p m328p -U lfuse:w:0xE2:m -U hfuse:w:0xD9:m -U efuse:w:0xFF:m. Then, in the Arduino IDE, use Sketch > Upload Using Programmer.
අවශ්ය මෙවලම්:
 AVR ISP ක්රමලේඛකයArduino IDE සහිත පරිගණකය
10
10
Print the back shell
Print the back shell
An open-front shell, 84.8 x 59.8 x 8.9 mm, with four standoffs for M2 screws, a slot to slide the cell out and a window under J1. PLA, 0.2 mm layers, 20 % infill, printed on its floor.
11
11
Fit the shell
Fit the shell
The shell leaves 5.0 mm for the back parts: measure your cell holder with a cell in it before you print. Check the holder's open side faces the board's left edge, where the shell's cell slot is. Slide in a CR2032 and screw the board into the shell with four M2 self-tapping screws.
මෙම පියවර සඳහා ද්රව්ය:
 PLA තන්තුව1 කැබැල්ල
 ස්වයං-කැපුම් ඉස්කුරුප්පුව4 කැබලි
 කාසි බැටරිය CR20321 කැබැල්ල
අවශ්ය මෙවලම්:
 FDM 3D මුද්රණ යන්ත්රය
 වර්නියර් කැලිපරය
 නිරවද්ය ඉස්කුරුප්පු නියන කට්ටලය
12
12
Troubleshooting
Troubleshooting
Pocket Morse decoder troubleshooting.
Flow
Loading...
13
13
History and honest limits
History and honest limits
The chart is **Dave Nathanson**'s (KG6ZJO), drawn in 2010 and shared as copyleft; his post says it is a novel way to decode by following a path. The letter codes are ITU-R M.1677-1's. The board, sizes, parts and timings are ours, drawn with Youblob's Draw PCB: its ERC and DRC pass with no errors and every LED's wiring was checked against the firmware by script, but it has not been built, flashed or tested.
ද්රව්ය
12- 1 කැබැල්ලස්ථානගත
- 1 කැබැල්ලස්ථානගත
- 27 කැබලිස්ථානගත
- 7 කැබලිස්ථානගත
- 3 කැබලිස්ථානගත
- ස්ථානගත
- ස්ථානගත
- 1 කැබැල්ලස්ථානගත
- 1 කැබැල්ලස්ථානගත
- 1 කැබැල්ලස්ථානගත
- 4 කැබලිස්ථානගත
- 1 කැබැල්ලස්ථානගත
අවශ්ය මෙවලම්
12- ස්ථානගත
- 2 vendors sell this, none ship to you yetස්ථානගත
- ස්ථානගත
- ස්ථානගත
- ස්ථානගත
- ස්ථානගත
- ස්ථානගත
- ස්ථානගත
- ස්ථානගත
සැලසුම් ගොනු
1මෙම සැලසුම සාදන්නේ

සම්බන්ධ බ්ලූප්රින්ට්
මෙම බ්ලූප්රින්ට් දැනුම බෙදා ගනී — ශිල්ප ක්රම, ද්රව්ය හෝ මූලධර්ම


CC0 පොදු වසම
මෙම බ්ලූප්රින්ට් CC0 යටතේ නිකුත් කර ඇත. ඔබට අවසර නොමැතිව පිටපත් කිරීම, වෙනස් කිරීම, බෙදා හැරීම සහ භාවිතා කිරීම කළ හැක.
බ්ලූප්රින්ට් හරහා නිෂ්පාදන මිලදී ගැනීමෙන් නිර්මාතෘට සහාය වන්න නිර්මාතෘ කොමිසම විකුණුම්කරුවන් විසින් නියම කළ, හෝ මෙම බ්ලූප්රින්ට්හි නව අනුවාදයක් සාදා ආදායම බෙදා ගැනීමට ඔබේ බ්ලූප්රින්ට්හි සම්බන්ධතාවයක් ලෙස ඇතුළත් කරන්න.