කලාව
රූපලාවණ්‍ය සහ සුවතාව
ශිල්පය
සංස්කෘතිය සහ ඉතිහාසය
විනෝදාස්වාදය
පරිසරය
ආහාර සහ පාන
ප්‍රතිලෝම ඉංජිනේරු
විද්‍යාවන්
ක්‍රීඩා
තාක්ෂණය
පැළඳිය හැකි
Precision Digital Scale, 0.01 g: Parallel-Beam Load Cell, HX711 and ESP32 (after Laimins, 1961)
Ed

නිර්මාතෘ

Ed

22. නොවැම්බර් 2026FI
1
0
0
0
0

Precision Digital Scale, 0.01 g: Parallel-Beam Load Cell, HX711 and ESP32 (after Laimins, 1961)

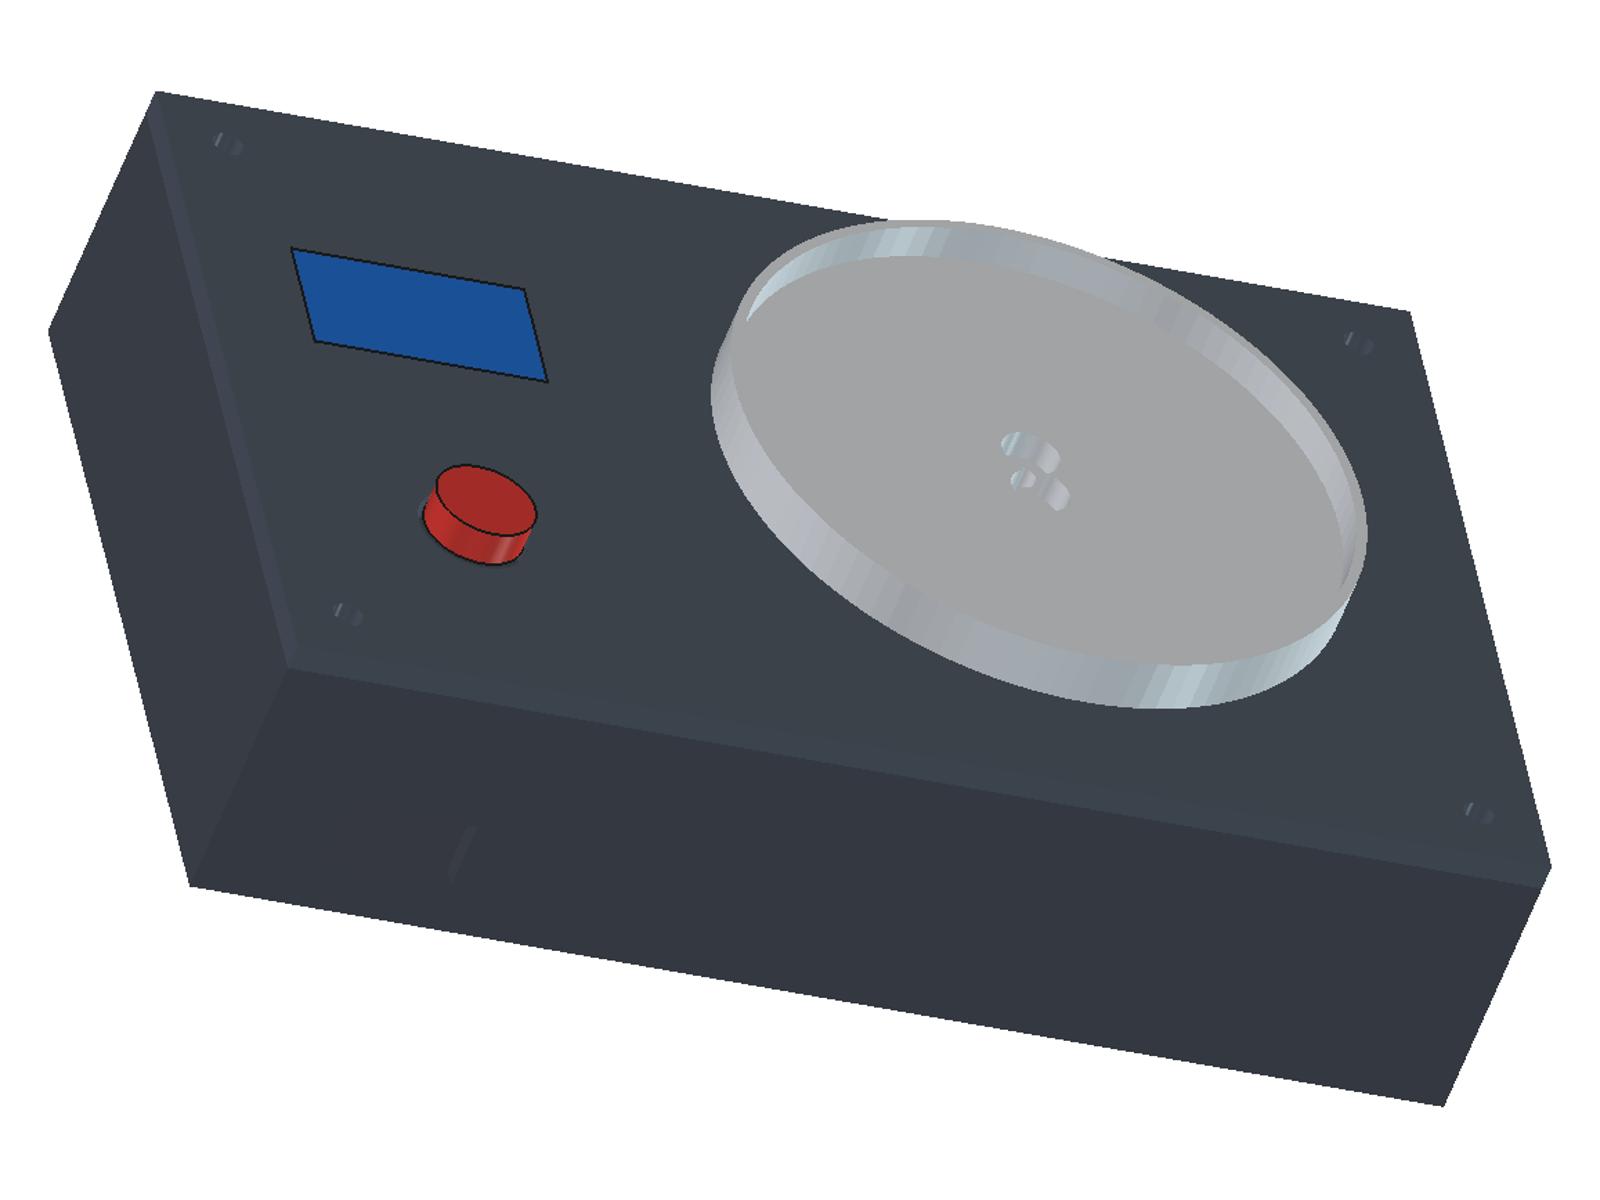
A small precision scale that reads in 0.01 g steps up to 80 g. A 100 g parallel-beam load cell, the shape Eric Laimins patented in 1961, bends a little under the pan; a 24-bit HX711 reads its bridge, an ESP32 averages and shows grams on an OLED. One button tares and calibrates. The case and pan are printed in PETG.
මධ්‍යම
About 1 day, mostly printing

උපදෙස්

1

Watch it built

An ESP32, an HX711 board and a load cell made into a scale with an OLED, including calibration (Electronic Clinic). Ours uses a smaller, finer cell.
2

The load cell: Laimins, 1961

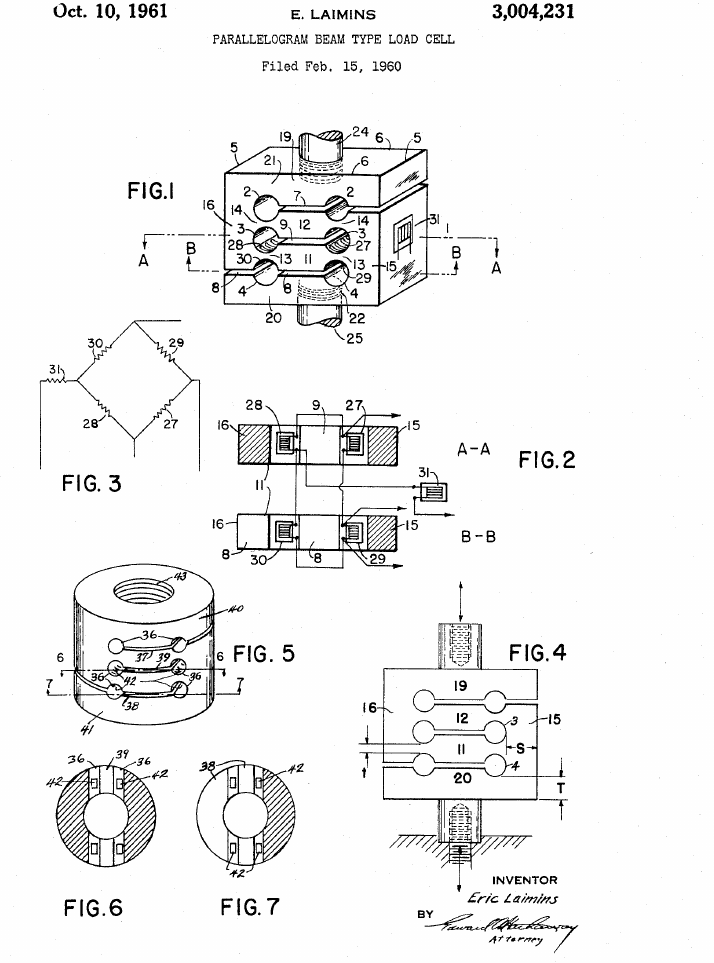
US 3,004,231 (Eric Laimins, 1961): one block with three pairs of cross holes joined by slots makes two parallel beams with thin flexures, so the ends stay parallel under load and the reading hardly depends on where the load sits. Bonded strain gauges on the hole walls form a bridge (his Fig. 3). He found S/t 40:1 and T/t 20:1 gave excellent results. The bar cells sold today have this shape.
පියවර 2 - Image 1
3

How fine can it read?

Jupyter සටහන් පොත පූරණය වෙමින්…

අවශ්‍ය මෙවලම්:

බහුමානකයබහුමානකය
4

Print the base

Floor down, no supports, PETG, 0.2 mm layers, 3 walls. The boss carries the cell's fixed end; the slot in the front wall is for the USB lead.
නිර්මාණ ගොනුවSTLCC0 - Free

මෙම පියවර සඳහා ද්‍රව්‍ය:

PETG තන්තුPETG තන්තු95 ග්‍රෑ

අවශ්‍ය මෙවලම්:

FDM 3D මුද්‍රණ යන්ත්‍රයFDM 3D මුද්‍රණ යන්ත්‍රය
5

Print the lid

Flat, no supports. Windows for the OLED and the 12 mm button, and a hole for the pan's post.
නිර්මාණ ගොනුවSTLCC0 - Free

මෙම පියවර සඳහා ද්‍රව්‍ය:

PETG තන්තුPETG තන්තු45 ග්‍රෑ

අවශ්‍ය මෙවලම්:

FDM 3D මුද්‍රණ යන්ත්‍රයFDM 3D මුද්‍රණ යන්ත්‍රය
6

Print the pan

Print it upside down: dish face on the bed, post up. It is the pan, and everything on the cell counts against its 100 g, so do not make it heavier.
නිර්මාණ ගොනුවSTLCC0 - Free

මෙම පියවර සඳහා ද්‍රව්‍ය:

PETG තන්තුPETG තන්තු15 ග්‍රෑ

අවශ්‍ය මෙවලම්:

FDM 3D මුද්‍රණ යන්ත්‍රයFDM 3D මුද්‍රණ යන්ත්‍රය
7

Change the case (optional)

The FreeCAD script that made the three parts; change sizes at the top and run: OUT=. freecadcmd build_all.py
build_all.pypython
"""Batch 2524 -- printed case for a 100 g precision scale: a TAL221-type parallel-beam bar load cell (47 x 12 x 6 mm, holes 40 mm
apart, 2 x M3 tapped at one end, 2 x 3.2 mm through at the other, 6 mm apart; HTC-Sensor datasheet), an HX711 board, an ESP32
DevKit and a 0.96 in I2C OLED. ALL sizes ours. Three parts, each printed flat face down, no supports:
  scale-base   tray 140 x 90 x 30 mm, boss under the cell's fixed end (counterbored for 2 x M3 x 14 from below), USB slot,
               4 corner posts with 2.8 mm pilot holes for the lid screws
  scale-lid    3 mm plate: OLED window, 12 mm button hole, clearance hole for the carrier post, 4 x 3.4 mm screw holes
  scale-carrier  70 mm dish (2 mm floor, 6 mm rim) on a 12 x 14 mm post, bolted to the cell's free end (2 x M3 x 30, nuts
               under the cell). It is the pan: everything resting on the cell counts against its 100 g, so it is kept light.
Run: OUT=<dir> freecadcmd build_all.py   (mm, z up; the base floor sits on the bed)."""
import os
import FreeCAD as App, Part, MeshPart
OUT = os.environ["OUT"]
V = App.Vector
L, W, H = 140.0, 90.0, 30.0            # tray outside; walls to z = 30
FLOOR, WALL = 3.0, 2.4
CELL_L, CELL_W, CELL_T = 47.0, 12.0, 6.0
HOLE_INSET, HOLE_PITCH = 3.5, 6.0      # holes 3.5 mm from each end (47 - 40) / 2, 6 mm apart across the bar
CELL_X0, CELL_YC = 45.0, 45.0          # fixed end of the cell at x = 45, cell centred across the tray
BOSS_TOP = 12.0                        # cell underside sits at z = 12
LID_T = 3.0
POST_W, POST_D = 12.0, 14.0            # carrier post along x, y
DISC_D, DISC_T, DISC_GAP = 70.0, 2.0, 3.0
RIM_H, RIM_T = 6.0, 1.2
CB_D, CB_H = 6.5, 3.2                  # counterbore for an M3 socket head (5.5 mm head, 3 mm high)

def save(sh, name):
    sh = sh.removeSplitter()
    bb = sh.BoundBox
    print(name, "valid", sh.isValid(), "solids", len(sh.Solids), "bbox", [round(v, 1) for v in (bb.XLength, bb.YLength, bb.ZLength)],
          "volume_cm3", round(sh.Volume / 1000, 1))
    MeshPart.meshFromShape(Shape=sh, LinearDeflection=0.03, AngularDeflection=0.12).write(os.path.join(OUT, name + ".stl"))
    return sh

fx = CELL_X0 + HOLE_INSET                       # fixed-end hole line
gx = CELL_X0 + CELL_L - HOLE_INSET              # free-end hole line (40 mm on)
ys = (CELL_YC - HOLE_PITCH / 2, CELL_YC + HOLE_PITCH / 2)
cell_top = BOSS_TOP + CELL_T                    # 18
lid_top = H + LID_T                             # 33

# ---- base tray
base = Part.makeBox(L, W, H).cut(Part.makeBox(L - 2 * WALL, W - 2 * WALL, H, V(WALL, WALL, FLOOR)))
boss = Part.makeBox(14.0, 16.0, BOSS_TOP - FLOOR, V(CELL_X0, CELL_YC - 8.0, FLOOR))
base = base.fuse(boss)
for y in ys:
    base = base.cut(Part.makeCylinder(1.7, BOSS_TOP + 1, V(fx, y, -0.5)))          # 3.4 mm clearance
    base = base.cut(Part.makeCylinder(CB_D / 2, CB_H + 0.5, V(fx, y, -0.5)))     # head counterbore from below
POSTS = [(WALL + 4.5, WALL + 4.5), (L - WALL - 4.5, WALL + 4.5), (WALL + 4.5, W - WALL - 4.5), (L - WALL - 4.5, W - WALL - 4.5)]
for (x, y) in POSTS:
    p = Part.makeCylinder(4.0, H - FLOOR, V(x, y, FLOOR)).cut(Part.makeCylinder(1.4, H, V(x, y, FLOOR + 6)))   # 2.8 mm pilot, 21 mm deep
    base = base.fuse(p)
base = base.cut(Part.makeBox(14.0, WALL + 2, 8.0, V(13.0, -1, FLOOR + 3)))        # USB slot in the front wall (ESP32 at the left)
base = save(base, "scale-base")

# ---- lid
lid = Part.makeBox(L, W, LID_T, V(0, 0, H))
lid = lid.cut(Part.makeBox(26.0, 15.0, LID_T + 2, V(11.0, 52.0, H - 1)))          # OLED window (active area 0.96 in, 128 x 64)
lid = lid.cut(Part.makeCylinder(6.1, LID_T + 2, V(24.0, 25.0, H - 1)))           # 12 mm panel push button
lid = lid.cut(Part.makeBox(POST_W + 4, POST_D + 4, LID_T + 2, V(gx - POST_W / 2 - 2, CELL_YC - POST_D / 2 - 2, H - 1)))
for (x, y) in POSTS:
    lid = lid.cut(Part.makeCylinder(1.7, LID_T + 2, V(x, y, H - 1)))
lid = save(lid, "scale-lid")

# ---- pan carrier (modelled in place: post from the cell top to the disc, disc DISC_GAP above the lid)
disc_z = lid_top + DISC_GAP
car = Part.makeBox(POST_W, POST_D, disc_z - cell_top, V(gx - POST_W / 2, CELL_YC - POST_D / 2, cell_top))
car = car.fuse(Part.makeCylinder(DISC_D / 2, DISC_T, V(gx, CELL_YC, disc_z)))
car = car.fuse(Part.makeCylinder(DISC_D / 2, RIM_H, V(gx, CELL_YC, disc_z)).cut(Part.makeCylinder(DISC_D / 2 - RIM_T, RIM_H + 1, V(gx, CELL_YC, disc_z + DISC_T))))
for y in ys:
    car = car.cut(Part.makeCylinder(1.7, disc_z + DISC_T, V(gx, y, cell_top - 1)))
    car = car.cut(Part.makeCylinder(CB_D / 2, CB_H + 0.5, V(gx, y, disc_z + DISC_T - CB_H)))
car = save(car, "scale-carrier")

# checks (our numbers)
print("cell underside z", BOSS_TOP, "top", cell_top, "; free end clears the floor by", BOSS_TOP - FLOOR, "mm")
print("fixed-end screw: from the counterbore seat to the cell top", round(cell_top - CB_H, 1), "mm -> M3 x 14 leaves",
      round(14 - (BOSS_TOP - CB_H), 1), "mm in the 6 mm thread")
grip = disc_z + DISC_T - CB_H - BOSS_TOP
print("carrier screw: seat z", round(disc_z + DISC_T - CB_H, 1), "to cell underside", BOSS_TOP, "=", round(grip, 1),
      "mm -> M3 x 30 leaves", round(30 - grip, 1), "mm below the cell for the 2.4 mm nut")
print("carrier volume", round(car.Volume / 1000, 2), "cm3 -> solid PETG at 1.27 g/cm3:", round(car.Volume / 1000 * 1.27, 1), "g (the most it can weigh)")
print("disc underside", disc_z, "lid top", lid_top, "post clearance in the lid hole 2 mm each side")
print("disc spans x", gx - DISC_D / 2, "to", gx + DISC_D / 2, "(tray 0 to", L, ")")

අවශ්‍ය මෙවලම්:

ඩිජිටල් කැලිපරය අඟල් 6ඩිජිටල් කැලිපරය අඟල් 6
8

Bolt the pan to the cell

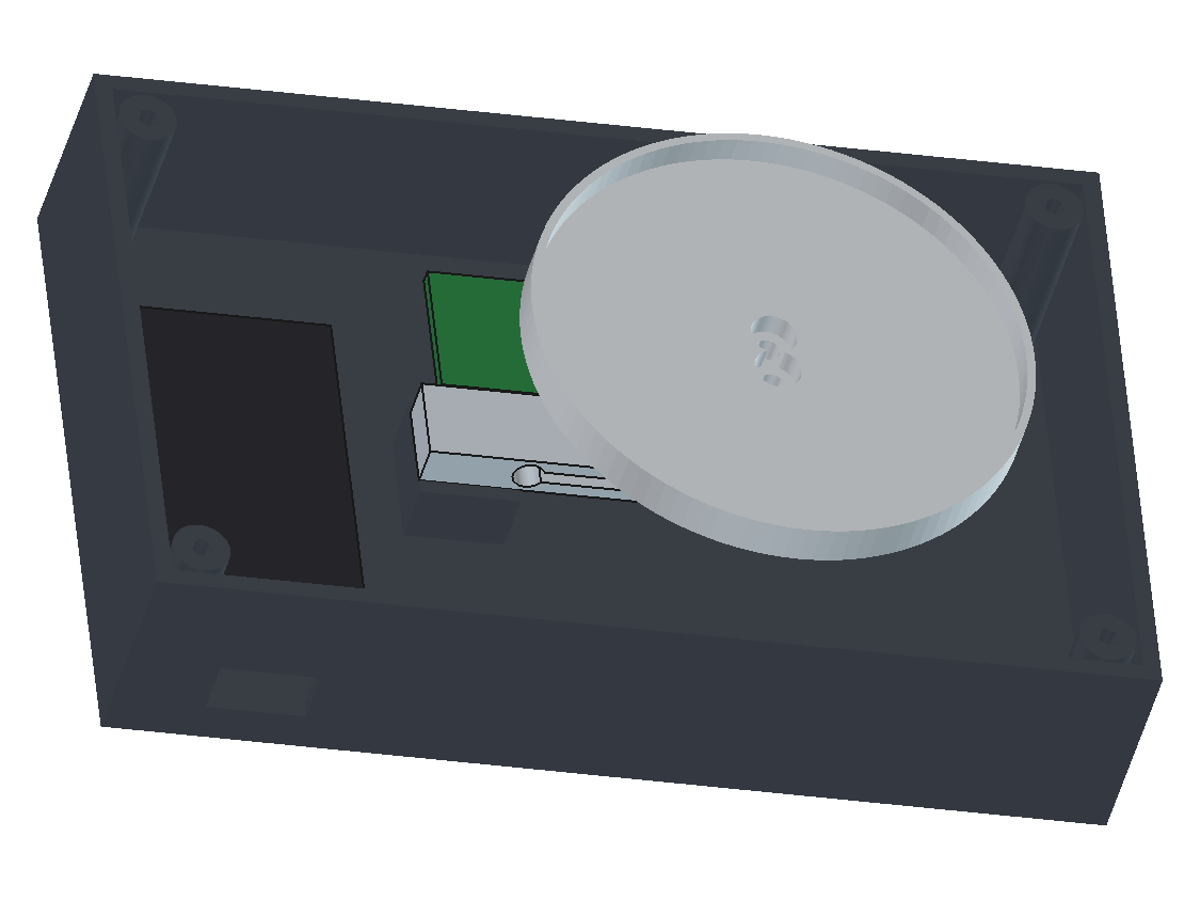
Push the pan's post down through the lid's hole. Under the lid, bolt the post to the cell end with the two 3.2 mm holes: 2 x M3 x 30 socket screws from the pan side, 2 x M3 nuts under the cell. The cell lies flat (load through its mounting holes); its cable leaves the other, M3 end, which goes on the boss.
පියවර 8 - Image 1

මෙම පියවර සඳහා ද්‍රව්‍ය:

බර සංවේදකයබර සංවේදකය1 piece (100 g bar, parallel beam, 0.6 mV/V)

සොකට් හෙඩ් කැප් ඉස්කුරුප්පුවසොකට් හෙඩ් කැප් ඉස්කුරුප්පුව2 piece (M3 x 30)

ෂඩාස්‍ර ඇණ බෝල්තුවෂඩාස්‍ර ඇණ බෝල්තුව2 piece (M3)

අවශ්‍ය මෙවලම්:

ඇලන් යතුරු කට්ටලයඇලන් යතුරු කට්ටලය
9

Wire it

Cell to HX711: red E+, black E-, green A+, white A-. HX711: VCC and GND to the ESP32's 3V3 and GND, DT to GPIO16, SCK to GPIO4. OLED: VCC 3V3, GND, SDA GPIO21, SCL GPIO22. Button: one leg to GPIO27, the other to GND. Solder the cell's fine wires and cover each joint with heat-shrink; keep the cell's wires slack so they do not pull on it.

මෙම පියවර සඳහා ද්‍රව්‍ය:

ලෝඩ් සෙල් වර්ධකයලෝඩ් සෙල් වර්ධකය1 කැබැල්ල
ESP32 සංවර්ධන පුවරුවESP32 සංවර්ධන පුවරුව1 කැබැල්ල
OLED තිරයOLED තිරය1 piece (0.96 in, I2C, SSD1306)
තල්ලු බොත්තමතල්ලු බොත්තම1 piece (12 mm panel, momentary)

සම්බන්ධක කම්බිසම්බන්ධක කම්බි12 කැබලි
සම්බන්ධක කම්බියසම්බන්ධක කම්බිය0.5 m
පාස්සන ඊයම් කම්බියපාස්සන ඊයම් කම්බිය2 ග්‍රෑ
තාපයෙන් හැකිලෙන නළයතාපයෙන් හැකිලෙන නළය8 සෙමී

අවශ්‍ය මෙවලම්:

පෑස්සුම් කූරුපෑස්සුම් කූරු
කම්බි ආවරණ ගලවන අඬුවකම්බි ආවරණ ගලවන අඬුව
10

Load the firmware

Install Adafruit SSD1306 and Adafruit GFX from the Library Manager, choose ESP32 Dev Module, upload. Short press = tare; hold 3 s = calibrate.
precision_scale.inocpp
// Precision scale, 100 g by 0.01 g: HX711 + parallel-beam bar load cell + ESP32 + 0.96 in SSD1306 OLED (I2C, address 0x3C).
// CC0. Pins (ours): HX711 DT -> GPIO16, SCK -> GPIO4; OLED SDA -> GPIO21, SCL -> GPIO22; button GPIO27 to GND.
// The HX711 is read as its datasheet says: wait for DOUT low, 25 clock pulses (24 data bits MSB first, the 25th selects
// channel A, gain 128 for the next reading), 24-bit two's complement. A clock pulse held high for over 60 us powers the
// chip down, so the pulses run with interrupts off.
// Weighs up to 80 g: the cell carries 100 g, and the printed pan, its screws and nuts rest on it all the time.
// Short press: tare. Press and hold 3 s with the pan empty, then put the 50.00 g weight on when asked: calibration.
// Libraries: Adafruit SSD1306 and Adafruit GFX (Arduino Library Manager). Board: ESP32 Dev Module.
#include <Wire.h>
#include <Adafruit_GFX.h>
#include <Adafruit_SSD1306.h>
#include <Preferences.h>

const int PIN_DT = 16, PIN_SCK = 4, PIN_BTN = 27;
const float CAL_MASS_G = 50.00;   // the calibration weight you use
const int N_AVG = 8;              // readings averaged (10 per second at RATE = 0)

Adafruit_SSD1306 oled(128, 64, &Wire, -1);
Preferences prefs;
portMUX_TYPE mux = portMUX_INITIALIZER_UNLOCKED;
long tareRaw = 0;
float countsPerGram = 0;          // set by calibration, kept in flash

long readRaw() {
  while (digitalRead(PIN_DT) == HIGH) delay(1);       // DOUT low = data ready
  long v = 0;
  portENTER_CRITICAL(&mux);
  for (int i = 0; i < 24; i++) {
    digitalWrite(PIN_SCK, HIGH); delayMicroseconds(1);
    v = (v << 1) | digitalRead(PIN_DT);
    digitalWrite(PIN_SCK, LOW); delayMicroseconds(1);
  }
  digitalWrite(PIN_SCK, HIGH); delayMicroseconds(1);   // 25th pulse: channel A, gain 128
  digitalWrite(PIN_SCK, LOW); delayMicroseconds(1);
  portEXIT_CRITICAL(&mux);
  if (v & 0x800000) v |= 0xFF000000;                   // sign-extend the 24-bit two's complement
  return v;
}

long readAvg(int n) {
  long long s = 0;
  for (int i = 0; i < n; i++) s += readRaw();
  return (long)(s / n);
}

void show(const char* top, const char* big) {
  oled.clearDisplay();
  oled.setTextColor(SSD1306_WHITE);
  oled.setTextSize(1); oled.setCursor(0, 0); oled.print(top);
  oled.setTextSize(2); oled.setCursor(0, 28); oled.print(big);
  oled.display();
}

void calibrate() {
  show("Calibrate: pan empty", "wait...");
  delay(1500);
  long empty = readAvg(32);
  char msg[24]; snprintf(msg, sizeof msg, "%.2f g", CAL_MASS_G);
  show("Put on the weight:", msg);
  while (digitalRead(PIN_BTN) == HIGH) delay(10);      // press when the weight is on and still
  delay(1500);
  long loaded = readAvg(32);
  countsPerGram = (loaded - empty) / CAL_MASS_G;
  prefs.putFloat("cpg", countsPerGram);
  tareRaw = empty;
  show("Saved. Remove weight", "done");
  delay(2000);
}

void setup() {
  pinMode(PIN_SCK, OUTPUT); digitalWrite(PIN_SCK, LOW);   // low = HX711 running
  pinMode(PIN_DT, INPUT);
  pinMode(PIN_BTN, INPUT_PULLUP);
  Wire.begin(21, 22);
  oled.begin(SSD1306_SWITCHCAPVCC, 0x3C);
  prefs.begin("scale", false);
  countsPerGram = prefs.getFloat("cpg", 0);
  delay(500);                                             // datasheet settling time 400 ms at 10 SPS
  tareRaw = readAvg(16);
  if (countsPerGram == 0) calibrate();
}

void loop() {
  if (digitalRead(PIN_BTN) == LOW) {
    unsigned long t0 = millis();
    while (digitalRead(PIN_BTN) == LOW && millis() - t0 < 3000) delay(10);
    if (millis() - t0 >= 3000) { while (digitalRead(PIN_BTN) == LOW) delay(10); calibrate(); }
    else { show("Tare", "..."); tareRaw = readAvg(16); }
  }
  float g = (readAvg(N_AVG) - tareRaw) / countsPerGram;
  if (fabs(g) < 0.005) g = 0;                             // no "-0.00"
  char big[16]; snprintf(big, sizeof big, "%7.2f g", g);
  show(g > 80.0 ? "OVER 80 g - unload" : "Precision scale", big);
}

මෙම පියවර සඳහා ද්‍රව්‍ය:

USB-C CableUSB-C Cable1 කැබැල්ල

අවශ්‍ය මෙවලම්:

Arduino IDE සහිත පරිගණකයArduino IDE සහිත පරිගණකය
11

Close the case

Stick the ESP32 (USB to the front slot) and the HX711 to the floor with double-sided tape, the OLED behind its window, the button through its hole. Lower lid, cell and pan onto the base so the cell's tapped end sits on the boss; from underneath, 2 x M3 x 14 into the cell's M3 holes. Lid: 4 x M3 x 10 into the corner posts. The pan must not touch the lid anywhere.

මෙම පියවර සඳහා ද්‍රව්‍ය:

සොකට් හෙඩ් කැප් ඉස්කුරුප්පුවසොකට් හෙඩ් කැප් ඉස්කුරුප්පුව6 piece (2 x M3 x 14, 4 x M3 x 10)

දෙපැත්ත ඇලෙන පටියදෙපැත්ත ඇලෙන පටිය0.2 m

අවශ්‍ය මෙවලම්:

ඇලන් යතුරු කට්ටලයඇලන් යතුරු කට්ටලය
අත්කම් පිහියඅත්කම් පිහිය
12

Calibrate and check

Stand it level on a steady table out of draughts and let it warm up 10 minutes. Empty pan: short press to tare. Hold the button 3 s, put the 50 g weight on when asked, press again. Check 10 g, 20 g and 50 g, and put the 50 g on and off five times: the readings should agree within about 0.05 g.

අවශ්‍ය මෙවලම්:

ක්‍රමාංකන බර කට්ටලයක්‍රමාංකන බර කට්ටලය
මට්ටම් ගෙඩියමට්ටම් ගෙඩිය
13

Troubleshooting

Scale problems and fixes.

Flow

Loading...
14

History and honest limits

Eric Laimins, Cambridge, Mass., assignor to Baldwin-Lima-Hamilton Corporation: US 3,004,231, "Parallelogram Beam Type Load Cell", filed 15 Feb 1960, granted 10 Oct 1961. His block floats on two load rods instead of being clamped, so clamping does not strain the gauges. Ours: the bought cell, the case, the pins, the firmware and every size. The display shows 0.01 g, but the cell's datasheet allows about +/- 0.05 g (repeatability, hysteresis, creep); weigh up to 80 g. Not built or tested by us yet.

ද්‍රව්‍ය

14

අවශ්‍ය මෙවලම්

10

සැලසුම් ගොනු

3

සම්බන්ධ බ්ලූප්‍රින්ට්

මෙම බ්ලූප්‍රින්ට් දැනුම බෙදා ගනී — ශිල්ප ක්‍රම, ද්‍රව්‍ය හෝ මූලධර්ම

CC0 පොදු වසම

මෙම බ්ලූප්‍රින්ට් CC0 යටතේ නිකුත් කර ඇත. ඔබට අවසර නොමැතිව පිටපත් කිරීම, වෙනස් කිරීම, බෙදා හැරීම සහ භාවිතා කිරීම කළ හැක.

බ්ලූප්‍රින්ට් හරහා නිෂ්පාදන මිලදී ගැනීමෙන් නිර්මාතෘට සහාය වන්න නිර්මාතෘ කොමිසම විකුණුම්කරුවන් විසින් නියම කළ, හෝ මෙම බ්ලූප්‍රින්ට්හි නව අනුවාදයක් සාදා ආදායම බෙදා ගැනීමට ඔබේ බ්ලූප්‍රින්ට්හි සම්බන්ධතාවයක් ලෙස ඇතුළත් කරන්න.

සාකච්ඡාව

(0)

පිවිසෙන්න සාකච්ඡාවට එක්වීමට

අදහස් පූරණය කරමින්...