සහයෝගීතාව
කලාව
රූපලාවණ්ය සහ සුවතාව
ශිල්පය
සංස්කෘතිය සහ ඉතිහාසය
විනෝදාස්වාදය
පරිසරය
ආහාර සහ පාන
ප්රතිලෝම ඉංජිනේරු
විද්යාවන්
ක්රීඩා
තාක්ෂණය
පැළඳිය හැකි
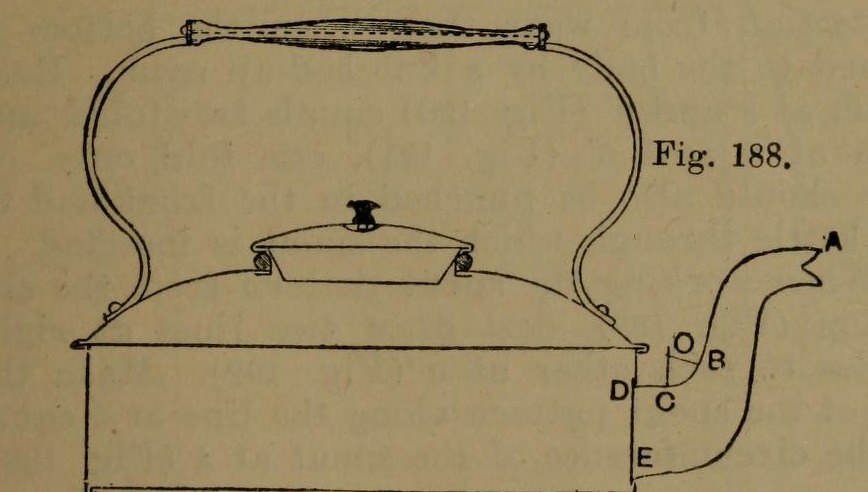


Stovetop Kettle: a Square Copper Kettle (Hasluck, 1907)
A tinsmith's square kettle in sheet copper, 9 x 9 in and 3 5/8 in deep: a box body with folded corner seams, a hollowed top pened on, a brazed and bent spout, a small cover, and a wooden handle on brass uprights.
Hasluck prefers copper; tinplate also works and is a separate route.
Source: Paul N. Hasluck, Tinplate Work (1907), pp. 91-98. Unknown: copper gauge, solder. Picture: Figs. 188-189 of the book.
උසස්
Unknown
උපදෙස්
1
1
Cut the patterns
Cut the patterns
For a body 9 x 9 x 3 5/8 in, cut two ends 9 1/2 x 4 in and two sides 9 1/4 x 4 in, notched for box seams at the corners (Figs. 190-191), with allowances to fold at top and bottom. Punch the spout hole in the front. Cut the bottom 9 1/2 in square, notched for a 1/4 in edge. Set out the top as a 10 1/2 in square with curved allowances for hollowing and a 4 in circle for the cover hole (Fig. 193); set out the spout from the elevation (Fig. 192), the cover and its cone-shaped rim (Figs. 194-195).
මෙම පියවර සඳහා ද්රව්ය:
 තඹ තහඩුව1 body, bottom, top, spout, cover
අවශ්ය මෙවලම්:
 තුඩු දෙකේ මිනුම් කවකටුව
 ඉරි අඳින උල
 තහඩු කපන කතුර
2
2
Braze and shape the spout
Braze and shape the spout
Thin the long edges by hammering. Set in the throat with a stretching hammer on a beak iron, bend the spout round until the edges overlap, bind it with wire, lay spelter and borax along the inside of the seam and braze it; then close and braze the under seam. Fill it with lead and bend the neck with a round-faced hammer on the hollowing block; file off spare spelter and smooth it. Run out the lead, throw off a seating round the large end, trim the top with snips and tin the inside.
මෙම පියවර සඳහා ද්රව්ය:
 නොදන්නා ලෝහය1 spelter
 ටින්1 tinning
අවශ්ය මෙවලම්:
 සමතලා කරන මිටිය
 කණුව
 යකඩ කම්බි
 බෝරැක්ස් කුඩු
 ලෝකඩ පෑස්සුම් පන්දම
 ඊයම්
 සිදුරු සහිත හැන්ද
 දැඩි දැව කුට්ටිය
 ලෝහ කටුවතහඩු කපන කතුර
3
3
Fold and seam the body
Fold and seam the body
Fold the top edges square, the front and back outwards and the sides likewise; fold the bottom edges right over inwards to take the bottom (Fig. 188). Hook each side's end over the front's and work the corner seam on a straight-edged tool (Figs. 198-199). Turn up the bottom's 1/4 in edge, push it edge-down into the bottom folds, and solder the bottom and seams.
මෙම පියවර සඳහා ද්රව්ය:
 ටින්-ඊයම් පෑස්සුම1 කැබැල්ල
අවශ්ය මෙවලම්:
 දැව මිටියකණුව
 විදුලි පාස්සන යකඩය
 ෆ්ලක්ස්
4
4
Hollow the top and make the cover
Hollow the top and make the cover
Hollow the top on the block: sink the four sides a little, hollow the corners with a bullet-faced hammer, flatten each side along the block edge, even the shoulder and smooth it all over. Pare the edges, mark the flange with an edging machine, set it down square with a hatchet stake and mallet, and take up an edge to fit over the body. Cut the cover hole with circular snips and fit a narrow wired rim, worked over inside. Make the cover: solder its cone rim to fit the wired rim, throw off a flange, hollow the cover disc and seam it on, and fix the knob.
මෙම පියවර සඳහා ද්රව්ය:
යකඩ කම්බි1 rimටින්-ඊයම් පෑස්සුම1 කැබැල්ලනොදන්නා ලෝහය1 cover knobඅවශ්ය මෙවලම්:
සමතලා කරන මිටියදැඩි දැව කුට්ටියකණුවදැව මිටියතහඩු කපන කතුරවිදුලි පාස්සන යකඩයෆ්ලක්ස්5
5
Handle, top and spout
Handle, top and spout
Cut two handle uprights from stout brass or copper band (Fig. 196), drill them for rivets and for the spindle that carries the wooden handle, and bend them to shape. Rivet them to the top and solder over the rivet heads inside. Pene the top down onto the body and solder along each edge. Push the spout through its hole from inside until its large end butts against the front, and solder it strongly from inside.
මෙම පියවර සඳහා ද්රව්ය:
 පිත්තල තහඩුව1 handle uprights
 පිත්තල දණ්ඩ1 spindle
 මිට1 wood
 තඹ රිවට්1 number not givenටින්-ඊයම් පෑස්සුම1 කැබැල්ල
අවශ්ය මෙවලම්:
 අත් විදුම
 රිවට් මිටියදැව මිටියවිදුලි පාස්සන යකඩයෆ්ලක්ස්
ද්රව්ය
9- 1 body, bottom, top, spout, coverස්ථානගත
- 1 cover knobස්ථානගත
- 1 tinningස්ථානගත
- 3 කැබලිස්ථානගත
- 1 rimස්ථානගත
- 1 handle uprightsස්ථානගත
- 1 spindleස්ථානගත
- 1 woodස්ථානගත
- 1 number not givenස්ථානගත
අවශ්ය මෙවලම්
17- ස්ථානගත
- ස්ථානගත
- ස්ථානගත
- ස්ථානගත
- ස්ථානගත
- ස්ථානගත
- ස්ථානගත
- ස්ථානගත
- ස්ථානගත
- ස්ථානගත
- ස්ථානගත
- ස්ථානගත
- ස්ථානගත
- ස්ථානගත
- ස්ථානගත
- ස්ථානගත
- ස්ථානගත
සම්බන්ධිත සැලසුම්වල ද්රව්ය


මෙම සැලසුම සාදන්නේ
CC0 පොදු වසම
මෙම බ්ලූප්රින්ට් CC0 යටතේ නිකුත් කර ඇත. ඔබට අවසර නොමැතිව පිටපත් කිරීම, වෙනස් කිරීම, බෙදා හැරීම සහ භාවිතා කිරීම කළ හැක.
බ්ලූප්රින්ට් හරහා නිෂ්පාදන මිලදී ගැනීමෙන් නිර්මාතෘට සහාය වන්න නිර්මාතෘ කොමිසම විකුණුම්කරුවන් විසින් නියම කළ, හෝ මෙම බ්ලූප්රින්ට්හි නව අනුවාදයක් සාදා ආදායම බෙදා ගැනීමට ඔබේ බ්ලූප්රින්ට්හි සම්බන්ධතාවයක් ලෙස ඇතුළත් කරන්න.