සහයෝගීතාව
කලාව
රූපලාවණ්ය සහ සුවතාව
ශිල්පය
සංස්කෘතිය සහ ඉතිහාසය
විනෝදාස්වාදය
පරිසරය
ආහාර සහ පාන
ප්රතිලෝම ඉංජිනේරු
විද්යාවන්
ක්රීඩා
තාක්ෂණය
පැළඳිය හැකි
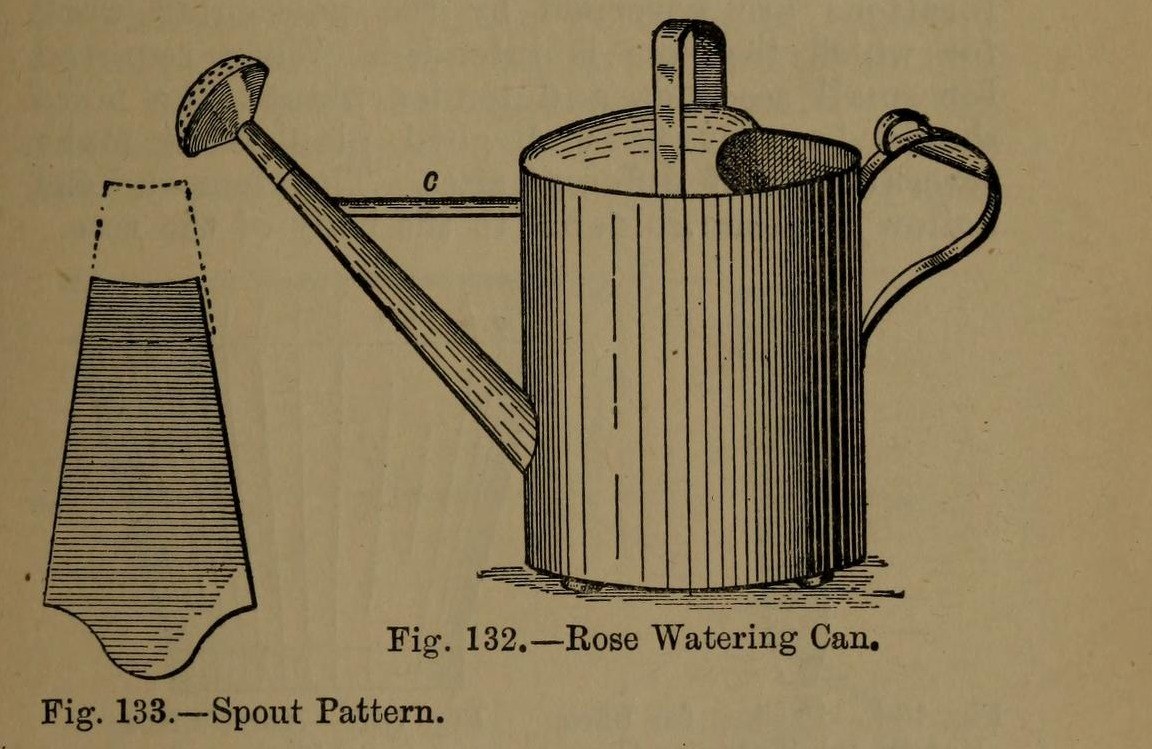


Watering Can: the Tinplate Rose Watering-Can (Hasluck, 1907)
A tinsmith's garden watering can: a round body from one sheet 2 ft 1 in x 8 1/2 in, a two-piece spout with a perforated rose, a hollowed top with a cross handle, and a back handle with a thumb ring. Tinplate or galvanised iron.
Variable: the rose. Its pattern diameter is the rose diameter x 4 / 3; finer holes for seedlings.
Source: Paul N. Hasluck, Tinplate Work (1907), pp. 54-57. Unknown: solder. Picture: Figs. 132-135 of the book.
මධ්යම
Unknown
උපදෙස්
1
1
Make the body and bottom
Make the body and bottom
Cut a sheet 2 ft 1 in by 8 1/2 in. Wire one edge, sink it in the crease iron, round it and groove the seam; solder the seam inside. Cut the spout hole opposite the seam, 2 1/2 in from the bottom. Edge the bottom to fit, beat it up and solder it from inside.
මෙම පියවර සඳහා ද්රව්ය:
 ටින් ආලේපිත තහඩුව1 body, bottom
 යකඩ කම්බි1 edge
 ටින්-ඊයම් පෑස්සුම1 කැබැල්ල
අවශ්ය මෙවලම්:
 තහඩු කපන කතුර
 කණුව
 දැව මිටිය
 විදුලි පාස්සන යකඩය
 ෆ්ලක්ස්
2
2
Make and fit the spout
Make and fit the spout
Cut the spout in two pieces (Fig. 133), bend them to shape and solder the seams. Solder the larger piece into the body. Make it longer for plants out of reach, with an elbow for plants up high. Make the stay: a taper strip as long as the gap between can and spout, bent to a half-round section and soldered in.
මෙම පියවර සඳහා ද්රව්ය:
ටින් ආලේපිත තහඩුව1 spout, stayටින්-ඊයම් පෑස්සුම1 කැබැල්ලඅවශ්ය මෙවලම්:
තහඩු කපන කතුරකණුවවිදුලි පාස්සන යකඩයෆ්ලක්ස්3
3
Make the rose
Make the rose
Set out the rose body (Fig. 135): its diameter is the rose diameter x 4 / 3, so a 3 in rose needs a 4 in pattern, with lines a b at right angles. Bend it over a funnel stake and solder the seam. Hollow a disc for the front, with edges for capping on. Inside the hollow, mark circles and pierce them at intervals with a bradawl over a hard wood block; very fine for seedlings. Solder front and stem to the rose body. Several roses of different sizes are useful.
මෙම පියවර සඳහා ද්රව්ය:
ටින් ආලේපිත තහඩුව1 roseටින්-ඊයම් පෑස්සුම1 කැබැල්ලඅවශ්ය මෙවලම්:
 තුඩු දෙකේ මිනුම් කවකටුවතහඩු කපන කතුරකණුව
 සමතලා කරන මිටිය
 සිදුරු අඬුව
 දැඩි දැව කුට්ටියවිදුලි පාස්සන යකඩයෆ්ලක්ස්
4
4
Fit the top and handles
Fit the top and handles
Hollow the top (Fig. 134), fit it to the body, wire its inner arc and solder it on. Cross handle: a strip about 1 3/4 in wide, wired with No. 12 B.W.G., bent to shape; cut two holes in the top with a small sharp chisel and solder the ends inside and on top. Back handle (Fig. 136): wire and bend it, solder a small boss under its upper part, and solder it opposite the spout with a thumb ring at the top. Solder three small hollowed studs under the bottom.
මෙම පියවර සඳහා ද්රව්ය:
ටින් ආලේපිත තහඩුව1 top, handles, studsයකඩ කම්බි1 No. 12 B.W.G.ටින්-ඊයම් පෑස්සුම1 කැබැල්ලඅවශ්ය මෙවලම්:
තහඩු කපන කතුරසමතලා කරන මිටිය වානේ නියනවිදුලි පාස්සන යකඩයෆ්ලක්ස්
5
5
Clean and paint
Clean and paint
Clean with turpentine and whiting. Give two good coats of paint: red inside and green outside suit it.
මෙම පියවර සඳහා ද්රව්ය:
 තෙල් තීන්ත2 coats
අවශ්ය මෙවලම්:
 තර්පන්ටයින්
 කැල්සියම් කාබනේට් (සුදු හුණු)
ද්රව්ය
4- 1 top, handles, studsස්ථානගත
- 1 No. 12 B.W.G.ස්ථානගත
- 4 කැබලිස්ථානගත
- 2 coatsස්ථානගත
අවශ්ය මෙවලම්
12- ස්ථානගත
- ස්ථානගත
- ස්ථානගත
- ස්ථානගත
- ස්ථානගත
- ස්ථානගත
- ස්ථානගත
- ස්ථානගත
- ස්ථානගත
- ස්ථානගත
- ස්ථානගත
සම්බන්ධිත සැලසුම්වල ද්රව්ය



මෙම සැලසුම සාදන්නේ

CC0 පොදු වසම
මෙම බ්ලූප්රින්ට් CC0 යටතේ නිකුත් කර ඇත. ඔබට අවසර නොමැතිව පිටපත් කිරීම, වෙනස් කිරීම, බෙදා හැරීම සහ භාවිතා කිරීම කළ හැක.
බ්ලූප්රින්ට් හරහා නිෂ්පාදන මිලදී ගැනීමෙන් නිර්මාතෘට සහාය වන්න නිර්මාතෘ කොමිසම විකුණුම්කරුවන් විසින් නියම කළ, හෝ මෙම බ්ලූප්රින්ට්හි නව අනුවාදයක් සාදා ආදායම බෙදා ගැනීමට ඔබේ බ්ලූප්රින්ට්හි සම්බන්ධතාවයක් ලෙස ඇතුළත් කරන්න.