Хамтын ажиллагаа
УРЛАГ
ГОО САЙХАН БА ЭРҮҮЛ МЭНД
ГАРААР ХИЙСЭН
СОЁЛ БА ТҮҮХ
ҮЗВЭР НААДАМ
БАЙГАЛЬ ОРЧИН
ХООЛ БА УНДАА
УРВУУ ИНЖЕНЕРЧЛЭЛ
ШИНЖЛЭХ УХААН
СПОРТ
ТЕХНОЛОГИ
ӨМСДӨГ ХЭРЭГСЭЛ
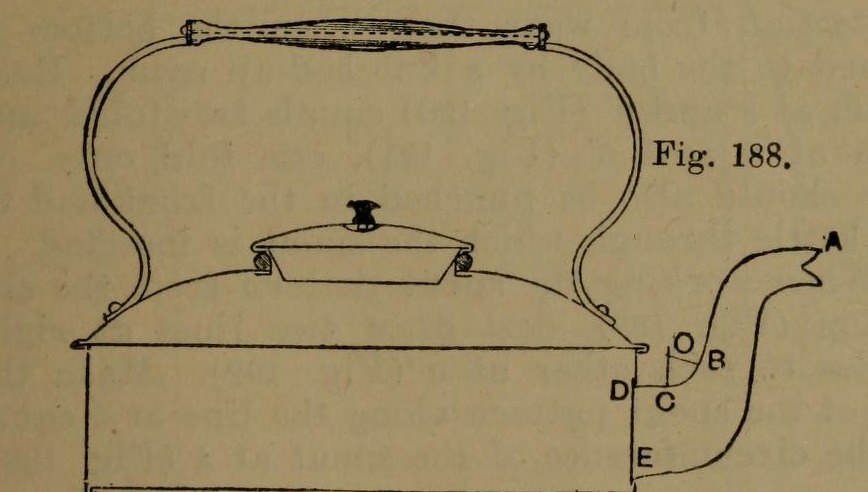


Stovetop Kettle: a Square Copper Kettle (Hasluck, 1907)
A tinsmith's square kettle in sheet copper, 9 x 9 in and 3 5/8 in deep: a box body with folded corner seams, a hollowed top pened on, a brazed and bent spout, a small cover, and a wooden handle on brass uprights.
Hasluck prefers copper; tinplate also works and is a separate route.
Source: Paul N. Hasluck, Tinplate Work (1907), pp. 91-98. Unknown: copper gauge, solder. Picture: Figs. 188-189 of the book.
Дээд шат
Unknown
Зааварчилгаа
1
1
Cut the patterns
Cut the patterns
For a body 9 x 9 x 3 5/8 in, cut two ends 9 1/2 x 4 in and two sides 9 1/4 x 4 in, notched for box seams at the corners (Figs. 190-191), with allowances to fold at top and bottom. Punch the spout hole in the front. Cut the bottom 9 1/2 in square, notched for a 1/4 in edge. Set out the top as a 10 1/2 in square with curved allowances for hollowing and a 4 in circle for the cover hole (Fig. 193); set out the spout from the elevation (Fig. 192), the cover and its cone-shaped rim (Figs. 194-195).
Энэ алхмын материал:
 Зэсэн хуудас1 body, bottom, top, spout, cover
Шаардлагатай багаж:
 Хоёр үзүүрт циркуль
 Зурмал зүү
 Тугалган цаас огтлох хайч
2
2
Braze and shape the spout
Braze and shape the spout
Thin the long edges by hammering. Set in the throat with a stretching hammer on a beak iron, bend the spout round until the edges overlap, bind it with wire, lay spelter and borax along the inside of the seam and braze it; then close and braze the under seam. Fill it with lead and bend the neck with a round-faced hammer on the hollowing block; file off spare spelter and smooth it. Run out the lead, throw off a seating round the large end, trim the top with snips and tin the inside.
Энэ алхмын материал:
 Тодорхойгүй металл1 spelter
 Цагаан тугалга1 tinning
Шаардлагатай багаж:
 Тэгшлэх алх
 Гадас
 Төмөр утас
 Борын нунтаг
 Хатуу гагнуурын бамбар
 Хар тугалга
 Нүхтэй шөл авагч
 Хатуу модны блок
 Металлын гилбэрТугалган цаас огтлох хайч
3
3
Fold and seam the body
Fold and seam the body
Fold the top edges square, the front and back outwards and the sides likewise; fold the bottom edges right over inwards to take the bottom (Fig. 188). Hook each side's end over the front's and work the corner seam on a straight-edged tool (Figs. 198-199). Turn up the bottom's 1/4 in edge, push it edge-down into the bottom folds, and solder the bottom and seams.
Энэ алхмын материал:
 Цагаан тугалга-хар тугалганы гагнуур1 ширхэг
Шаардлагатай багаж:
 Модон алхГадас
 Цахилгаан гагнуурын индүү
 Флюс
4
4
Hollow the top and make the cover
Hollow the top and make the cover
Hollow the top on the block: sink the four sides a little, hollow the corners with a bullet-faced hammer, flatten each side along the block edge, even the shoulder and smooth it all over. Pare the edges, mark the flange with an edging machine, set it down square with a hatchet stake and mallet, and take up an edge to fit over the body. Cut the cover hole with circular snips and fit a narrow wired rim, worked over inside. Make the cover: solder its cone rim to fit the wired rim, throw off a flange, hollow the cover disc and seam it on, and fix the knob.
Энэ алхмын материал:
Төмөр утас1 rimЦагаан тугалга-хар тугалганы гагнуур1 ширхэгТодорхойгүй металл1 cover knobШаардлагатай багаж:
Тэгшлэх алхХатуу модны блокГадасМодон алхТугалган цаас огтлох хайчЦахилгаан гагнуурын индүүФлюс5
5
Handle, top and spout
Handle, top and spout
Cut two handle uprights from stout brass or copper band (Fig. 196), drill them for rivets and for the spindle that carries the wooden handle, and bend them to shape. Rivet them to the top and solder over the rivet heads inside. Pene the top down onto the body and solder along each edge. Push the spout through its hole from inside until its large end butts against the front, and solder it strongly from inside.
Энэ алхмын материал:
 Гуулин хуудас1 handle uprights
 Гуулин баганз1 spindle
 Бариул1 wood
 Зэсэн ривет1 number not givenЦагаан тугалга-хар тугалганы гагнуур1 ширхэг
Шаардлагатай багаж:
 Гар өрөм
 Ривет алхМодон алхЦахилгаан гагнуурын индүүФлюс
Материал
9- 1 body, bottom, top, spout, coverТүр орлуулагч
- 1 cover knobТүр орлуулагч
- 1 tinningТүр орлуулагч
- Түр орлуулагч
- 1 rimТүр орлуулагч
- 1 handle uprightsТүр орлуулагч
- 1 spindleТүр орлуулагч
- 1 woodТүр орлуулагч
- 1 number not givenТүр орлуулагч
Шаардлагатай багаж
17- Түр орлуулагч
- Түр орлуулагч
- Түр орлуулагч
- Түр орлуулагч
- Түр орлуулагч
- Түр орлуулагч
- Түр орлуулагч
- Түр орлуулагч
- Түр орлуулагч
- Түр орлуулагч
- Түр орлуулагч
- Түр орлуулагч
- Түр орлуулагч
- Түр орлуулагч
- Түр орлуулагч
- Түр орлуулагч
- Түр орлуулагч
Холбогдсон загварын материал


Энэ загвараар хийдэг
CC0 Нийтийн домэйн
Энэ загвар CC0 дор гаргагдсан. Та зөвшөөрөл авахгүйгээр хуулах, өөрчлөх, түгээх, ашиглах боломжтой.
Загвараар дамжуулан бүтээгдэхүүн худалдаж авч Бүтээгчийг дэмжээрэй Бүтээгчийн шимтгэл Борлуулагчаар тогтоосон, эсвэл энэ загварын шинэ хувилбар үүсгэж орлогоо хуваахын тулд өөрийн загварт холбоос болгон оруулна уу.