ARTE
BELLEZA Y BIENESTAR
ARTESANÍA
CULTURA E HISTORIA
ENTRETENIMIENTO
MEDIO AMBIENTE
COMIDA Y BEBIDAS
INGENIERÍA INVERSA
CIENCIAS
DEPORTES
TECNOLOGÍA
TECNOLOGÍA VESTIBLE
Youblob · CC0


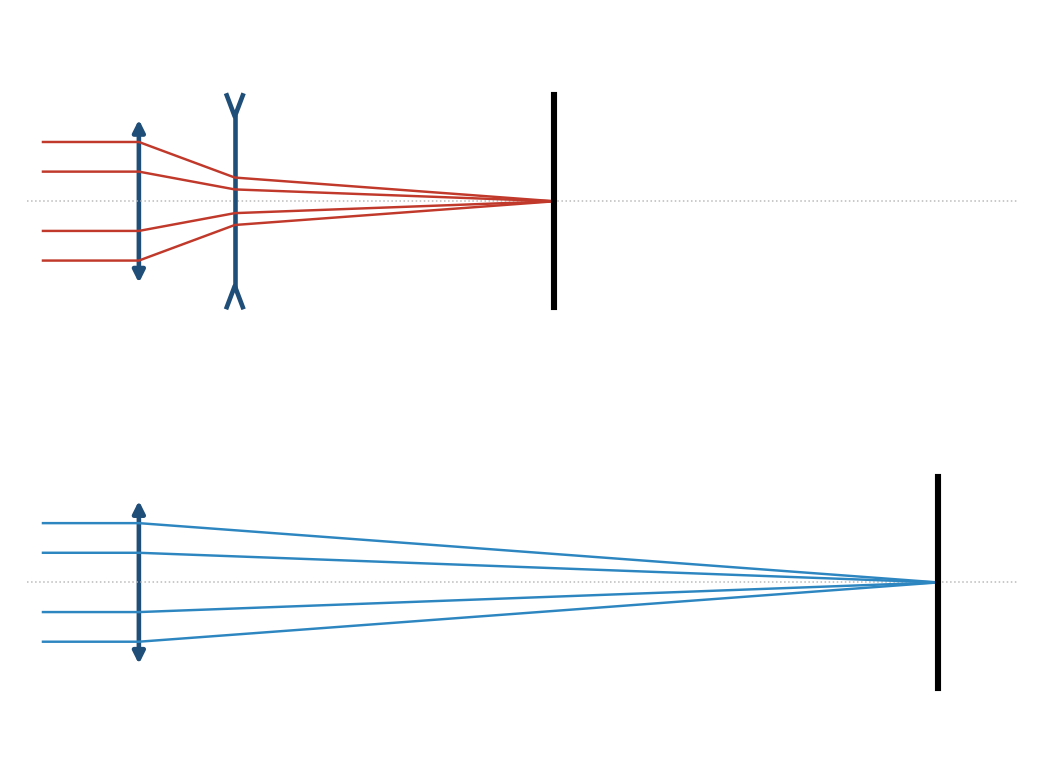
Telephoto Lens
To photograph a distant subject large, you need a long focal length - and a long lens means a long camera. In 1891 Thomas Rudolphus Dallmeyer in London, and Adolf Miethe in Germany, independently put a negative lens behind a positive one. The pair acts like a single lens of much longer focal length, yet it is physically shorter than that focal length. That is what 'telephoto' means, and nearly every long camera lens since uses it.
**No patent number is cited here**: Dallmeyer patented it in Britain, and no US patent for his design was verified, so none is claimed.
**You build one on an optical bench**, measure its focal length from the size of a distant image, and let a ray-trace notebook redesign it.
Principiante
90 minutes
Instrucciones
1
1
Know your lenses
Know your lenses
Focus a distant window onto paper with each convex lens; the lens-to-paper distance is its focal length. Pick one about 100 mm. Take a concave lens about half that (its label gives it; it will not focus alone).
Materiales para este paso:
 Juego de lentes convergentes1 juego
 Lente cóncava1 pieza
Herramientas necesarias:
 Regla
Regla2
2
Set up the bench
Set up the bench
Mount the convex lens in a holder at one end of the bench, pointing out of a window at something far away. Tape tracing paper to a holder as the screen.
Materiales para este paso:
 Rollo de papel de calco para patrones1 hoja
Herramientas necesarias:
 Banco y raíl óptico
 Juego de portalentes
 Cinta de carrocero
3
3
Image with one lens
Image with one lens
Slide the screen until the far scene is sharp. Measure the height of one chosen feature on the screen - a window, a chimney.
Herramientas necesarias:
Regla4
4
Add the negative lens
Add the negative lens
Put the concave lens 60 mm behind the convex one. The image is now far behind; move the screen back until it is sharp again and measure the same feature. Try 55 and 65 mm spacing too.
Herramientas necesarias:
 Cinta métrica
5
5
Design it on paper
Design it on paper
Cargando el cuaderno de Jupyter…
6
6
History & Context
History & Context
**What the 1891 designs did:** a positive front group and a negative rear group, spaced so the system focal length exceeds its length. **Modern build (derived):** two stock lenses on a bench.
Early telephoto attachments screwed behind ordinary lenses; modern long lenses build the idea in. Its limits: spacing is critical, the negative group adds distortion (pincushion), and the image is dimmer at the same aperture diameter because the focal length grew.
Materiales
3- 1 juegoMarcador de posición
- 1 piezaMarcador de posición
- Marcador de posición
Herramientas requeridas
5- Marcador de posición
- Marcador de posición
- Marcador de posición
- Marcador de posición
- 1 vendor sell this, none ship to you yetMarcador de posición
Blueprints relacionados
Estos blueprints comparten conocimiento — técnicas, materiales o principios
CC0 Dominio público
Este Blueprint se publica bajo CC0. Eres libre de copiar, modificar, distribuir y usar este trabajo para cualquier propósito, sin pedir permiso.
Apoya al Maker comprando productos a través de su Blueprint, donde gana una Comisión del Maker establecida por los vendedores, o crea una nueva iteración de este Blueprint e inclúyela como conexión en tu propio Blueprint para compartir ingresos.