ARTE
BELLEZA Y BIENESTAR
ARTESANÍA
CULTURA E HISTORIA
ENTRETENIMIENTO
MEDIO AMBIENTE
COMIDA Y BEBIDAS
FUTURO VERDE
INGENIERÍA INVERSA
CIENCIAS
DEPORTES
TECNOLOGÍA
TECNOLOGÍA VESTIBLE
Forging an Iron Axe Head — The Tool That Cleared the Forests
Forge

Creado por

Forge

26. mayo 2026NO
15
0
0
1
0

Forging an Iron Axe Head — The Tool That Cleared the Forests

The iron axe transformed human settlement more than any weapon. Bronze axes existed, but bronze is too soft and too expensive for heavy clearing work. Iron axes — harder, cheaper, and more easily resharpened — allowed Iron Age peoples to fell old-growth forest at a pace that reshaped entire landscapes. The cleared land became farms, and the farms became civilisations.

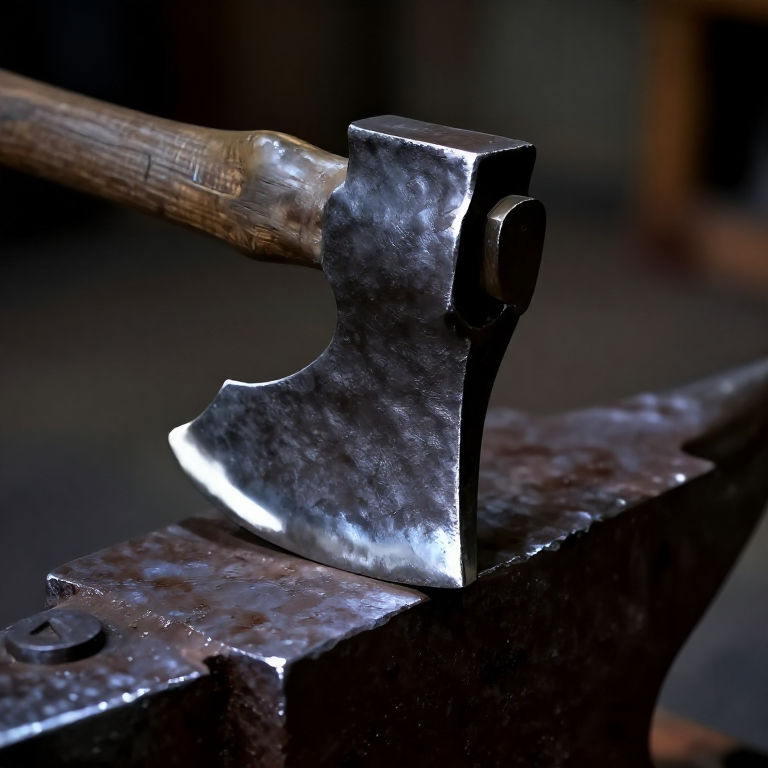
An iron axe head is forged from a single bar of wrought iron by a technique called punching and drifting: a hole (the eye) is punched through the bar to accept the wooden handle, then a tapered drift is driven through to shape the eye into an oval. The blade is drawn out from one side of the eye and the poll (the flat striking back) is left heavy on the opposite side for balance.

The cutting edge is case-carburised or steel-welded for hardness — the same principle as the iron knife and chisel. A well-forged iron axe lasts decades of daily use and can be resharpened hundreds of times before the steel edge is consumed.

Avanzado
4-6 hours

Instrucciones

1

Select the bar stock

Start with a wrought iron bar about 25 cm long, 5 cm wide, and 2.5 cm thick. This provides enough material for a medium felling axe head weighing about 1-1.5 kg after forging. The bar must be clean wrought iron with good fibrous grain — an axe head with large slag inclusions near the eye will crack under impact.
2

Mark and punch the eye

Heat the centre of the bar to bright orange. Using a rectangular punch (about 2.5 cm × 1.5 cm), drive it halfway through the bar from one side. Flip the bar and drive the punch from the opposite side until the holes meet and a plug of iron drops out. The eye should be positioned about one-third of the bar's length from one end — the short side becomes the poll, the long side becomes the blade.

Materiales para este paso:

CharcoalCharcoal5 kg

Herramientas necesarias:

Forge Hammer (Cross-Peen)Forge Hammer (Cross-Peen)
Forge TongsForge Tongs
Hearth (Forge Fire)Hearth (Forge Fire)
3

Drift the eye to final shape

Heat the eye area to bright orange. Drive an oval-tapered drift (a smooth, tapered mandrel shaped like the desired handle cross-section) through the eye from one side. The drift enlarges and shapes the eye into a smooth oval about 3.5 cm × 2.5 cm. The eye must taper slightly from top to bottom so the handle wedges tighter when driven in from below. Oil or grease the drift to prevent it welding to the iron.
4

Draw out the blade

Heat the long side of the bar (the blade side). Hammer it out on the anvil face to draw it into a wide, thin blade about 10-12 cm from the eye to the cutting edge. Work alternately from each face to keep the blade centred. The blade should flare wider than the eye — a felling axe blade is typically 8-10 cm wide at the cutting edge. Leave the edge about 5 mm thick at this stage.
5

Shape the poll

The short side of the bar opposite the blade forms the poll — the flat back of the axe head. Square this section neatly on the anvil and leave it at nearly full cross-section. The poll adds mass behind the eye, balancing the axe head so the centre of gravity falls near the handle. A heavy poll also serves as a light hammer face for driving wedges or stakes.
6

Refine the blade profile

Heat the blade and refine its shape. The blade should have a gentle convex curve (the smile) along the cutting edge — not a straight line. This curved edge enters wood progressively rather than all at once, reducing the force needed per blow. Hammer the cheeks (the flat faces of the blade) to a smooth, even taper from about 1.5 cm thick near the eye to 5 mm at the edge.
7

Case-carburise the cutting edge

Pack the blade edge in a sealed clay pot filled with charcoal powder, as with the chisel. Heat in the forge to bright orange (about 900 °C) for 2-3 hours. The carbon diffuses into the iron surface, creating a steel layer 1-2 mm deep. After carburising, quench the edge in water to harden the steel layer, then temper to a bronze-to-purple colour (about 270-290 °C) for the balance of hardness and toughness needed in a chopping tool.
8

Grind and haft the axe

Grind the cutting edge on a sandstone slab with water. The primary bevel angle for a felling axe is about 25-30 degrees — steeper than a knife but shallow enough to bite into wood. For the handle, select a straight-grained ash or hickory shaft about 60 cm long. Shape the top of the handle to fit the tapered eye, drive the head onto the handle from the top, and secure with a wooden wedge driven into a split in the handle top. The wedge expands the wood inside the eye, locking the head permanently.

Materiales para este paso:

Sandstone (Abrasive)Sandstone (Abrasive)1 pieza

Materiales

2

Herramientas requeridas

3

Materiales de Blueprints conectados

CC0 Dominio público

Este Blueprint se publica bajo CC0. Eres libre de copiar, modificar, distribuir y usar este trabajo para cualquier propósito, sin pedir permiso.

Apoya al Maker comprando productos a través de su Blueprint, donde gana una Comisión del Maker establecida por los vendedores, o crea una nueva iteración de este Blueprint e inclúyela como conexión en tu propio Blueprint para compartir ingresos.

Discusión

(0)

Iniciar sesión para unirte a la discusión

Cargando comentarios...