ARTE
BELLEZA Y BIENESTAR
ARTESANÍA
CULTURA E HISTORIA
ENTRETENIMIENTO
MEDIO AMBIENTE
COMIDA Y BEBIDAS
INGENIERÍA INVERSA
CIENCIAS
DEPORTES
TECNOLOGÍA
TECNOLOGÍA VESTIBLE
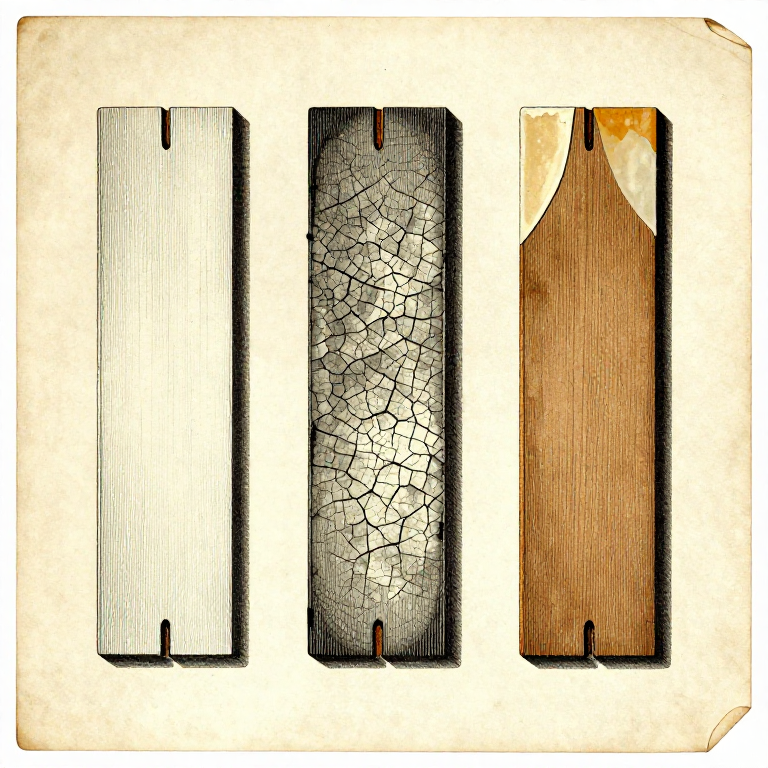


Squeeze-Out, Starvation and Reading a Joint That Failed
A broken joint is evidence. The two faces record exactly what went wrong, and reading them takes a minute and tells you what to change.
Most makers throw the pieces away and try again with more glue and more pressure — which is the wrong response to three of the four common failures, and makes one of them considerably worse.
This rung is the diagnostic table. It pairs with the fault-finding approach used elsewhere on Youblob: look at what the failure actually shows before deciding what to do about it.
Intermedio
2 hours
Instrucciones
1
1
Bare wood on both faces: it never bonded
Bare wood on both faces: it never bonded
Two clean surfaces, little or no glue visible, and the parts separated with much less force than they should have needed.
This is an ADHESION failure and the cause is almost always contamination or a sealed surface: oil, old finish, silicone polish, release agent, or an oily timber like teak that was not wiped with solvent. Occasionally it is an adhesive that simply does not bond that material — PVA on metal or on most plastics will do exactly this.
The fix is in the preparation rung, not in the glue bottle. Clean, abrade, and check that the adhesive is rated for both materials.
Materiales para este paso:
 Tabla de madera blanda seca2 piezas
Herramientas necesarias:
 Lupa de relojero
 Alcohol desnaturalizado
2
2
A thick brittle line: too much glue, or it cured wrong
A thick brittle line: too much glue, or it cured wrong
A visible glue line, glue on both faces, and the break running through the adhesive itself. That is a COHESIVE failure.
For PVA it usually means the film was too thick — it shrank as it dried and cracked internally — or it cured too cold and chalked instead of forming a proper film. Chalky white crumbs along the line are the signature of cold curing, and no amount of extra time fixes it.
For epoxy it means the mix was wrong. Two-part epoxy needs its stated ratio measured, not estimated, and thorough mixing including the sides of the pot. An under-mixed epoxy stays tacky or rubbery and never reaches strength.
Materiales para este paso:
 Epoxi de dos componentes1 pieza
 Cola blanca para madera (PVA)1 pieza
Herramientas necesarias:
Lupa de relojero3
3
Dry patches in a glued area: starvation
Dry patches in a glued area: starvation
Glue around the edges of the joint and dry, unglued wood in the middle. The joint was STARVED — squeezed so hard that the adhesive was driven out before it cured.
This is the failure that punishes the instinct to clamp harder. It also happens with too little glue, with a joint left unclamped so long that the glue skinned before contact, and on end grain that drank the glue away — which the first rung covers.
The fix is more glue and LESS pressure, which is counter-intuitive enough that people rarely try it. A continuous fine bead of squeeze-out along the whole joint is the target; streams of it running down the work mean you have gone past.
Materiales para este paso:
Cola blanca para madera (PVA)1 pieza Tabla de madera dura2 piezas
Herramientas necesarias:
 Brocha para cola
 Gato de tornillo en CLupa de relojero
4
4
Cleaning squeeze-out: wet, leathery, or cured
Cleaning squeeze-out: wet, leathery, or cured
There are three moments to deal with squeeze-out and they call for three different methods.
WET: wipe with a barely damp cloth. Tempting, and the trap is that water spreads thinned glue into the surrounding grain where it seals the wood invisibly — and shows up as a pale patch under the finish. Use as little water as possible, or skip this stage.
LEATHERY, after twenty minutes or so: the best moment. The bead has set enough to lift off in one rubbery piece with a chisel or a scraper, and it takes nothing with it. CURED: it has to be pared or scraped off, and you risk digging into the surface. Masking tape applied before assembly avoids the whole question.
Herramientas necesarias:
 Tela de algodónLupa de relojero
 Surtido de papel de lija
 Cinta de carrocero
Materiales
4- 2 piezasMarcador de posición
- 1 piezaMarcador de posición
- 2 piezasMarcador de posición
- 2 piezasMarcador de posición
Herramientas requeridas
7- Marcador de posición
- Marcador de posición
- Marcador de posición
- Marcador de posición
- Marcador de posición
- Marcador de posición
- Marcador de posición
Blueprints relacionados
Estos blueprints comparten conocimiento — técnicas, materiales o principios



CC0 Dominio público
Este Blueprint se publica bajo CC0. Eres libre de copiar, modificar, distribuir y usar este trabajo para cualquier propósito, sin pedir permiso.
Apoya al Maker comprando productos a través de su Blueprint, donde gana una Comisión del Maker establecida por los vendedores, o crea una nueva iteración de este Blueprint e inclúyela como conexión en tu propio Blueprint para compartir ingresos.