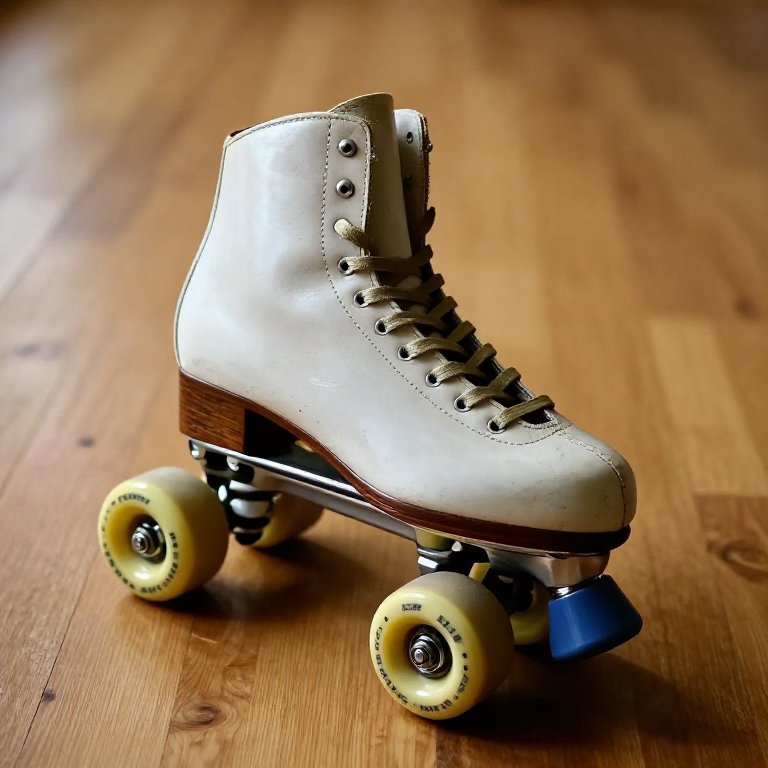


Rocking Roller Skates
Roller skates existed for a century before anyone could turn on them. Early skates were wheels bolted rigidly to a plate: they rolled forward and that was all. Steering meant stopping, lifting a foot and pointing it somewhere else. Skating rinks were novelties where people mostly fell over.
James Plimpton's insight was to let the axles pivot, and to damp that pivot with rubber. Lean your weight to one side and the axle cants; the wheels toe in like a wagon's front wheels and the skate carves an arc. Stand upright and the rubber returns it to straight. You steer by leaning, exactly as you do on a bicycle.
That single mechanism turned roller skating from a curiosity into a craze, and every quad skate since uses it.
Instrucciones
Wear a helmet and wrist guards from the first roll
Wear a helmet and wrist guards from the first roll
Wrists take the fall in skating. Helmet, wrist guards, knee and elbow pads before anyone stands on these, and test on a smooth flat floor with something to hold.
Cut two footplates to the wearer's sole
Cut two footplates to the wearer's sole
Draw round the boot and cut two hardwood plates to that outline, about 12 mm thick. Make them to the actual boot, not to a shoe size.
Materiales para este paso:
 Tabla de madera dura2 piezas
Herramientas necesarias:
 Regla
ReglaMark the two truck positions
Mark the two truck positions
Mark axle centres under the ball of the foot and under the heel. A wider spacing tracks straighter; a narrower one turns tighter.
Cut the two pivot blocks
Cut the two pivot blocks
Make two blocks that carry the axles, each with a single pivot hole drilled at an angle of roughly 45° to the plate. That angle is the entire steering geometry.
Angle both pivots toward the centre of the skate
Angle both pivots toward the centre of the skate
The front pivot leans back and the rear pivot leans forward, so both axles steer the same way when the plate rolls. Get one backwards and the skate fights itself.
Fit a pivot pin through each block
Fit a pivot pin through each block
Run a steel pin or bolt down the angled hole so each truck can rock about that axis and nothing else. No slop, no binding.
Materiales para este paso:
 Remaches de acero8 piezas
Fit rubber cushions above and below each pivot
Fit rubber cushions above and below each pivot
Sandwich a hard rubber bush on each side of the pivot. These do two jobs: they resist the lean and they return the truck to centre. This is Plimpton's actual claim.
Materiales para este paso:
 Plancha de caucho1 hoja
Make the cushions adjustable
Make the cushions adjustable
Fit the pivot bolt with a nut so the rubber can be compressed more or less. Loose gives a skate that turns on a thought; tight gives one that tracks straight and feels safe.
Fit four wheels per skate on the axles
Fit four wheels per skate on the axles
Mount two wheels on each axle. Wood or hard polyurethane both work; polyurethane grips and rolls quieter. Check each spins freely.
Check all four wheels touch the floor
Check all four wheels touch the floor
Set the skate on a flat surface and press each corner. Any rock means an axle is out of parallel — shim the block until all four bear evenly.
Test the rocking action by hand
Test the rocking action by hand
Press the plate over to one side. Both axles should cant the same way and spring back when released. If they do not return, the cushions are too soft or too worn.
Fit straps or mount to a boot
Fit straps or mount to a boot
Fix leather straps over toe and instep, or screw the plate directly to a stout boot sole. A skate that shifts underfoot cannot be steered at all.
Materiales para este paso:
 Cuero curtido al vegetal1 hoja
Roll straight first, holding a rail
Roll straight first, holding a rail
Stand and roll in a straight line before attempting to steer. Confirm the skate tracks true and the wheels run free.
Steer by leaning, not by twisting
Steer by leaning, not by twisting
Shift weight to one edge and let the skate carve. Do not twist the foot — the mechanism only responds to lean, and twisting is how ankles get hurt.
Tune the cushion tension to the skater
Tune the cushion tension to the skater
Tighten for a beginner or a heavy skater, loosen for tighter turns. Adjust one nut at a time and re-test; this is the difference between a good skate and an unrideable one.
History & Context — steering by leaning
History & Context — steering by leaning
The patent. James Leonard Plimpton received US Patent 37,305 in January 1863 for an improvement in skates. The claim is specifically about how the rollers attach: the wheels are made to "turn or cramp like the wheels of a wagon by the rocking or canting of the stock or foot-stand", with the pivoting action cushioned by rubber. It is a steering patent, not a wheel patent.
Why earlier skates failed. Roller skates go back at least to the 1760s and John Joseph Merlin's much-mocked demonstration, and Petitbled patented an inline design in Paris in 1819 — but these were rigid. A rigid skate can only travel where it points, so it cannot follow a curve without the foot leaving the ground. Plimpton's rocking truck makes the two axles steer in opposite directions about a shared lean, which is what allows a continuous arc. The same idea reappears in the skateboard truck, which is mechanically Plimpton's design turned to another purpose.
He sold the experience, not just the skate. Plimpton leased rather than sold his skates, opened rinks — including one in a New York hotel dining room and a celebrated one at Newport — and founded a club. Roller skating became a mass craze in the 1860s and 1870s in America and then Europe. It is an early and unusually clear case of an inventor building the market for the product rather than waiting for one.
The trade-off you can feel in the nut. Cushion tension trades stability against agility, and there is no correct setting — a beginner needs the skate to resist lean, an artistic skater wants it to answer immediately. Modern quad trucks still expose exactly this adjustment, still with a rubber bush and a nut, 160 years on.
Materiales
4- 2 piezasMarcador de posición
- 8 piezasMarcador de posición
- 1 hojaMarcador de posición
- 1 hojaMarcador de posición
Este plano hace
Blueprints relacionados
Estos blueprints comparten conocimiento — técnicas, materiales o principios


CC0 Dominio público
Este Blueprint se publica bajo CC0. Eres libre de copiar, modificar, distribuir y usar este trabajo para cualquier propósito, sin pedir permiso.
Apoya al Maker comprando productos a través de su Blueprint, donde gana una Comisión del Maker establecida por los vendedores, o crea una nueva iteración de este Blueprint e inclúyela como conexión en tu propio Blueprint para compartir ingresos.