ARTE
BELLEZA Y BIENESTAR
ARTESANÍA
CULTURA E HISTORIA
ENTRETENIMIENTO
MEDIO AMBIENTE
COMIDA Y BEBIDAS
INGENIERÍA INVERSA
CIENCIAS
DEPORTES
TECNOLOGÍA
TECNOLOGÍA VESTIBLE
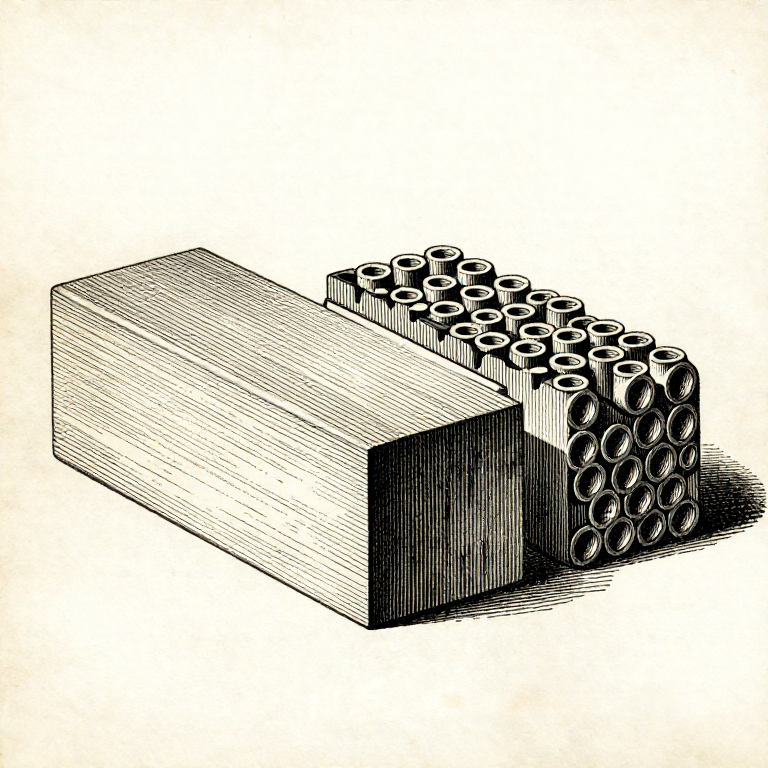


Why a Butt Joint Fails: End Grain Does Not Glue
Glue two long-grain faces together properly and the joint is stronger than the wood — break it and it tears out fibres either side. Glue two END-grain faces together and it comes apart in your hands.
The reason is the cell structure. Long grain presents cell WALLS to be bonded; end grain presents the open ends of hollow tubes, which drink the glue away from the surface and leave a starved joint over very little real contact area.
Every traditional joint in woodworking is, at bottom, a way of turning an end-grain meeting into a long-grain glue surface, a mechanical interlock, or both. Knowing that makes the whole catalogue of joints look less like tradition and more like solutions.
Principiante
2 hours
Instrucciones
1
1
What end grain does to glue
What end grain does to glue
End grain wicks glue into the open tubes by capillary action. The surface is left starved, so the bond line has too little adhesive exactly where it is needed — the starvation failure the glue batch describes, produced by the timber rather than by the clamps.
The contact area is also far smaller than it looks. A long-grain surface is a field of cell walls to bond to; an end-grain surface is mostly open holes, and glue bridging a hole is not holding anything.
SIZING helps and does not cure it: brush on thinned glue, let it soak in and become tacky, then glue normally. That fills the tubes first so the real joint is not starved. It typically gets an end-grain joint to a useful fraction of long-grain strength — better than nothing, nowhere near enough to rely on.
Materiales para este paso:
 Bloque de madera dura1 pieza
 Cola blanca para madera (PVA)1 pieza
Herramientas necesarias:
 Sargento
2
2
The three cures, and every joint is one of them
The three cures, and every joint is one of them
**Add long grain.** A mortise and tenon works because the tenon's cheeks are long grain glued to the mortise's long-grain walls. The end grain at the bottom of the tenon contributes nothing and is not asked to.
**Add mechanical interlock.** A dovetail resists being pulled apart by its shape alone — the glue is a bonus, which is why antique dovetailed drawers survive with the glue long since failed.
**Add a separate piece of long grain.** A dowel, a loose tenon, a biscuit, a spline. Each one crosses the joint with its own grain running the useful way, turning two end-grain faces into several long-grain glue surfaces.
Materiales para este paso:
 Varilla de madera (tarugo)1 piezaCola blanca para madera (PVA)1 pieza
 Tabla de madera dura1 pieza
Herramientas necesarias:
 Formones
 Serrucho de costilla
 Gramil
3
3
Long grain to long grain is the joint that needs nothing
Long grain to long grain is the joint that needs nothing
An edge joint — two boards glued edge to edge to make a wider panel — is long grain to long grain the whole way. Properly made it needs no dowels, no biscuits and no splines, and it will not be where the panel breaks.
Dowels and biscuits in an edge joint are for ALIGNMENT during glue-up, not strength. That is a perfectly good reason to use them, but adding them for strength is effort spent on the one part of the joint that was never going to fail.
What an edge joint does need is a straight, square, well-fitted edge and even clamping. That is the clamping-pressure rung, and it is where edge joints actually go wrong.
Materiales para este paso:
Tabla de madera dura2 piezasCola blanca para madera (PVA)1 piezaHerramientas necesarias:
 Cepillo de carpinteroSargento
 Escuadra combinada
4
4
Cross-grain gluing: the mistake that waits a year
Cross-grain gluing: the mistake that waits a year
Gluing one board ACROSS another's width — a solid batten glued across a panel, a wide top glued to a wide rail — puts one piece's several millimetres of seasonal movement against the other's near zero. One of them will give.
It never fails during the build, which is what makes it so common. The glue holds perfectly, the piece looks fine for a season, and it splits in the first dry winter — by which time the cause is not obvious.
The cures are all forms of letting it slide: glue only the middle few centimetres and let the rest float, use slotted screw holes, use tabletop buttons that hook into a groove. A breadboard end does all three at once, and the last rung of this batch is that joint in detail.
Materiales para este paso:
Tabla de madera dura1 piezaCola blanca para madera (PVA)1 piezaHerramientas necesarias:
SargentoGramilMateriales
4- 1 piezaMarcador de posición
- 4 piezasMarcador de posición
- 1 piezaMarcador de posición
- 2 piezasMarcador de posición
Blueprints relacionados
Estos blueprints comparten conocimiento — técnicas, materiales o principios


CC0 Dominio público
Este Blueprint se publica bajo CC0. Eres libre de copiar, modificar, distribuir y usar este trabajo para cualquier propósito, sin pedir permiso.
Apoya al Maker comprando productos a través de su Blueprint, donde gana una Comisión del Maker establecida por los vendedores, o crea una nueva iteración de este Blueprint e inclúyela como conexión en tu propio Blueprint para compartir ingresos.