Kerjasama
SENI
KECANTIKAN & KESEJAHTERAAN
KRAFTANGAN
BUDAYA & SEJARAH
HIBURAN
ALAM SEKITAR
MAKANAN & MINUMAN
KEJURUTERAAN TERBALIK
SAINS
SUKAN
TEKNOLOGI
BOLEH PAKAI
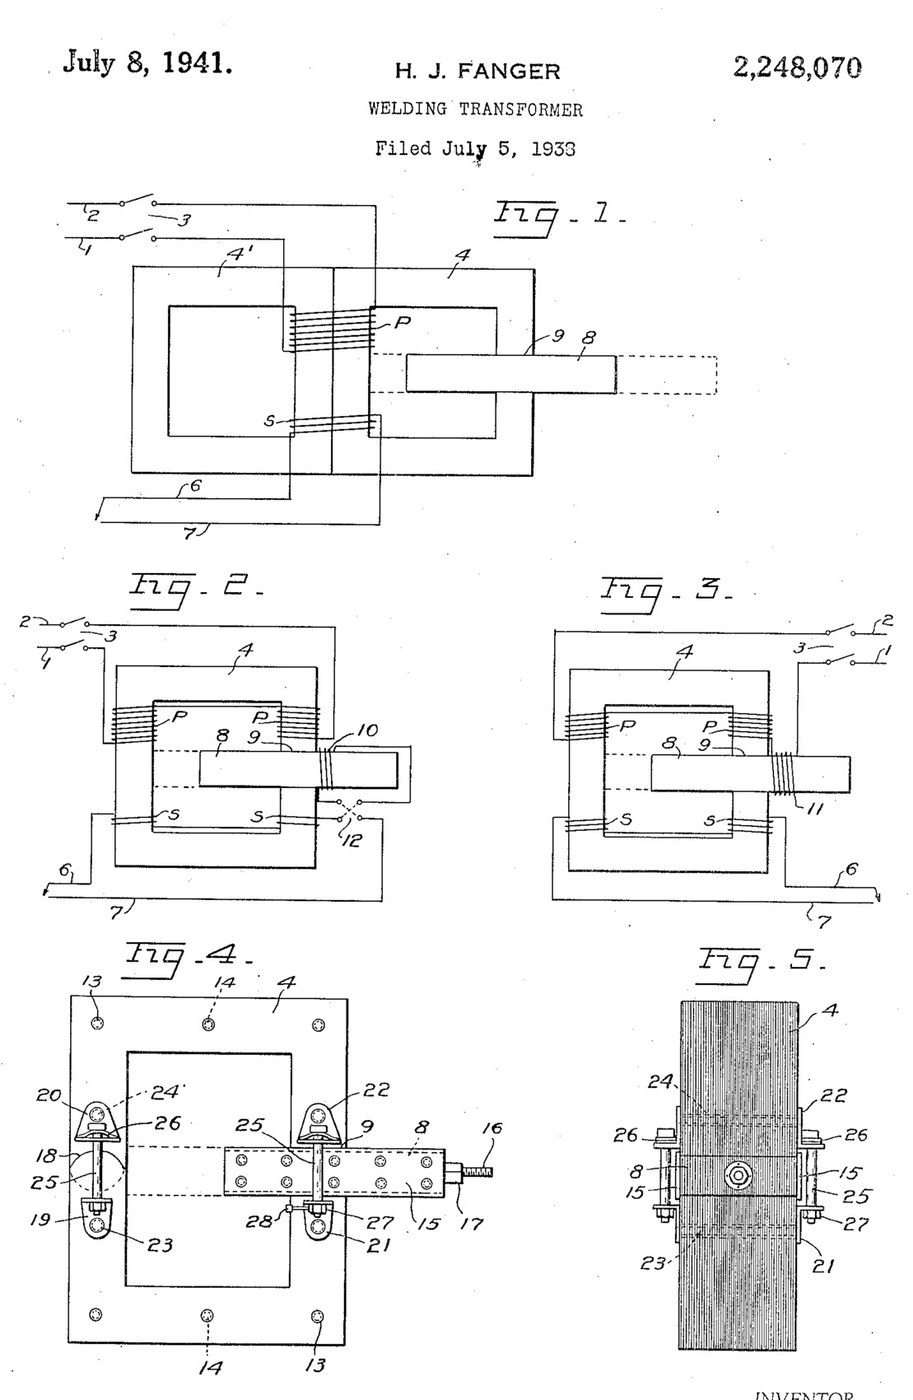


Arc Welder: AC Transformer with a Sliding Shunt Core (Fanger, US 2,248,070)
An AC arc welder is a step-down transformer whose current can be turned up and down. H. J. Fanger (US 2,248,070, 1941) cuts a gap through one leg of a laminated ring core and slides a laminated iron shunt bar through it: pushed in, it carries flux past the secondary and lowers the welding current; pulled out, the current rises.
For arc welding he gives about 60 to 68 volts open circuit, 15 to 200 amps, dropping to 38 or 40 volts at the working arc, with a small coil on the shunt bar in series with the secondary.
Source: H. J. Fanger, "Welding Transformer", US Patent 2,248,070 (filed 1938, granted 1941). Picture: its Figs. 1-5.
Lanjutan
Unknown
Arahan
1
1
Read Fanger
Read Fanger
"With arc welding, infinite control of the volume of the secondary current, between maximum and minimum is obtained by adjustment of the slidable shunt core without altering the welding characteristics of the current, also better ignition of the arc is had at a given voltage, and greater stability of the arc".
2
2
Stack the core
Stack the core
Build a single rectangular ring core of insulated iron laminations, held together with brass (or insulated) bolts or rivets in insulating tubes (Fig. 4). Cut a gap straight through one leg, accurately machined and finished, and make a circular joint through the opposite leg with the segments staggered to overlap in successive laminations. Core size, lamination iron and thickness are not given (ours: the tools).
Bahan untuk langkah ini:
 Logam tidak diketahui1 iron laminations
 Pelbagai bolt heksagon1 brass bolts
 Bahan penebat tidak diketahui1 insulating tubes
Alatan diperlukan:
 Gunting kepingan logam
 Gerudi Tiang
 Set Mata Gerudi
 Kikir (Kikir Tangan)
 Dimensi tidak diketahui
3
3
Make the shunt bar
Make the shunt bar
Make the sliding shunt section of the same laminated iron, a snug fit in the gap with its laminations edge-to-edge with the core's, and long enough to fill the gap at every position. Sheath both sides with a slightly wider plate of Bakelite that overlaps the edges of the gap to guide it. Fit a threaded rod on its outer end, working in a nut fixed to the section (or move it by hand, with calibration marks along one edge).
Bahan untuk langkah ini:
Logam tidak diketahui1 shunt laminations Bakelite2 side platesPelbagai bolt heksagon1 brass bolts
 Rod berbenang1 keping
 Nat Heksagon1 keping
Alatan diperlukan:
Gerudi TiangSet Mata GerudiKikir (Kikir Tangan)4
4
Wind the coils
Wind the coils
Wind the primary and secondary windings on both legs of the core (Fig. 2), in series or in parallel to suit the line voltage and the current wanted. Wind a small auxiliary coil round the shunt bar's path, fixed so the bar slides through it, and connect it in series with the secondary through a reversing switch (some jobs weld better with the current through it one way). Turns and wire sizes are not given.
Bahan untuk langkah ini:
 Dawai Tembaga1 insulation and size not given
Alatan diperlukan:
Dimensi tidak diketahui5
5
Spring the joints
Spring the joints
On both sides of the gap and of the circular joint fit pairs of confronting angle plates, held by brass bolts in insulating sleeves and drawn together by spring bolts whose heads rest on slightly arched spring plates, so the joints close snugly on the sliding bar. A small lever on the gap-joint nut gives a half turn to release the bar for moving. The angle-plate material is not given.
Bahan untuk langkah ini:
 Bahan tidak diketahui4 angle platesPelbagai bolt heksagon1 brass and spring boltsBahan penebat tidak diketahui1 sleeves
 Jalur keluli spring1 arched spring platesNat Heksagon4 keping
Alatan diperlukan:
Gerudi TiangSet Mata Gerudi Sepana boleh laras
6
6
Connect and set
Connect and set
Connect the primary to the line through a line switch, and the secondary leads to the electrode holder and the work. Pull the shunt bar out for more current, push it in for less: Fanger gives about 60-68 volts open circuit and 15-200 amps, dropping to 38-40 volts at the arc.
Bahan untuk langkah ini:
 Suis hidup/mati1 line switch
Alatan diperlukan:
Sepana boleh larasBahan
10- 1 shunt laminationsPemegang Tempat
- 1 brass and spring boltsPemegang Tempat
- 1 sleevesPemegang Tempat
- 2 side platesPemegang Tempat
- 1 kepingPemegang Tempat
- 5 kepingPemegang Tempat
- 1 insulation and size not givenPemegang Tempat
- 4 angle platesPemegang Tempat
- 1 arched spring platesPemegang Tempat
- 1 line switchPemegang Tempat
Blueprint ini membuat

CC0 Domain Awam
Blueprint ini dikeluarkan di bawah CC0. Anda bebas menyalin, mengubah, mengedar, dan menggunakan karya ini untuk sebarang tujuan, tanpa meminta kebenaran.
Sokong Pembuat dengan membeli produk melalui Blueprint mereka di mana mereka memperoleh Komisen Pembuat ditetapkan oleh Penjual, atau cipta iterasi baru Blueprint ini dan sertakan ia sebagai sambungan dalam Blueprint anda sendiri untuk berkongsi hasil.