Kerjasama
SENI
KECANTIKAN & KESEJAHTERAAN
KRAFTANGAN
BUDAYA & SEJARAH
HIBURAN
ALAM SEKITAR
MAKANAN & MINUMAN
KEJURUTERAAN TERBALIK
SAINS
SUKAN
TEKNOLOGI
BOLEH PAKAI
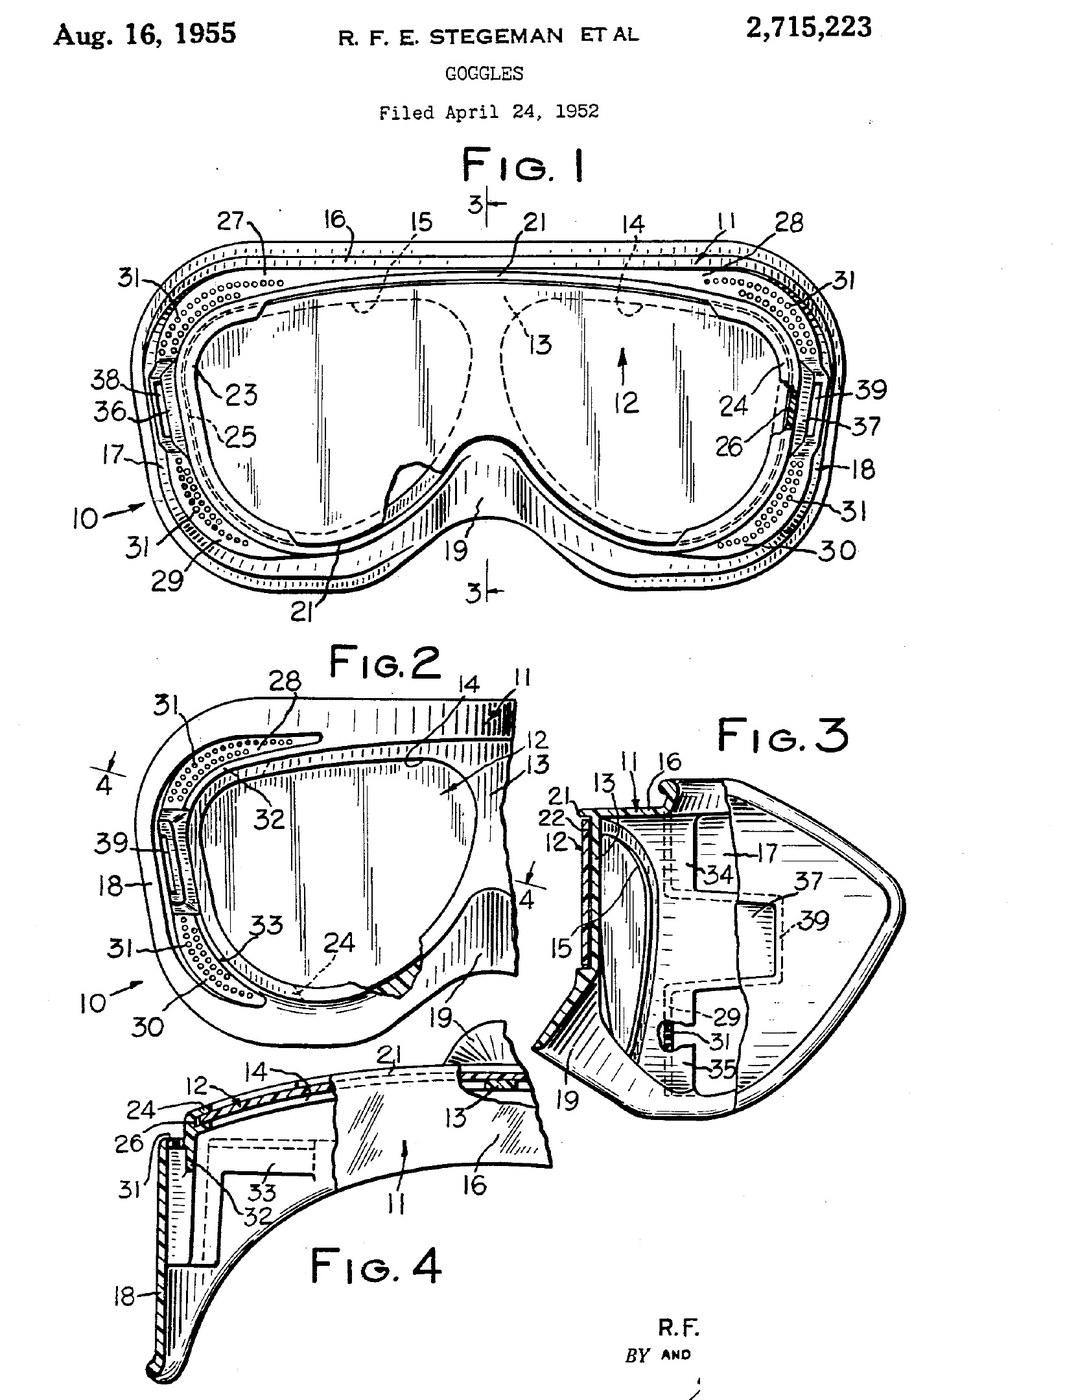


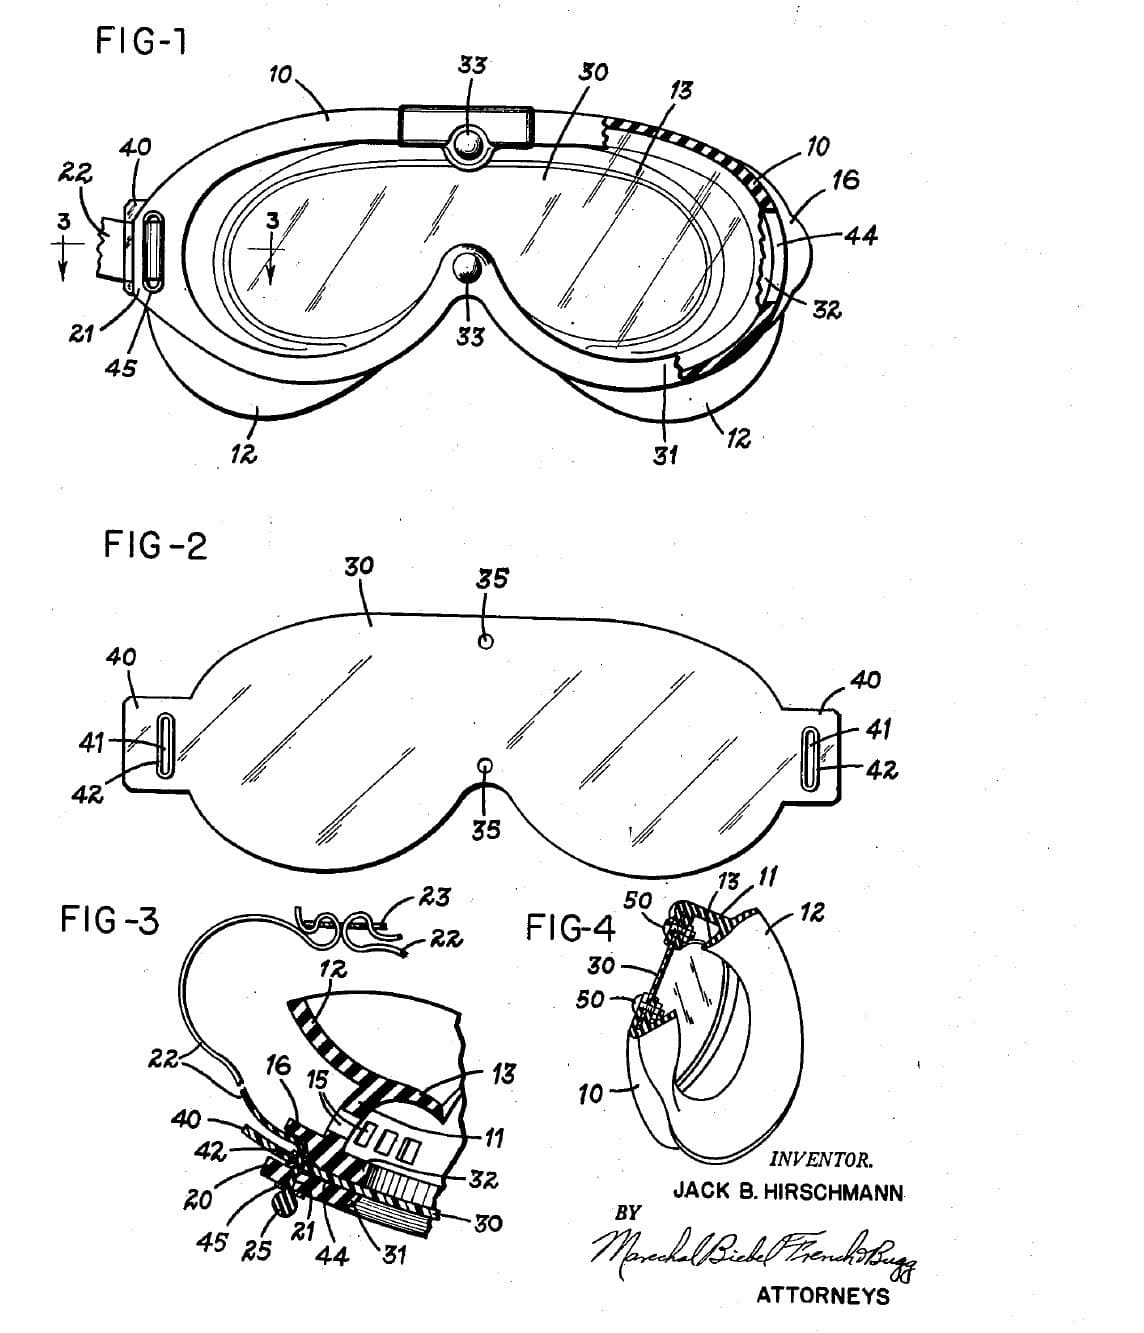
Lab Safety Goggles: Cover-All Body with Baffled Side Vents and a Snap-In Lens (Bausch & Lomb, US 2,715,223, 1955)
Cover-all goggles in two moulded plastic parts: a one-piece body that wraps the eyes and nose, and a flat clear lens panel sprung into a curve across its front. A raised rib round the front hides the lens edge so no particles can get in. The vents sit in set-back panels at the sides, and baffles inside turn the incoming air away from the eyes.
Result: ventilated goggles that keep out flying particles and splash, with a lens that snaps out for replacement.
Source: R. F. E. Stegeman and F. G. Gay (Bausch & Lomb), US 2,715,223 (1955). Unknown: sizes, the moulding and the strap. Picture: the patent drawing.
Pertengahan
Unknown
Arahan
1
1
Mould the body
Mould the body
Mould the body in one piece of plastic such as polystyrene or vinyl acetate. Give it a front wall curved from side to side with two sight openings, and a top wall and side walls running round to a projecting nose piece. Add a continuous rib round the front edge that stands forward of the lens, with overhanging flanges at the two temple ends forming grooves for the lens. Ours: polystyrene, injection moulded. Not given: sizes, the moulding.
Bahan untuk langkah ini:
 Polistirena1 body
Alatan diperlukan:
 Mesin pengacuan suntikan
 Dimensi tidak diketahui
2
2
Form the vents, baffles and strap anchors
Form the vents, baffles and strap anchors
In the same moulding, set back panels on the temple and side parts behind the lens plane and pierce them with many small vent holes. Inside, put baffle walls behind the holes so the incoming air is turned away from the eyes. Form an anchor recess with an opening in each side wall for the head strap.
Alatan diperlukan:
Mesin pengacuan suntikan3
3
Cut and fit the lens, add the strap
Cut and fit the lens, add the strap
Cut a flat, transparent lens panel to cover the whole front wall. Put one end in one temple groove, flex the panel and put its other end in the other groove; its own stiffness holds it curved against the front wall, with the rib covering its edge. Fasten a head strap in the two anchor recesses. Ours: clear plastic sheet, elastic cord. Not given: the lens thickness, the strap.
Bahan untuk langkah ini:
 Kepingan plastik jernih1 lens panel
 Tali getah1 head strap
Alatan diperlukan:
 Gunting kepingan logamDimensi tidak diketahui
Bahan
3- 1 bodyPemegang Tempat
- 1 lens panelPemegang Tempat
- 1 head strapPemegang Tempat
Alatan Diperlukan
3- Pemegang Tempat
- Pemegang Tempat
- Pemegang Tempat
Bahan Blueprint Bersambung


Blueprint ini membuat

Blueprint berkaitan
Blueprint ini berkongsi pengetahuan — teknik, bahan atau prinsip
CC0 Domain Awam
Blueprint ini dikeluarkan di bawah CC0. Anda bebas menyalin, mengubah, mengedar, dan menggunakan karya ini untuk sebarang tujuan, tanpa meminta kebenaran.
Sokong Pembuat dengan membeli produk melalui Blueprint mereka di mana mereka memperoleh Komisen Pembuat ditetapkan oleh Penjual, atau cipta iterasi baru Blueprint ini dan sertakan ia sebagai sambungan dalam Blueprint anda sendiri untuk berkongsi hasil.