Kerjasama
SENI
KECANTIKAN & KESEJAHTERAAN
KRAFTANGAN
BUDAYA & SEJARAH
HIBURAN
ALAM SEKITAR
MAKANAN & MINUMAN
KEJURUTERAAN TERBALIK
SAINS
SUKAN
TEKNOLOGI
BOLEH PAKAI
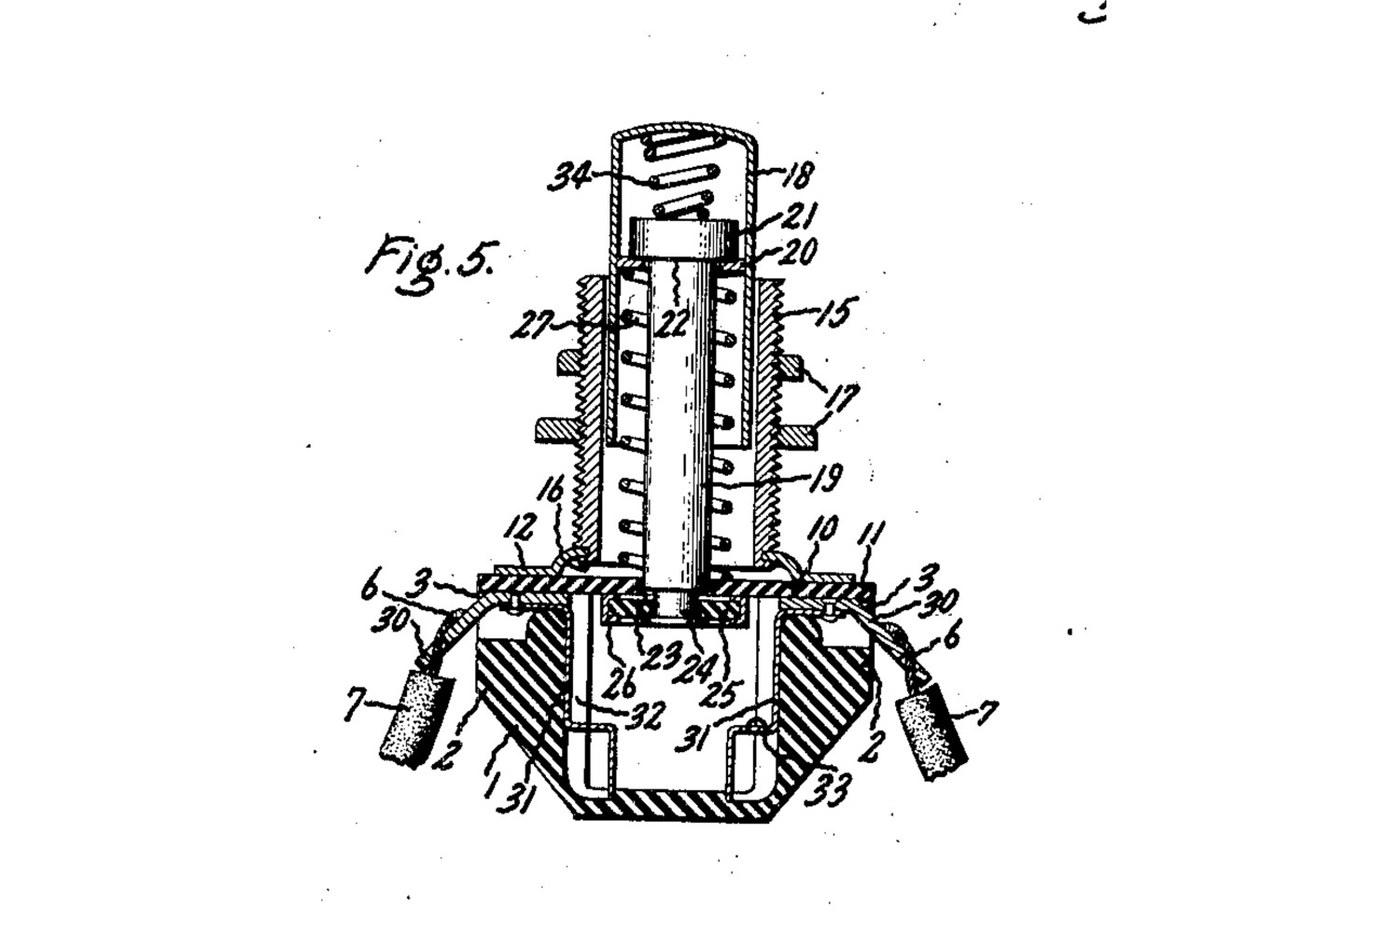


Push Button: Normally Open Momentary Switch with a Cushioned Contact (De Reamer, GE 1939)
A panel push button that closes a circuit only while you press it. A spring holds the button out, and a metal rim on the end of its rod sits clear of two contacts. Press it and the rim bridges both contacts. A second spring inside the button lets the rod give, so the contacts never take more than that spring's force.
Source: Frank C. De Reamer, US 2,166,803 (General Electric, 1939), Fig. 5. Unknown: the insulating material, the metals and every size. De Reamer gives none of them, so they are linked to unknown heads. The tools are ours. Picture: the patent's Fig. 5.
Lanjutan
2 days
Arahan
1
1
Mould the housing
Mould the housing
Mould a cup-shaped housing of insulating material, with a boss on each of two opposite sides, a recess in the top of each boss, a groove inside below each boss, and a bead round the top. Unknown: the material, the sizes and the moulding.
Bahan untuk langkah ini:
 Bahan penebat tidak diketahui1 as required
Alatan diperlukan:
 Acuan mampatan
 Dimensi tidak diketahui
2
2
Make the terminals and contacts
Make the terminals and contacts
Bend two angled metal strips. The upper end of each sits in a boss recess, and the lower end is a solder lug. Fix each upper end to a contact that fits the groove inside the housing, stepped at its bottom end. Unknown: the metal.
Bahan untuk langkah ini:
 Logam tidak diketahui1 as required
Alatan diperlukan:
 Gunting kepingan logam
 Playar Muncung RataDimensi tidak diketahui
3
3
Make the sleeve, plate and cover
Make the sleeve, plate and cover
Turn a threaded sleeve and cut its thread. Spin its lower end over onto a metal plate with tangs. Cut a cover of insulating sheet with ears that reach over the bosses and a hole in the middle to guide the rod.
Bahan untuk langkah ini:
Logam tidak diketahui1 as requiredBahan penebat tidak diketahui1 as requiredAlatan diperlukan:
 Mesin Pelarik Logam
 Set mata larik (HSS)
 Pemegang die ulirGunting kepingan logam
 Angkup VernierDimensi tidak diketahui
4
4
Make the push button
Make the push button
Make a drawn metal tube closed at the top, and a rod with a head. Put a small coil spring in the top of the tube, then the rod's head. Wedge a washer into the tube under the head. Leave clearance so the rod can swivel a little. Turn the rod's lower end down to a smaller diameter. Unknown: the metal.
Bahan untuk langkah ini:
Logam tidak diketahui1 as required Set Spring Mampatan1 spring
Alatan diperlukan:
Mesin Pelarik LogamSet mata larik (HSS)Angkup VernierDimensi tidak diketahui5
5
Assemble
Assemble
Set the terminals in their recesses and the contacts in their grooves. Slide the button into the sleeve, with a coil spring round the rod between the cover and the wedged washer. Pass the rod's end through the cover's hole. Put on it a loose insulating washer with a metal rim round its edge. Hammer the rod's end over into a flange. Lay the cover on the housing, so its ears clamp the terminals, and bend the plate's tangs over the bead.
Bahan untuk langkah ini:
Bahan penebat tidak diketahui1 as requiredLogam tidak diketahui1 as requiredSet Spring Mampatan1 springAlatan diperlukan:
 Ragum Bangku
 Tukul kepala bulatPlayar Muncung Rata
 Cermin mata keselamatan
6
6
Mount and wire it
Mount and wire it
Put the sleeve through a hole in the panel and clamp the panel between two nuts on the thread. Solder the bared wire ends to the two lugs.
Bahan untuk langkah ini:
 Nat Heksagon2 pcs
 Dawai Pateri1 as required
Alatan diperlukan:
 Alat pematerianPlayar Muncung Rata
7
7
Check it
Check it
At rest, the rim sits against the underside of the cover and the circuit is open. Pressed, the rim meets the stepped ends of both contacts and closes it. The checking is ours: the meter reads open, then closed while pressed.
Alatan diperlukan:
 Multimeter
Bahan
5- 1 as requiredPemegang Tempat
- 1 as requiredPemegang Tempat
- 1 springPemegang Tempat
- 2 pcsPemegang Tempat
- 1 as requiredPemegang Tempat
Alatan Diperlukan
13- Pemegang Tempat
- Pemegang Tempat
- Pemegang Tempat
- Pemegang Tempat
- Pemegang Tempat
- Pemegang Tempat
- Pemegang Tempat
- Pemegang Tempat
- Pemegang Tempat
- Pemegang Tempat
- Pemegang Tempat
- 2 vendors sell this, none ship to you yetPemegang Tempat
- Pemegang Tempat
Blueprint ini membuat

Blueprint berkaitan
Blueprint ini berkongsi pengetahuan — teknik, bahan atau prinsip

CC0 Domain Awam
Blueprint ini dikeluarkan di bawah CC0. Anda bebas menyalin, mengubah, mengedar, dan menggunakan karya ini untuk sebarang tujuan, tanpa meminta kebenaran.
Sokong Pembuat dengan membeli produk melalui Blueprint mereka di mana mereka memperoleh Komisen Pembuat ditetapkan oleh Penjual, atau cipta iterasi baru Blueprint ini dan sertakan ia sebagai sambungan dalam Blueprint anda sendiri untuk berkongsi hasil.