SENI
KECANTIKAN & KESEJAHTERAAN
KRAFTANGAN
BUDAYA & SEJARAH
HIBURAN
ALAM SEKITAR
MAKANAN & MINUMAN
KEJURUTERAAN TERBALIK
SAINS
SUKAN
TEKNOLOGI
BOLEH PAKAI
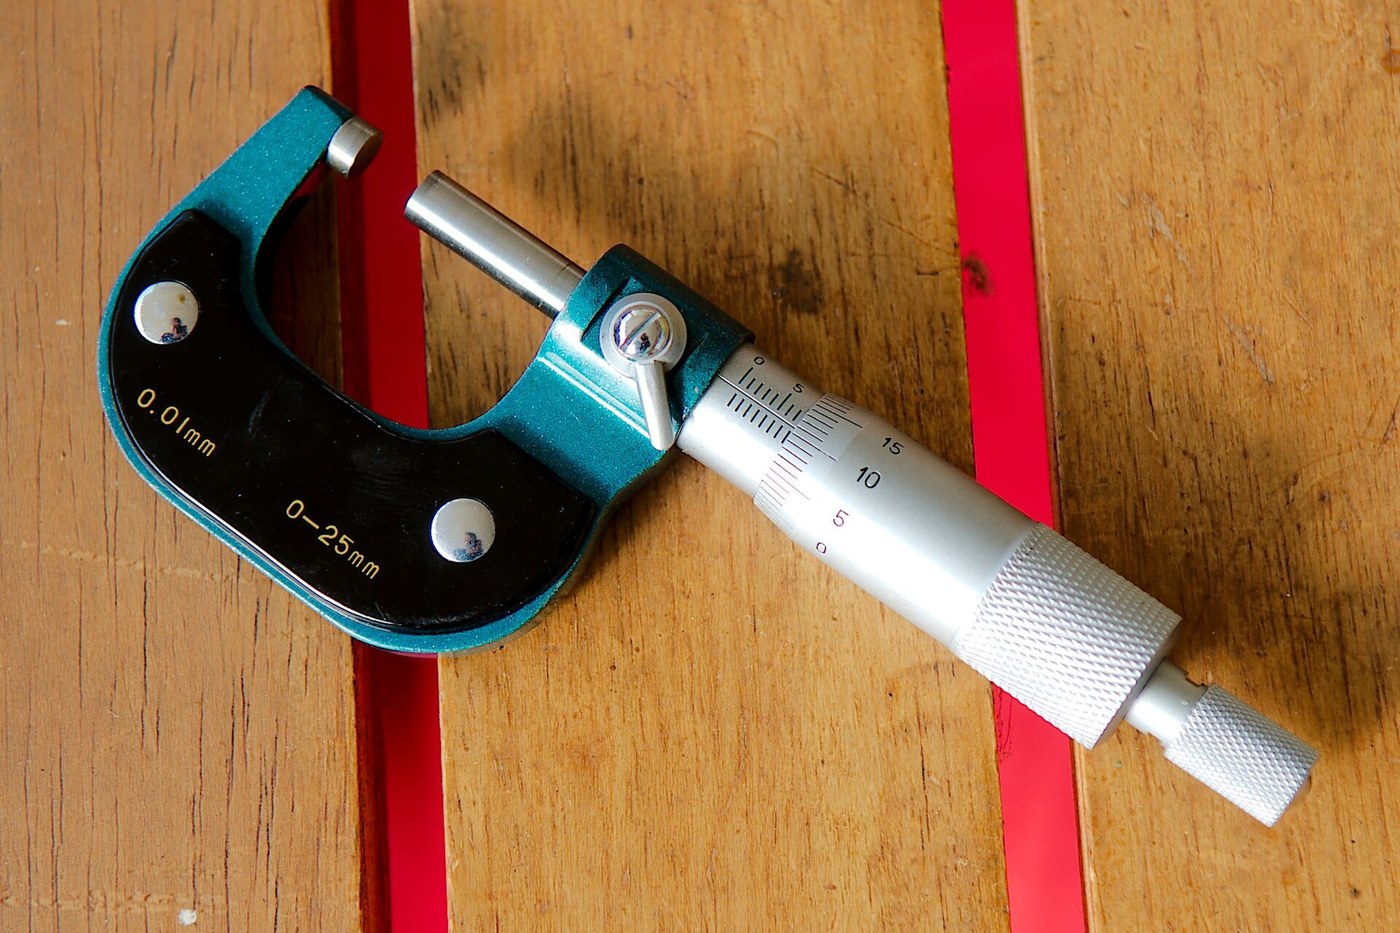


Using a Micrometer: Zero, Feel, and the Ratchet
A micrometer is a screw with a scale wrapped around it. That is the entire idea: turn a known thread through a known fraction of a turn and you have moved the spindle a known distance, magnified from an invisible axial motion into a large, readable rotation.
It resolves ten times finer than a vernier caliper, and it is ten times easier to get a wrong number out of, because the thing that decides the reading is not the scale — it is how hard you squeezed. Learning a micrometer is mostly learning a consistent FEEL, and the ratchet exists to take that decision away from your hand.
This rung assumes you can read a vernier, because the finest micrometers carry one on the sleeve.
Pemula
3 hours
Arahan
1
1
Work out what one turn is worth
Work out what one turn is worth
Close the micrometer, then open it exactly one full turn of the thimble and read how far the spindle moved on the sleeve scale.
On a standard metric micrometer the spindle thread has a pitch of 0.5 mm, so one turn is 0.5 mm and the 50 divisions around the thimble are 0.01 mm each. On an inch micrometer the thread is 40 turns per inch, so one turn is 0.025 inch and the 25 thimble divisions are 0.001 inch each.
Do this once on your own instrument rather than taking it on trust. It also explains the instrument's range: a 0-25 mm micrometer is not arbitrary, it is the length of usable thread, which is why larger sizes come as separate frames rather than a longer screw.
Alatan diperlukan:
 Mikrometer
2
2
Read sleeve then thimble, and mind the half-millimetre
Read sleeve then thimble, and mind the half-millimetre
Read the largest whole millimetre visible on the sleeve. Check the row BELOW the line for a half-millimetre mark that is also uncovered. Then read the thimble division against the sleeve's datum line.
7 mm on top, the 0.5 mark showing beneath, and 28 on the thimble is 7 + 0.5 + 0.28 = 7.78 mm.
Missing an uncovered half-millimetre mark is the classic micrometer blunder and it is worth exactly 0.5 mm — fifty times the resolution. It happens because the thimble edge sits close to the mark when the reading is near a half. When the thimble reads near 0 or near 50, look twice at that lower row.
Alatan diperlukan:
Mikrometer Kanta Pembesar
3
3
Use the ratchet, every time, and find out why
Use the ratchet, every time, and find out why
Measure one piece of bar three times using the thimble directly and squeezing as you think right. Then measure it three times more, closing the last part of the travel on the ratchet or friction thimble until it clicks two or three times. Compare the two sets.
The hand-tightened readings will scatter and will usually read SMALL, because a micrometer frame flexes and the part compresses under load. The ratchet applies the same modest force every time, so the error becomes a constant instead of a variable — and a constant error can be calibrated out, while scatter cannot.
This is the single biggest improvement available to a beginner with a micrometer, and it costs nothing.
Bahan untuk langkah ini:
 Bar keluli mentah1 keping
Alatan diperlukan:
Mikrometer4
4
How much your grip is worth
How much your grip is worth
Memuatkan buku nota Jupyter…
Bahan untuk langkah ini:
Bar keluli mentah1 keping Bar rata aluminium1 keping
Alatan diperlukan:
Mikrometer Kalkulator
5
5
Set the zero, and check it against something real
Set the zero, and check it against something real
For a 0-25 mm micrometer, wipe the faces and close them on the ratchet; the thimble should read zero. If it does not, the sleeve is adjusted with the spanner supplied, or the thimble is released and re-indexed, depending on the instrument.
For any larger range the anvil never closes on the spindle, so you zero it against a setting standard — a length bar supplied with the micrometer, or a wrung stack of gauge blocks.
Then verify at a size in the middle of the range rather than only at zero. A micrometer can be perfect at zero and wrong at 20 mm if the thread is worn unevenly, and that is exactly the failure a zero check cannot see.
Alatan diperlukan:
Mikrometer Set blok tolok seramik
 Kain Kapas
6
6
Measure a round bar properly: rock it and take the largest
Measure a round bar properly: rock it and take the largest
Bring the anvils onto the bar and rock the micrometer gently across the diameter while closing the last of the travel on the ratchet. Take the LARGEST reading.
Any line across a circle that does not pass through the centre is shorter than the diameter, so every error of alignment reads small and never large. The maximum you can find is the diameter.
Then measure the bar at three places along its length and at two angles at each place. You are now measuring not just size but TAPER and OUT-OF-ROUNDNESS, and a single reading has been hiding both of them. Most stock is not as round as it looks, and the difference matters the moment it has to fit something.
Bahan untuk langkah ini:
 Bar Loyang1 keping
Alatan diperlukan:
MikrometerBahan
3- 1 kepingPemegang Tempat
- 1 kepingPemegang Tempat
- 1 kepingPemegang Tempat
Alatan Diperlukan
5- Pemegang Tempat
- Pemegang Tempat
- Pemegang Tempat
- Pemegang Tempat
- Pemegang Tempat
Blueprint berkaitan
Blueprint ini berkongsi pengetahuan — teknik, bahan atau prinsip

CC0 Domain Awam
Blueprint ini dikeluarkan di bawah CC0. Anda bebas menyalin, mengubah, mengedar, dan menggunakan karya ini untuk sebarang tujuan, tanpa meminta kebenaran.
Sokong Pembuat dengan membeli produk melalui Blueprint mereka di mana mereka memperoleh Komisen Pembuat ditetapkan oleh Penjual, atau cipta iterasi baru Blueprint ini dan sertakan ia sebagai sambungan dalam Blueprint anda sendiri untuk berkongsi hasil.