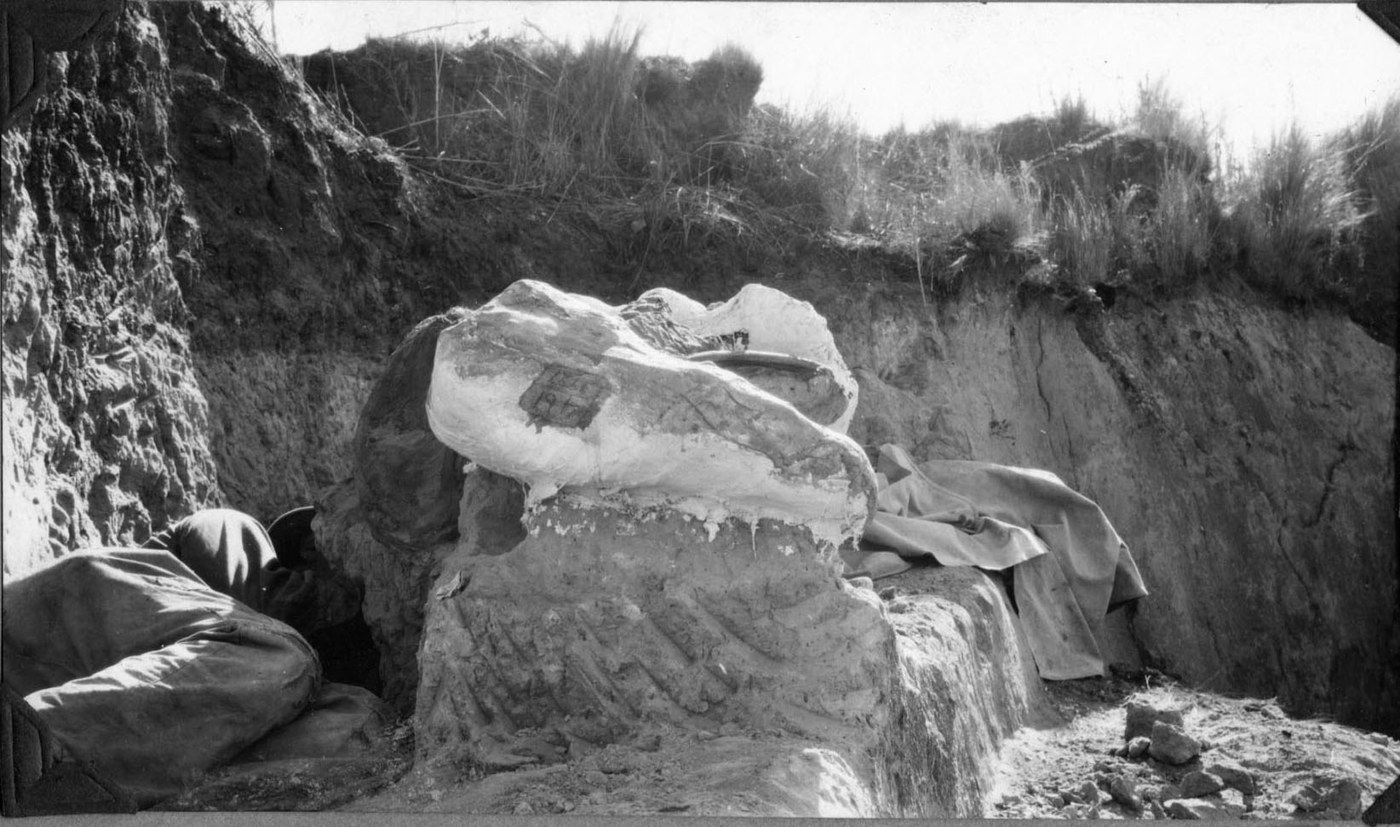


Plaster Field Jacket
A fossil bone that has sat in rock for eighty million years is usually held together by the rock. Free it in the field and it falls apart in your hands — cracked, mineral-weakened, and often softer than the matrix around it. The problem is not finding fossils. It is moving them.
The plaster field jacket solves it by refusing to separate the fossil from its rock at all. You leave the specimen embedded in a block of matrix, wrap that whole block in plaster-soaked burlap until it is a rigid shell, and ship the shell. The preparation happens years later in a laboratory, under a microscope, with the jacket opened like a clamshell.
The method dates from the 1870s and is essentially unchanged, because nothing better has been found.
निर्देशनहरू
Confirm you are allowed to collect at all
Confirm you are allowed to collect at all
Vertebrate fossils are legally protected in most countries and on most public land, and collecting without a permit is an offence. Check the law for your jurisdiction and landowner before a tool touches the ground. An illegally collected specimen is scientifically worthless as well as illegal — no museum will accept it.
Record the site before you disturb it
Record the site before you disturb it
Photograph the exposure, record coordinates, the rock unit and the bed the specimen came from. A fossil without stratigraphic context has lost most of its information — the age and environment come from the rock, not the bone.
Expose the top and sides only
Expose the top and sides only
Work the overburden down with hand tools until the upper surface of the specimen is defined and you know its outline. Do not chase the bone downward and do not clean it — dirt is protection at this stage.
चाहिने औजार:
 जीवाश्म खन्ने किट
Consolidate any cracks with dilute adhesive
Consolidate any cracks with dilute adhesive
Brush a thin reversible consolidant, such as dilute B-72 in acetone, into visible cracks and let it wick in. Use it thin and only where needed — a thick surface skin traps moisture and causes worse problems later.
Trench around the specimen to leave a pedestal
Trench around the specimen to leave a pedestal
Dig a channel right around the block, at least a hand's width clear of the fossil on every side, and deeper than the fossil goes. You are carving a mushroom of rock with the specimen inside the cap.
Undercut the pedestal at the base
Undercut the pedestal at the base
Cut inward at the bottom of the trench to narrow the stem. Undercut enough that the block will snap free cleanly when the time comes — but not so much that it topples while you are plastering.
Lay a separator over everything the plaster will touch
Lay a separator over everything the plaster will touch
Cover the exposed rock and fossil completely with damp paper towel, tissue or aluminium foil. This is the step that cannot be skipped. Plaster keyed directly onto bone cannot be removed in the laboratory without destroying the specimen.
यस चरणका सामग्री:
 अम्लविहीन पातलो कागज4 पाना
 एल्युमिनियम पत्र1 रोल
Cut burlap into manageable strips
Cut burlap into manageable strips
Tear or cut hessian into strips roughly 80-150 mm wide and long enough to cross the block and lap onto the pedestal. Prepare them all before mixing plaster — you will not have time afterwards.
यस चरणका सामग्री:
 बोरा कपडा2 sqm
Mix plaster to the consistency of thick cream
Mix plaster to the consistency of thick cream
Sift plaster of Paris into water — not water into plaster — until islands stop sinking, then stir smooth. Mix only what you can use in a few minutes; it begins to set as soon as it is wet.
यस चरणका सामग्री:
 प्लास्टर अफ प्यारिस5 केजी
Apply the first layer of soaked burlap
Apply the first layer of soaked burlap
Draw each strip through the plaster, strip off the excess between two fingers, and lay it over the block so it beds down onto the separator. Overlap every strip by half its width.
Build up three to four layers, crossing directions
Build up three to four layers, crossing directions
Run each successive layer across the one below. The strength comes from the burlap fibre, not the plaster — plaster alone cracks under its own weight on a large block.
Add wooden splints to anything large
Add wooden splints to anything large
For a block over about 300 mm across, bed timber battens into the wet plaster and bandage over them. A heavy jacket flexes in transit, and a flexing jacket grinds the specimen inside it.
Let it set hard, then break the pedestal
Let it set hard, then break the pedestal
Wait until the plaster is warm and rigid — the set is exothermic, so heat means it is working. Then lever or chisel the undercut stem until the block parts from the bedrock.
Roll it over and jacket the underside
Roll it over and jacket the underside
Turn the block carefully, trim any loose matrix, apply separator to the new face, and plaster the bottom the same way. The specimen is now fully enclosed.
Label the jacket while it is still wet
Label the jacket while it is still wet
Write the field number, locality, date, collector and a large arrow marked TOP directly onto the plaster. Jackets sit in stores for decades and an unlabelled one is a mystery block nobody will open.
History & Context — the shell that made palaeontology portable
History & Context — the shell that made palaeontology portable
The problem was transport, not discovery. The fossil fields of the American West opened in the 1870s, in the middle of the rivalry between Othniel Marsh and Edward Cope, and the bottleneck was immediate: specimens that survived eighty million years in rock disintegrated on the wagon ride east. The plaster-and-burlap jacket is generally credited to Charles H. Sternberg, working in the late 1870s, though as with many field techniques the first use is not cleanly documented and rice-paste, flour-paste and rag-and-glue wrappings were all tried in the same period. What is certain is that the plaster jacket won, and that it is still standard practice on every professional dig today.
Why the rock is kept. The instinct is to free the beautiful bone in the field. It is the wrong instinct. Matrix supports the specimen mechanically, and it also carries evidence — associated microfossils, pollen, sediment structures, the exact three-dimensional arrangement of scattered elements. Preparation is destructive and irreversible, so it belongs in a laboratory where it can be done slowly and recorded, not on a hillside in the wind.
What the plaster is doing chemically. Plaster of Paris is calcium sulfate hemihydrate. Adding water rehydrates it to gypsum, which crystallises as an interlocking mesh — that is why it warms as it sets and why the reaction cannot be reversed by drying. It is a different chemistry from lime plaster, which sets slowly by absorbing carbon dioxide from the air; gypsum's speed is exactly what a field team needs before the light goes.
The mistake that ruins specimens. Omitting or skimping the separator layer. Wet plaster keys into every pore of exposed bone, and in the laboratory the only way to remove it is mechanically, taking bone surface with it. Preparators regularly open century-old jackets to find the specimen fused to its own shell. The damp paper towel is the cheapest and most important material in this blueprint.
सामग्री
4- 4 पानाप्लेसहोल्डर
- 1 रोलप्लेसहोल्डर
- 2 sqmप्लेसहोल्डर
- 5 केजीप्लेसहोल्डर
आवश्यक उपकरणहरू
1- प्लेसहोल्डर
सम्बन्धित ब्लुप्रिन्ट
यी ब्लुप्रिन्टहरूले ज्ञान साझा गर्छन् — प्रविधि, सामग्री वा सिद्धान्त

CC0 सार्वजनिक डोमेन
यो ब्लुप्रिन्ट CC0 अन्तर्गत जारी गरिएको छ। तपाईं अनुमति नसोधी प्रतिलिपि, परिमार्जन, वितरण र प्रयोग गर्न सक्नुहुन्छ।
ब्लुप्रिन्ट मार्फत उत्पादनहरू किनेर सिर्जनाकर्तालाई सहयोग गर्नुहोस् सिर्जनाकर्ता कमिसन विक्रेताले तोकेको, वा यो ब्लुप्रिन्टको नयाँ संस्करण बनाउनुहोस् र आम्दानी बाँड्न आफ्नो ब्लुप्रिन्टमा जडानको रूपमा समावेश गर्नुहोस्।