
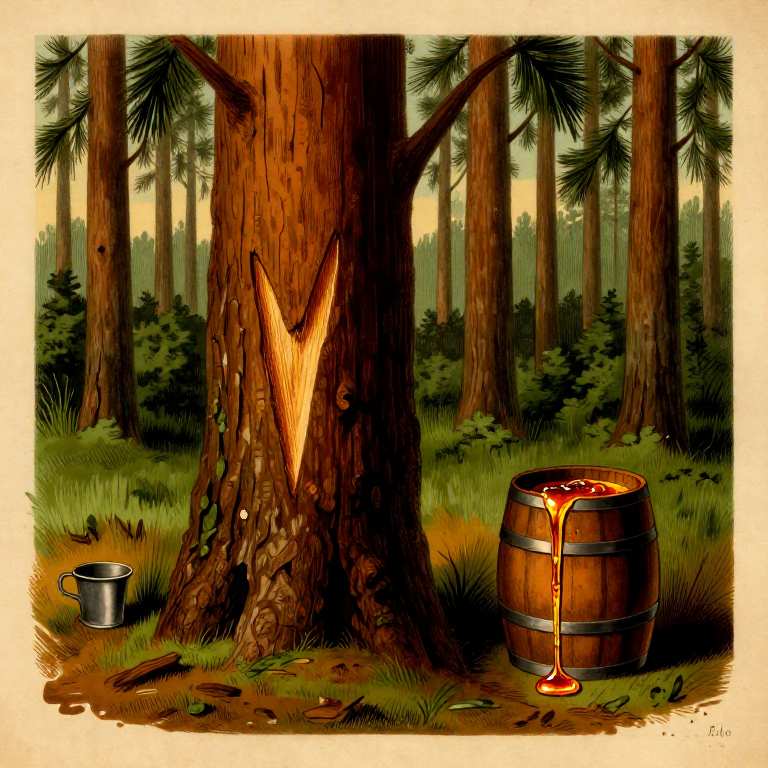
पाइन रुखहरूबाट रेजिन ट्यापिङ — लङ्गलीफ पाइनबाट नेभल स्टोरहरू संग्रह गर्दै
लङ्गलीफ पाइन (Pinus palustris) र अन्य दक्षिणी पाइन प्रजातिहरूबाट ओलिओरेजिनको लागि ट्यापिङ गर्ने विस्तृत गाइड — कच्चा सामग्री जसले टर्पेन्टाइन र रोजिन उपज दिन्छ, ऐतिहासिक रूपमा नेभल स्टोरहरू भनिन्छ। अमेरिकी दक्षिणपूर्व (जर्जिया, फ्लोरिडा, क्यारोलिनाहरू) १८औं देखि २०औं शताब्दीसम्म नेभल स्टोरहरूको विश्वको सबैभन्दा ठूलो उत्पादक थियो। ओलिओरेजिन अस्थिर टर्पेनेसको प्राकृतिक मिश्रण हो (टर्पेन्टाइन, लगभग २०%) र ठोस डिटर्पेन एसिड (रोजिन, लगभग ८०%)। यो ब्लूप्रिन्टले पूर्ण प्रक्रिया समेटिएको छ: परिपक्व रुखहरू छनोट गर्दै, क्याटफेस काटिदै, संग्रह गटरहरू र कपहरू स्थापना गर्दै, रेजिन प्रवाह बढाउन सल्फ्यूरिक एसिड उद्दीपक लागु गर्दै, ट्यापिङ सीजन (मार्च देखि नोभेम्बरसम्म) मार्फत एकाधिक राउन्डहरूमा ओलिओरेजिन संग्रह गरी र छान्दै, र अगिलो सीजनको लागि तयार गर्दै।
Instructions
सल्लाको ओलियोरेजिन र नौसैनिक सामग्री बुझ्नुहोस्
सल्लाको ओलियोरेजिन एक चिप्लो र गाढा पदार्थ हो जुन सल्लाका रूखहरूले कीरा र ढुसी रोगजनकहरू विरुद्ध रक्षा तन्त्रको रूपमा उत्पादन गर्छन्। जब सल्लाको रूखको बोक्रा घाइते हुन्छ, सारकाठमा रहेका रेजिन नलीहरूले घाउ बन्द गर्न ओलियोरेजिन स्राव गर्छन्। ओलियोरेजिन दुई मुख्य अवयवहरूको मिश्रण हो: टर्पेन्टाइन (वाष्पशील मोनोटर्पेनहरू र सेस्क्विटर्पेनहरू, मुख्यतया अल्फा-पाइनिन र बेटा-पाइनिन, ताजा ओलियोरेजिनको लगभग 20% हुन्छ) र रोजिन (ठोस डाइटर्पेन रेजिन एसिडहरू, मुख्यतया एबिएटिक एसिड र पिमारिक एसिड, लगभग 80% हुन्छ)। "नौसैनिक सामग्री" शब्द काठको जहाज निर्माणमा टार, पिच, टर्पेन्टाइन र रोजिनको ऐतिहासिक प्रयोगबाट आएको हो — जोडहरू सिल गर्न, हलहरू जलरोधी बनाउन, र डोरी तथा तार-जालको उपचार गर्न। लामो पातको सल्ला (Pinus palustris) अमेरिकी नौसैनिक सामग्री उद्योगमा मुख्य प्रजाति थियो, स्ल्यास सल्ला (Pinus elliottii) सँगै। एउटा रूखले प्रति टेपिङ सिजनमा लगभग 2 देखि 4 किलोग्राम ओलियोरेजिन उत्पादन गर्छ।
उपयुक्त सल्लाका रूखहरू छान्नुहोस्
कम्तीमा 30 सेन्टिमिटर छातीको उचाइमा व्यास (DBH) भएका स्वस्थ लामो पातको सल्ला (Pinus palustris) वा स्ल्यास सल्ला (Pinus elliottii) रूखहरू छान्नुहोस्। रूखमा सिधा खम्बा, स्वस्थ मुकुट हुनुपर्छ र गम्भीर कीरा क्षति वा रोगका कुनै संकेत हुनु हुँदैन। बाटो वा संरचनाहरू नजिकका रूखहरू जोगाउनुहोस् जुन टेपिङबाट कमजोर हुन सक्छन्। व्यवस्थित वनमा, रूखहरू सामान्यतया पहिलो टेपिङ अगाडि 20 देखि 30 वर्षका हुन्छन्। छानिएका रूखहरूलाई आँखाको तहमा पेन्ट वा झण्डा टेपले चिन्ह लगाउनुहोस्। 30 देखि 40 सेमी DBH का रूखहरूमा दुईभन्दा बढी मुख नटेप्ने योजना बनाउनुहोस्, र 40 सेमी DBH भन्दा ठूला रूखहरूमा तीनवटासम्म मुख। अत्यधिक टेपिङले रूखलाई तनाव दिन्छ र समयसँगै रेजिनको गुणस्तर र उत्पादन कम गर्छ।
Materials for this step:
Flagging Tape1 रोलTools needed:
Diameter Tape (DBH Tape)औजार र उपकरण तयार पार्नुहोस्
औजार र उपकरण तयार पार्नुहोस्
सल्लाको वनमा जानु अघि सबै आवश्यक औजारहरू जम्मा गर्नुहोस्। बोक्रा ह्याक (बोक्रा चिपर वा पुलर पनि भनिन्छ) मुख्य औजार हो — लगभग 3 देखि 4 सेन्टिमिटर चौडा घुम्रो ब्लेड भएको विशेष औजार जुन बोक्राको पातलो पट्टी खुर्कन र ताजा रेजिन नलीहरू उजागर गर्न प्रयोग गरिन्छ। तपाईंलाई धातुका गटरहरू (लगभग 20 सेमी लामो ग्याल्भेनाइज्ड टिनका पट्टीहरू, V-आकारमा बाकिएका) रेजिन प्रवाह चैनल गर्न, सिरामिक वा धातुका सङ्कलन कप (लगभग 0.5 देखि 1 लिटर क्षमता), गटर र कपहरू रूखमा जोड्न किला वा ब्र्याकेटहरू, र कपहरूबाट जम्मा भएको रेजिन हटाउन समतल तलभएको खुर्कने औजार ("डिपर") पनि चाहिन्छ। बोक्रा ह्याकको ब्लेड धारिलो छ भनी सुनिश्चित गर्नुहोस् — भुँडो ब्लेडले बोक्रालाई सफा सँग खुर्कनुको सट्टा च्यात्छ, जसले रूखलाई हानि पुर्याउँछ र रेजिन प्रवाह कम गर्छ।
Materials for this step:
Metal Gutter (Galvanized Tin Strip)2 टुक्रा
Ceramic Collection Cup2 टुक्रा
Galvanized Nails (7 cm)10 टुक्राTools needed:
Bark Hack (Bark Chipper)
Claw Hammer
Sharpening Fileप्रारम्भिक क्याटफेस कट बनाउनुहोस्
प्रारम्भिक क्याटफेस कट बनाउनुहोस्
"क्याटफेस" भनेको रूखको खम्बामा बोक्रा हटाइएको दागदार क्षेत्र हो जहाँ रेजिन नलीहरू उजागर गरिन्छ। जमिन तहभन्दा लगभग 15 देखि 20 सेन्टिमिटर माथिबाट सुरु गर्नुहोस्। बोक्रा ह्याक प्रयोग गरेर, V-आकारको शेभ्रन ढाँचामा बोक्राको पातलो पट्टी (कम्बियममा लगभग 1 देखि 2 मिलिमिटर गहिरो) खुर्कनुहोस्। क्याटफेस सामान्यतया 25 देखि 35 सेन्टिमिटर चौडा हुन्छ, खम्बामा केन्द्रित। पहिलो गोरेटो (पहिलो V-कट) को बाहुहरू लगभग 30 देखि 45 डिग्रीमा तल झुकिएका हुनुपर्छ, तल बीचमा एक बिन्दुमा भेट्दै। सारकाठमा सबैभन्दा बाहिरी रेजिन नलीहरू काट्न पर्याप्त गहिरो मात्र काट्नुहोस् — धेरै गहिरो काट्दा कम्बियमलाई क्षति पुग्छ र अत्यधिक घाउको तन्तु बनाउँछ। रेजिन मिनेटमै बग्न थाल्दा उजागर सतह ओसिलो र हल्का पहेँलो देखिनुपर्छ।
Tools needed:
Bark Hack (Bark Chipper)गटर र सङ्कलन कप जडान गर्नुहोस्
गटर र सङ्कलन कप जडान गर्नुहोस्
V-कटको सबैभन्दा तल्लो बिन्दु (शेभ्रनको शीर्ष) ठीक तल धातुको गटर राख्नुहोस्। गटर V-आकारको ग्याल्भेनाइज्ड टिन पट्टी हो जसले बग्ने रेजिनलाई सङ्कलन कपमा चैनल गर्छ। गटरलाई ठाउँमा राख्न एक वा दुईवटा ग्याल्भेनाइज्ड किला बोक्रामा हल्का तलतिर कोणमा हान्नुहोस्, खुला छेउ बाहिर पट्टि निस्कने गरी। सिरामिक वा धातुको सङ्कलन कप गटरको निकासमुनि किलामा झुण्ड्याउनुहोस्, वा तार ब्र्याकेट प्रयोग गरेर खम्बामा मजबुत रूपमा समात्नुहोस्। रेजिन सिधा भित्र टपक्ने गरी कप गटर मुनि राम्ररी बस्नुपर्छ। कप स्थिर छ र हावा वा जनावरले ढाल्न सक्दैन भनी सुनिश्चित गर्नुहोस्। व्यावसायिक कार्यमा, कहिलेकाहीं कपमुनि माटो वा धातुको एप्रन बढी आउने रेजिन समात्न जडान गरिन्छ।
Materials for this step:
Metal Gutter (Galvanized Tin Strip)1 टुक्रा
Ceramic Collection Cup1 टुक्रा
Galvanized Nails (7 cm)3 टुक्रा
Wire Bracket1 टुक्राTools needed:
Claw Hammerताजा कटमा अम्ल उत्प्रेरक लगाउनुहोस्
ताजा कटमा अम्ल उत्प्रेरक लगाउनुहोस्
ताजा काटिएको बोक्राको सतहमा पातलो सल्फ्युरिक अम्ल पेस्ट लगाउँदा रेजिन प्रवाह उल्लेखनीय रूपमा बढ्छ — सामान्यतया उपचार नगरिएको मुखको भन्दा 2 देखि 3 गुणा बढी। मानक उत्प्रेरक वजनले लगभग 50% सल्फ्युरिक अम्लबाट बनेको पेस्ट हो जुन निष्क्रिय पाउडर (काओलिन माटो वा पिसेको क्याल्सियम कार्बोनेट) सँग मिसाएर बाक्लो, दल्ने मिल्ने बनावट बनाइन्छ। लामो हत्केला भएको अम्ल लगाउने (साँघुरो नोजल भएको निचोड बोतल वा डबर) प्रयोग गरेर, ताजा उजागर गोरेटोमा लगभग 1 देखि 2 सेन्टिमिटर चौडा अम्ल पेस्टको पातलो पट्टी लगाउनुहोस्। अम्लले बोक्रामा घाउ निको हुने प्रक्रिया ढिलो गर्छ, रेजिन नलीहरू लामो समय खुला राख्छ। सुरक्षा: सल्फ्युरिक अम्ल संक्षारक छ। रासायनिक-प्रतिरोधी पञ्जा, सुरक्षा चस्मा र लामो बाहुला लगाउनुहोस्। छालाको सम्पर्कबाट बच्नुहोस्। अम्ल छालामा लागे, तुरुन्तै ठूलो मात्रामा पानीले धुनुहोस्। सधैं पानीको भाँडो हातमा राख्नुहोस्।
Materials for this step:
Sulfuric Acid Solution (50% concentration)0.5 लिटर
Kaolin Clay Powder0.25 kilogramTools needed:
Acid Applicator (Squeeze Bottle with Nozzle)
Chemical-Resistant Gloves
Safety Gogglesपहिलो दिनहरूमा रेजिन प्रवाह अनुगमन गर्नुहोस्
पहिलो दिनहरूमा रेजिन प्रवाह अनुगमन गर्नुहोस्
प्रारम्भिक कट र अम्ल उपचार पछि, रेजिन मिनेटमै बग्न सुरु हुनुपर्छ र केही दिनसम्म जारी रहनुपर्छ। 24 देखि 48 घण्टा पछि रूखमा जानुहोस् र रेजिन गटर र कपमा ठीकसँग बगिरहेको छ कि छैन जाँच गर्नुहोस्। रेजिन प्रवाह न्यानो मौसममा सबैभन्दा बढी हुन्छ — 25 डिग्री सेल्सियस भन्दा माथिको दिनको तापक्रमले सबैभन्दा राम्रो प्रवाह दिन्छ, जबकि 10 डिग्री सेल्सियस भन्दा कमको चिसो रातले यसलाई उल्लेखनीय रूपमा ढिलो गर्छ। अमेरिकाको दक्षिणपूर्वमा टेपिङ सिजन लगभग मार्चदेखि नोभेम्बरसम्म चल्छ। ग्रीष्ममा (जुनदेखि अगस्ट) प्रवाह दरहरू सबैभन्दा उच्च हुन्छन् जब तापक्रम र रूखको चयापचय चरम बिन्दुमा पुग्छ। यदि कप अपेक्षा भन्दा छिटो भरिँदैछ भने, ठूलो भाँडोले बदल्नुहोस्। यदि रेजिन गटरलाई बाइपास गर्दैछ भने, यसको स्थिति समायोजन गर्नुहोस् वा प्रवाह पुनःनिर्देशित गर्न सानो माटोको बाँध थप्नुहोस्।
Refreshing the Streak — Subsequent Rounds
After 2 to 4 weeks, the exposed bark surface oxidizes and resin flow slows as wound tissue begins to seal the canals. A new streak must be chipped above the previous one to reopen flow. Using the bark hack, shave a fresh strip of bark approximately 1 to 2 centimeters high directly above the previous cut, extending the catface upward. Apply acid stimulant to the new streak. This process is called "streaking" or "chipping." Over one season, the catface gradually moves upward by 30 to 50 centimeters. A single face can be worked for 5 to 7 or more years, eventually reaching 2 to 3 meters high (at which point a raised hack or ladder is needed). Each new streak reopens resin canals and restarts the flow cycle.
Materials for this step:
Sulfuric Acid Paste0.25 लिटरTools needed:
Bark Hack (Bark Chipper)
Acid Applicator (Squeeze Bottle with Nozzle)Collecting the Oleoresin — Dipping
Collecting the Oleoresin — Dipping
When the collection cup is full or near full (typically every 2 to 4 weeks), the oleoresin is harvested — a process traditionally called "dipping." Using the flat-bottomed dipper (a spatula-like scraping tool), scoop the accumulated oleoresin from the cup into a collection bucket. Also scrape any hardened resin (called "scrape" or "gum" that has dried on the face of the tree above the gutter) into the bucket separately — scrape is lower quality than cup resin (called "virgin dip" or "gum") because it has lost some of its volatile turpentine to evaporation. A healthy longleaf pine produces approximately 200 to 400 grams of oleoresin per collection round, totaling 2 to 4 kilograms over the full season.
Materials for this step:
Metal Collection Bucket (10 liter)1 टुक्राTools needed:
Resin Dipper (Flat Scraping Tool)Straining and Cleaning the Oleoresin
Straining and Cleaning the Oleoresin
Raw oleoresin collected from the cups contains bark chips, insects, pine needles, and other forest debris. Strain the oleoresin through a coarse mesh screen (2 to 3 millimeter openings) or cheesecloth into a clean storage barrel or drum. For higher purity, strain a second time through finer cheesecloth. Work in a well-ventilated area — fresh oleoresin releases turpentine vapors that are flammable and can cause dizziness and respiratory irritation with prolonged exposure. Do not strain near open flames or sparks. Strained oleoresin can be stored in sealed metal drums or barrels. Keep barrels in shade to minimize turpentine evaporation through any gaps.
Materials for this step:
Cheesecloth2 मिटर
Metal Storage Barrel (50 liter)1 टुक्राTools needed:
Coarse Mesh ScreenTransferring Oleoresin to Storage
Transferring Oleoresin to Storage
Once strained, transfer the oleoresin to sealed metal storage barrels. Historically, wooden barrels were used, but metal drums with locking lids are preferred today to prevent turpentine evaporation and contamination. Label each barrel with the date, tree face numbers, and whether the contents are cup resin or scrape. Store barrels upright in a shaded, cool location away from any heat sources or open flames. Turpentine vapor is heavier than air and can accumulate in low areas — ensure storage is well-ventilated. Oleoresin remains workable for several months in sealed containers before further processing (distillation to separate turpentine from rosin). Do not store in direct sunlight, which heats the barrel and accelerates turpentine loss.
Materials for this step:
Paper Labels5 टुक्राCleaning and Maintaining Tools
Cleaning and Maintaining Tools
After each collection round, clean all tools immediately — dried oleoresin becomes extremely difficult to remove. Soak the bark hack blade, dipper, and gutters in turpentine or mineral spirits for 15 to 20 minutes, then wipe clean with a rag. Sharpen the bark hack blade with a file after every 2 to 3 rounds — a sharp blade produces clean cuts that maximize resin flow and minimize tree damage. Inspect ceramic or metal cups for cracks and replace any damaged ones. Rinse the acid applicator with water to prevent clogging. Store tools in a dry place to prevent corrosion. Well-maintained tools produce cleaner cuts and better resin yields throughout the season.
Materials for this step:
Mineral Spirits0.5 लिटर
Cotton Rags3 टुक्राTools needed:
Sharpening FilePreparing for the Next Streak Round
Preparing for the Next Streak Round
Every 2 to 4 weeks throughout the tapping season, repeat the cycle: chip a new streak above the previous one, apply acid stimulant, and collect accumulated resin. Keep a log of each tree: date of each streak, resin yield per collection, and any signs of tree stress (excessive wound tissue, crown thinning, insect infestation). A well-managed tree receives 15 to 25 streak rounds per season. Adjust the chipping schedule based on weather — during hot, dry periods, resin flows faster and cups fill more quickly (chip every 2 weeks). During cooler or rainy spells, extend the interval to 3 to 4 weeks. Never chip more bark than necessary per round — overtapping exhausts the tree's resin production capacity.
Tools needed:
Field NotebookEnd-of-Season Tree Care and Closing
End-of-Season Tree Care and Closing
At the end of the tapping season (typically late October to November in the Southeast), make a final collection from all cups and scrape remaining hardened resin from the catfaces. Remove all cups, gutters, and nails from the trees to prevent damage over winter and allow wound tissue to form naturally. The exposed catface will gradually callus over during the dormant season. Do not seal or paint the wound — the tree's natural wound response is sufficient. Inspect each tree's crown and trunk condition. Trees showing severe decline (more than 30% crown dieback or heavy boring insect damage) should be rested for a full season before re-tapping. Healthy trees can be tapped on the same face the following spring by continuing upward from the previous year's highest streak, or a new face can be opened on the opposite side of the trunk.
Tools needed:
Resin Dipper (Flat Scraping Tool)
Claw HammerMaterials
14- 1 रोलPlaceholder
- Placeholder
- 3 टुक्राPlaceholder
- 13 टुक्राPlaceholder
- 1 टुक्राPlaceholder
- Placeholder
- 0.25 kilogramPlaceholder
- 0.25 लिटरPlaceholder
- Placeholder
- 2 मिटरPlaceholder
- 1 टुक्राPlaceholder
- 5 टुक्राPlaceholder
- 0.5 लिटरPlaceholder
- 3 टुक्राPlaceholder
Tools Required
10- Placeholder
- Placeholder
- Placeholder
- Placeholder
- Placeholder
- Placeholder
- Placeholder
- Placeholder
- Placeholder
CC0 Public Domain
This blueprint is released under CC0. You are free to copy, modify, distribute, and use this work for any purpose, without asking permission.
Support the Maker by purchasing products through their Blueprint where they earn a Maker Commission set by Vendors, or create a new iteration of this Blueprint and include it as a connection in your own Blueprint to share revenue.