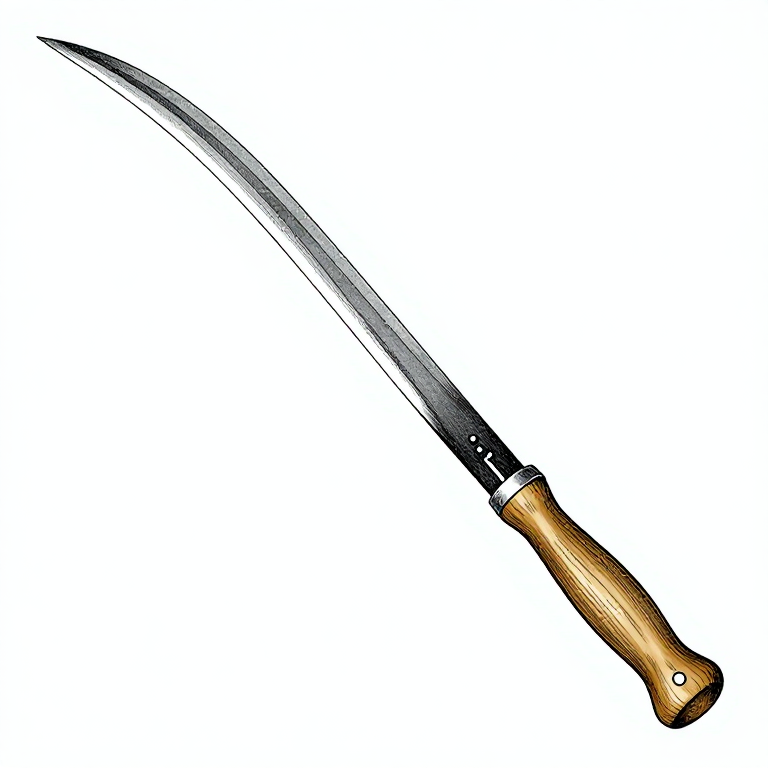


Forging a Viking Iron Sickle — The Grain Harvester
निर्देशनहरू
Prepare the Bloom Iron
Prepare the Bloom Iron
Heat a bloom iron bar in the forge until it reaches orange-hot (approximately 900-1000°C). The iron should be glowing brightly. Using a cross-peen hammer on the anvil, draw the iron out into a flat stock approximately 30cm long, 3cm wide, and 5-6mm thick. Work with steady, overlapping blows, flipping the stock regularly to maintain even thickness. Reheat as needed — bloom iron cools quickly and becomes unworkable below red heat.
Bloom iron contains slag inclusions from the bloomery process. As you draw out the stock, these inclusions will break apart and some will be expelled. This initial forging also consolidates the iron, improving its quality.
यस चरणका सामग्री:
 ब्लूम फलाम (स्पन्ज फलाम)1 bar (~500g) ग्राम
 पिँधेको कोइला500g for carburizing ग्राम
 बीँडका लागि कडा काठ1 piece (30-40cm) सेमि
 छालाको फित्ता1 strip (30cm) सेमि
 पानीBucket for quenching टुक्रा
चाहिने औजार:
 चुह्लो (आरनको आगो)
 निहुँ
निहुँ आरन
आरन आरनको चिम्टा
 खलाती
खलाती पानी दिने बाल्टिन
Forge the Curved Blade
Forge the Curved Blade
With the flat stock at forging heat (orange-hot), begin bending the blade into its characteristic crescent curve. Use the horn of the anvil as a bending form — lay the stock across the horn and hammer the ends downward to create a smooth, even curve. The inside radius should be approximately 15-20cm.
Maintain even thickness along the entire blade length as you curve it. The blade should taper slightly toward the cutting edge (thinner) and remain thicker along the spine (back edge). This geometry gives the sickle its strength while allowing a keen cutting edge.
Forge the Tang
Forge the Tang
Draw out one end of the blade into a narrow tang — a straight extension approximately 8-10cm long and 1cm wide. This tang will insert into the wooden handle. Taper it slightly toward the end so it wedges tightly into the handle.
Alternatively, for a socket-type attachment (common in some Viking-era finds), forge the end into a flat tab and curl it around a mandrel to form a conical socket that the handle slides into. The tang method is simpler and more common for sickles.
Carburize the Cutting Edge
Carburize the Cutting Edge
Pack the sickle blade edge in crushed charcoal inside a clay-lined trough or sealed clay container. Only the cutting edge needs exposure to charcoal — wrap or coat the spine with clay to protect it from carburization.
Place the packed assembly in the forge and maintain a steady high heat (bright orange, ~900°C) for 1-2 hours. Carbon from the charcoal diffuses into the iron surface, converting it to steel to a depth of approximately 1-2mm. This process — called case-hardening or cementation — was the Viking-era method for creating steel cutting edges from soft bloom iron.
Quench and Temper
Quench and Temper
Remove the blade from the charcoal pack and heat the edge uniformly to cherry-red (~800°C). Plunge the cutting edge into a bucket of water, quenching rapidly. This hardens the carburized steel layer. Quench only the edge — keep the spine softer for flexibility.
The quenched edge is now very hard but brittle. Temper it by cleaning the surface bright and gently reheating the spine with the forge or a torch. Watch the heat colors migrate toward the edge: straw-yellow (220°C) is the target for a sickle — hard enough to hold an edge but with enough toughness to resist chipping in use. Quench again when the straw color reaches the edge.
Fit the Wooden Handle
Fit the Wooden Handle
Select a straight-grained hardwood piece (ash or birch, 30-40cm long) for the handle. Drill or burn a hole into one end sized to receive the tang snugly. Drive the tang into the handle — it should fit tightly by friction.
For additional security, wrap the junction of blade and handle with a wet leather strap. As the leather dries, it shrinks and tightens, locking the tang firmly in place. Some Viking-era sickles also used an iron ferrule (a metal ring) around the handle end to prevent splitting.
Sharpen the cutting edge on a whetstone, stroking along the inside curve. The sickle is now ready for harvesting grain — grip the handle firmly and sweep the blade through the stalks close to the ground.
सामग्री
5- 1 bar (~500g) ग्रामप्लेसहोल्डर
- 500g for carburizing ग्रामप्लेसहोल्डर
- 1 piece (30-40cm) सेमिप्लेसहोल्डर
- 1 strip (30cm) सेमिप्लेसहोल्डर
- Bucket for quenching टुक्राप्लेसहोल्डर
CC0 सार्वजनिक डोमेन
यो ब्लुप्रिन्ट CC0 अन्तर्गत जारी गरिएको छ। तपाईं अनुमति नसोधी प्रतिलिपि, परिमार्जन, वितरण र प्रयोग गर्न सक्नुहुन्छ।
ब्लुप्रिन्ट मार्फत उत्पादनहरू किनेर सिर्जनाकर्तालाई सहयोग गर्नुहोस् सिर्जनाकर्ता कमिसन विक्रेताले तोकेको, वा यो ब्लुप्रिन्टको नयाँ संस्करण बनाउनुहोस् र आम्दानी बाँड्न आफ्नो ब्लुप्रिन्टमा जडानको रूपमा समावेश गर्नुहोस्।