सहयोग
कला
सुन्दरता र कल्याण
हस्तकला
संस्कृति र इतिहास
मनोरञ्जन
वातावरण
खाना र पेय
रिभर्स इन्जिनियरिङ
विज्ञान
खेलकुद
प्रविधि
पहिर्न मिल्ने
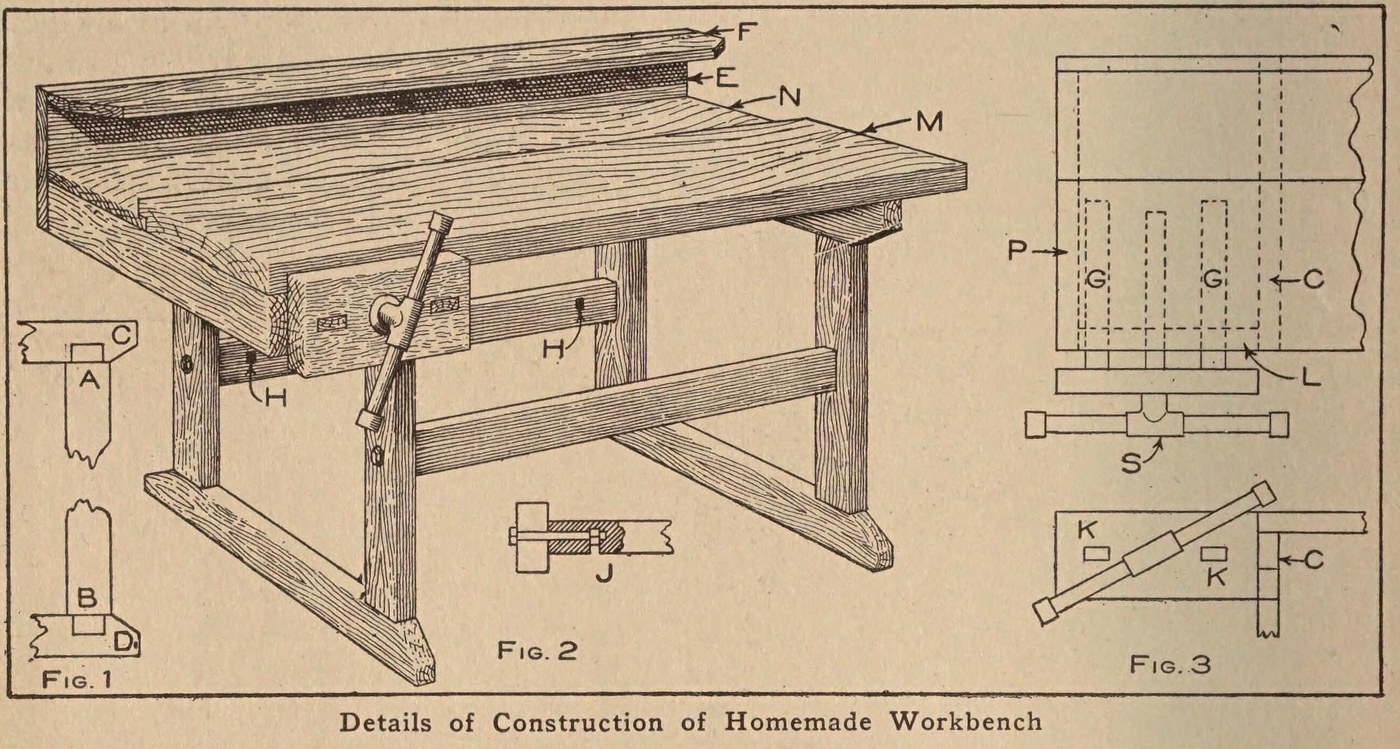


Workbench: a Pine Bench with a Plank Top and Vise (Boy Mechanic, 1913)
A boy's first workshop bench: two mortised pine leg frames bolted to braces, a 3 1/2 ft top of one 2 x 12 in plank with a back board, a tool rack behind, and a wooden vise on an iron bench screw.
Source: C. E. McKinney, Jr., 'Homemade Workbench', The Boy Mechanic, Book 1 (1913), pp. 442-443. Picture: Figs. 1-3 of the book.
मध्यम
Unknown
निर्देशनहरू
1
1
Make the two leg frames
Make the two leg frames
Cut four 2 x 4 in pine legs 23 in long with a tenon on each end 1/2 in thick, 3 1/2 in wide and 1 1/2 in long (Fig. 1, A and B). Cut four crosspieces of the same stock 20 in long, mortised in the narrow edge 1 1/4 in from each end, and slope their corners from the leg out to the middle. Fit each pair of legs to a pair of crosspieces to make the two supports.
यस चरणका सामग्री:
 सल्लाको काठ1 2 x 4 in: legs, crosspieces
चाहिने औजार:
 हाते आरा
 चुलको छिनो
 घन
2
2
Brace them together
Brace them together
Join the supports with two 2 x 4 in braces 24 in long, ends sawn square. Bore through each leg and 4 in into the centre of each brace end, bore an intersecting hole on the back of each brace for the nut, and draw each joint tight with a 3/8 x 6 in bolt (Fig. 2, J). A cross brace on the back stops rocking when planing.
यस चरणका सामग्री:
सल्लाको काठ1 2 x 4 in: braces गोलो टाउको भएको बोल्ट4 3/8 x 6 in
चाहिने औजार:
हाते आरा हातले घुमाउने ड्रिल र बिट
 मिलाउन मिल्ने पाना
3
3
Fit the plank top
Fit the plank top
Make the main top M from one 2 x 12 in plank 3 1/2 ft long. Rabbet its back edge 1/2 in to take a back board N of the same length, 8 1/2 in wide and 7/8 in thick. Screw the top to the top crosspieces with long screws.
यस चरणका सामग्री:
 कडा काठको पाटो1 2 x 12 in, 3 1/2 ft
 सल्लाको फल्याक1 back board
 काठका पेच1 long
चाहिने औजार:
हाते आरा ब्लक रन्दा
 पेचकिला - चेप्टो
4
4
Add the tool rack
Add the tool rack
Nail a board E 10 in wide to the back of the bench and fasten a 2 1/2 in board F on top of it at right angles; both 7/8 in thick and 3 1/2 ft long. Bore holes or cut notches in F to hold tools.
यस चरणका सामग्री:
सल्लाको फल्याक2 7/8 in, 3 1/2 ft काँटी1 टुक्रा
चाहिने औजार:
हातले घुमाउने ड्रिल र बिटहाते आराघन5
5
Fit the vise
Fit the vise
Fasten an iron bench screw in a 2 x 6 in block 12 in long. Mortise two guide rails 7/8 x 1 1/2 in and 20 in long into the block; they slide in mortises in a 2 x 4 piece L bolted under the top, which holds the bench-screw nut between the two mortises. Nail L to a top crosspiece and to a 2 x 4 piece P bolted under the top at the end (Fig. 3).
यस चरणका सामग्री:
सल्लाको काठ1 2 x 6 block, 2 x 4 pieces, guide rails काठ कुँद्ने बेन्चको पेच1 टुक्रागोलो टाउको भएको बोल्ट1 for L and Pकाँटी1 टुक्रा
चाहिने औजार:
हाते आराचुलको छिनोहातले घुमाउने ड्रिल र बिटमिलाउन मिल्ने पानाघनसामग्री
7- 1 2 x 6 block, 2 x 4 pieces, guide railsप्लेसहोल्डर
- 1 for L and Pप्लेसहोल्डर
- 1 2 x 12 in, 3 1/2 ftप्लेसहोल्डर
- 2 7/8 in, 3 1/2 ftप्लेसहोल्डर
- 1 longप्लेसहोल्डर
- 2 टुक्राप्लेसहोल्डर
- 1 टुक्राप्लेसहोल्डर
यो खाकाले बनाउँछ

CC0 सार्वजनिक डोमेन
यो ब्लुप्रिन्ट CC0 अन्तर्गत जारी गरिएको छ। तपाईं अनुमति नसोधी प्रतिलिपि, परिमार्जन, वितरण र प्रयोग गर्न सक्नुहुन्छ।
ब्लुप्रिन्ट मार्फत उत्पादनहरू किनेर सिर्जनाकर्तालाई सहयोग गर्नुहोस् सिर्जनाकर्ता कमिसन विक्रेताले तोकेको, वा यो ब्लुप्रिन्टको नयाँ संस्करण बनाउनुहोस् र आम्दानी बाँड्न आफ्नो ब्लुप्रिन्टमा जडानको रूपमा समावेश गर्नुहोस्।