تعاون
فن
خوبصورتی اور تندرستی
دستکاری
ثقافت اور تاریخ
تفریح
ماحول
خوراک اور مشروبات
ریورس انجینئرنگ
سائنسز
کھیل
ٹیکنالوجی
پہننے والے آلات


Pocket Morse Code Learning Board - v.1
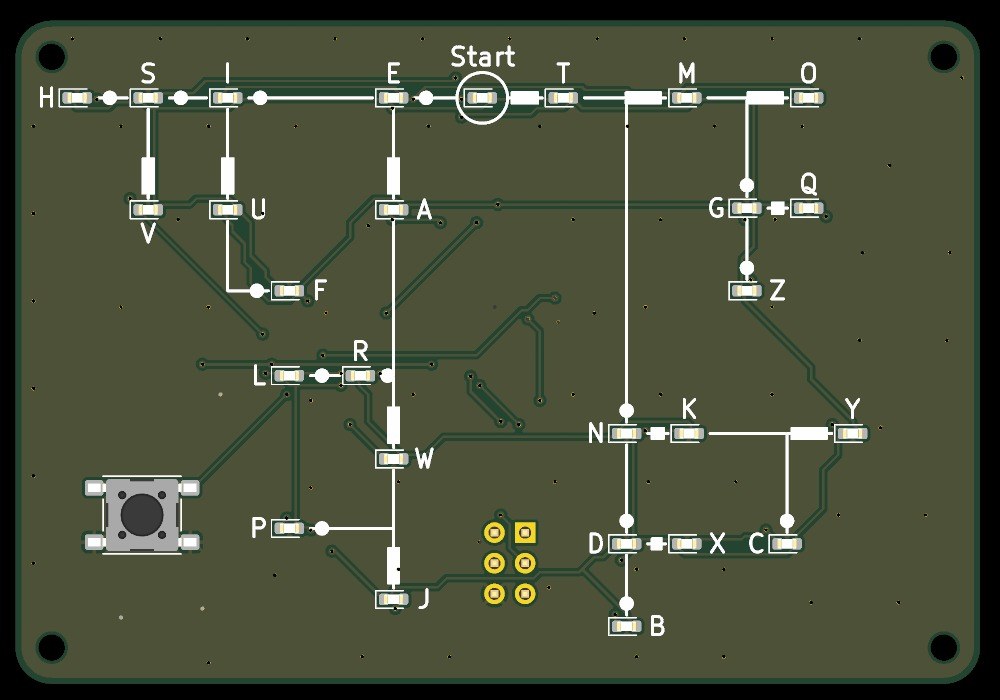
A pocket board, 80 x 55 mm, that teaches you to read Morse code. Its front is Dave Nathanson's Morse decoding chart: from Start, dots run one way and dashes the other, and every letter sits where its dots and dashes lead. Here every letter has its own LED. Press the key short for a dot and long for a dash, and the LED of the letter you have reached lights; pause, and it blinks.
It runs on one CR2032 coin cell and sleeps between uses. The board was drawn with Youblob's Draw PCB, and its checks pass, but it has not been built yet.
اعلیٰ
About 1 day, plus board delivery
ہدایات
1
1
LED current and keying speed
LED current and keying speed
Jupyter نوٹ بک لوڈ ہو رہی ہے…
2
2
The code it decodes
The code it decodes
This board reads the International Morse code letters as ITU-R M.1677-1 gives them.
3
3
Read the chart
Read the chart
Dave Nathanson (KG6ZJO) drew his decoding chart in 2010: "Start with your finger at "Start Here". Then move your finger to track the Morse dots & dashes. You will arrive at the correct letter!" On this board the LEDs do the tracking. ITU-R M.1677-1: "A dash is equal to three dots."
4
4
The schematic
The schematic
ATmega328P on its internal 8 MHz clock, straight from the coin cell; 27 LEDs charlieplexed on PC0-PC5 through six 330 Ω resistors; the key on INT0; a 2x3 ISP footprint.
KiCanvas ویور لوڈ ہو رہا ہے...
پیشہ ور PCB ڈیزائن ویور
5
5
The board
The board
Two layers, 80 x 55 mm. The chart, LEDs and key on the front; the chip, resistors, capacitors and cell holder on the back.
KiCanvas ویور لوڈ ہو رہا ہے...
پیشہ ور PCB ڈیزائن ویور
6
6
Order the board
Order the board
Open the board in KiCad and plot Gerber and drill files (File > Fabrication Outputs). Order a two-layer board, 1.6 mm thick, from any board maker that takes Gerbers.
اس مرحلے کے لیے مواد:
 چھپا ہوا سرکٹ بورڈ1 ٹکڑا
درکار اوزار:
 Arduino IDE والا کمپیوٹر
7
7
Solder the parts
Solder the parts
Back first: paste and reflow U1, R1-R7, C1-C3 and the cell holder BT1 with hot air. Then the front: the 27 red LEDs D1-D27 with pad 1 (cathode) as the board's assembly drawing shows, and the key SW1. Leave J1 empty. Clean off the flux, then test each LED's direction with the meter's diode test.
اس مرحلے کے لیے مواد:
 ATmega328P مائیکروکنٹرولر1 ٹکڑا
 چپ LED27 ٹکڑے
 چپ ریزسٹر7 ٹکڑے
 سرامک چپ کپیسٹر3 ٹکڑے
 دبانے کا بٹن1 ٹکڑا
 بیٹری کا خانہ1 ٹکڑا
 سولڈر پیسٹ (سیسے کے بغیر)1 ٹکڑا
 ٹانکے کا تار1 ٹکڑا
درکار اوزار:
 گرم ہوا مرمت اسٹیشن
 ٹانکا لگانے کی سلاخ
 نوکیلی چمٹی
 فلکس
 عدسی
 ملٹی میٹر
 آئسو پروپائل الکحل ۹۹ فیصد
8
8
The firmware
The firmware
pocket_morse_decoder_az.ino: every timing is a named constant at the top of the sketch. Board in the Arduino IDE: Arduino Pro or Pro Mini, ATmega328P (3.3V, 8 MHz).
pocket_morse_decoder_az.inoarduino
9
9
Set the fuses and upload
Set the fuses and upload
Do not use Burn Bootloader: the Pro board setting expects a crystal, and this board has none. Hold an ISP programmer's 2x3 pins on J1 and set the internal 8 MHz clock: avrdude -c usbasp -p m328p -U lfuse:w:0xE2:m -U hfuse:w:0xD9:m -U efuse:w:0xFF:m. Then, in the Arduino IDE, use Sketch > Upload Using Programmer.
درکار اوزار:
 AVR ISP پروگرامرArduino IDE والا کمپیوٹر
10
10
Print the back shell
Print the back shell
An open-front shell, 84.8 x 59.8 x 8.9 mm, with four standoffs for M2 screws, a slot to slide the cell out and a window under J1. PLA, 0.2 mm layers, 20 % infill, printed on its floor.
11
11
Fit the shell
Fit the shell
The shell leaves 5.0 mm for the back parts: measure your cell holder with a cell in it before you print. Check the holder's open side faces the board's left edge, where the shell's cell slot is. Slide in a CR2032 and screw the board into the shell with four M2 self-tapping screws.
اس مرحلے کے لیے مواد:
 PLA فلامنٹ1 ٹکڑا
 خود چوڑی کاٹنے والا پیچ4 ٹکڑے
 سکہ نما بیٹری CR20321 ٹکڑا
درکار اوزار:
 تار والا 3D پرنٹر (FDM)
 ورنیئر کیلیپر
 باریک پیچ کش سیٹ
12
12
Troubleshooting
Troubleshooting
Pocket Morse decoder troubleshooting.
Flow
Loading...
13
13
History and honest limits
History and honest limits
The chart is **Dave Nathanson**'s (KG6ZJO), drawn in 2010 and shared as copyleft; his post says it is a novel way to decode by following a path. The letter codes are ITU-R M.1677-1's. The board, sizes, parts and timings are ours, drawn with Youblob's Draw PCB: its ERC and DRC pass with no errors and every LED's wiring was checked against the firmware by script, but it has not been built, flashed or tested.
مواد
12- 1 ٹکڑاپلیس ہولڈر
- پلیس ہولڈر
- 27 ٹکڑےپلیس ہولڈر
- 7 ٹکڑےپلیس ہولڈر
- 3 ٹکڑےپلیس ہولڈر
- پلیس ہولڈر
- پلیس ہولڈر
- پلیس ہولڈر
- 1 ٹکڑاپلیس ہولڈر
- 1 ٹکڑاپلیس ہولڈر
- 4 ٹکڑےپلیس ہولڈر
- 1 ٹکڑاپلیس ہولڈر
درکار اوزار
12- پلیس ہولڈر
- پلیس ہولڈر
- 2 vendors sell this, none ship to you yetپلیس ہولڈر
- پلیس ہولڈر
- پلیس ہولڈر
- پلیس ہولڈر
- پلیس ہولڈر
- پلیس ہولڈر
- پلیس ہولڈر
- پلیس ہولڈر
- پلیس ہولڈر
- پلیس ہولڈر
ڈیزائن فائلیں
1یہ بلوپرنٹ بناتا ہے

متعلقہ بلیو پرنٹ
یہ بلیو پرنٹ علم بانٹتے ہیں — تکنیک، مواد یا اصول


CC0 پبلک ڈومین
یہ بلیو پرنٹ CC0 کے تحت جاری کیا گیا ہے۔ آپ اجازت لیے بغیر اس کام کو نقل، ترمیم، تقسیم اور کسی بھی مقصد کے لیے استعمال کرنے کے لیے آزاد ہیں۔
میکر کی حمایت کریں ان کے بلیو پرنٹ کے ذریعے پروڈکٹس خرید کر جہاں وہ میکر کمیشن وینڈرز کی طرف سے مقرر، کماتے ہیں، یا اس بلیو پرنٹ کی نئی تکرار بنائیں اور آمدنی شیئر کرنے کے لیے اسے اپنے بلیو پرنٹ میں کنکشن کے طور پر شامل کریں۔