تعاون
فن
خوبصورتی اور تندرستی
دستکاری
ثقافت اور تاریخ
تفریح
ماحول
خوراک اور مشروبات
ریورس انجینئرنگ
سائنسز
کھیل
ٹیکنالوجی
پہننے والے آلات
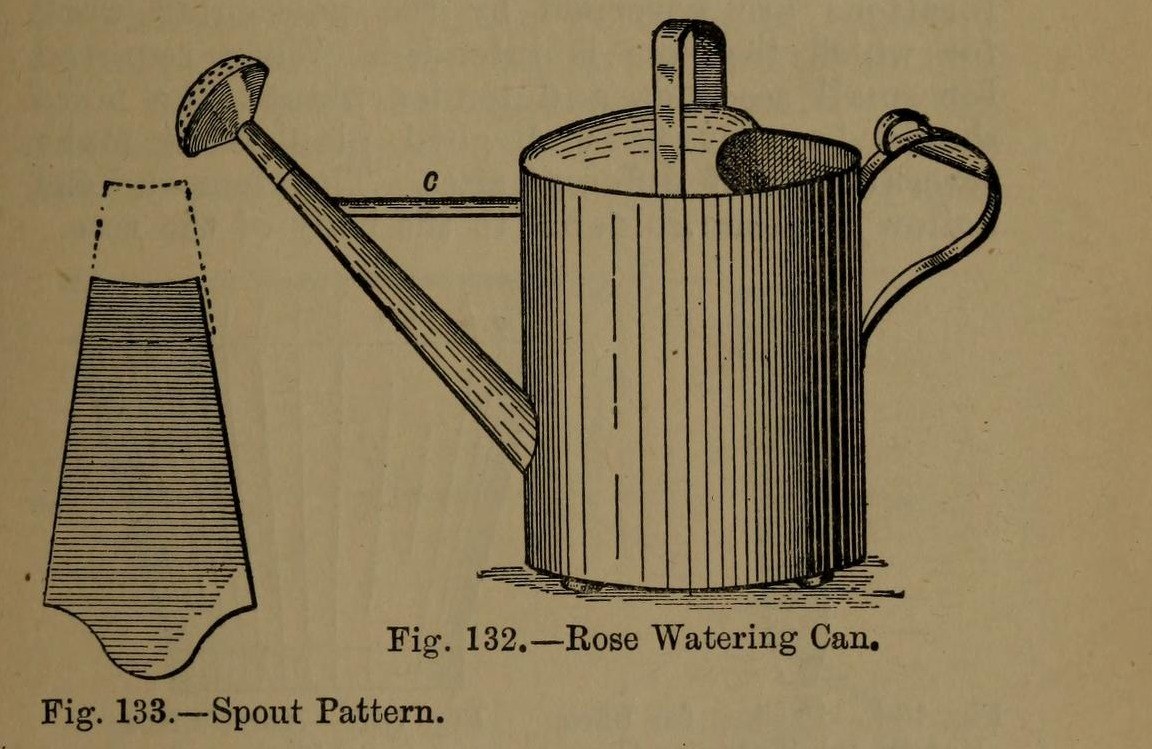


Watering Can: the Tinplate Rose Watering-Can (Hasluck, 1907)
A tinsmith's garden watering can: a round body from one sheet 2 ft 1 in x 8 1/2 in, a two-piece spout with a perforated rose, a hollowed top with a cross handle, and a back handle with a thumb ring. Tinplate or galvanised iron.
Variable: the rose. Its pattern diameter is the rose diameter x 4 / 3; finer holes for seedlings.
Source: Paul N. Hasluck, Tinplate Work (1907), pp. 54-57. Unknown: solder. Picture: Figs. 132-135 of the book.
درمیانہ
Unknown
ہدایات
1
1
Make the body and bottom
Make the body and bottom
Cut a sheet 2 ft 1 in by 8 1/2 in. Wire one edge, sink it in the crease iron, round it and groove the seam; solder the seam inside. Cut the spout hole opposite the seam, 2 1/2 in from the bottom. Edge the bottom to fit, beat it up and solder it from inside.
اس مرحلے کے لیے مواد:
 ٹین چڑھی چادر1 body, bottom
 لوہے کا تار1 edge
 ٹن-سیسے کا ٹانکہ1 ٹکڑا
درکار اوزار:
 چادر کاٹنے کی قینچی
 کھونٹا
 لکڑی کا ہتھوڑا
 برقی سولڈرنگ آئرن
 فلکس
2
2
Make and fit the spout
Make and fit the spout
Cut the spout in two pieces (Fig. 133), bend them to shape and solder the seams. Solder the larger piece into the body. Make it longer for plants out of reach, with an elbow for plants up high. Make the stay: a taper strip as long as the gap between can and spout, bent to a half-round section and soldered in.
اس مرحلے کے لیے مواد:
ٹین چڑھی چادر1 spout, stayٹن-سیسے کا ٹانکہ1 ٹکڑادرکار اوزار:
چادر کاٹنے کی قینچیکھونٹابرقی سولڈرنگ آئرنفلکس3
3
Make the rose
Make the rose
Set out the rose body (Fig. 135): its diameter is the rose diameter x 4 / 3, so a 3 in rose needs a 4 in pattern, with lines a b at right angles. Bend it over a funnel stake and solder the seam. Hollow a disc for the front, with edges for capping on. Inside the hollow, mark circles and pierce them at intervals with a bradawl over a hard wood block; very fine for seedlings. Solder front and stem to the rose body. Several roses of different sizes are useful.
اس مرحلے کے لیے مواد:
ٹین چڑھی چادر1 roseٹن-سیسے کا ٹانکہ1 ٹکڑادرکار اوزار:
 دو نوکوں والا پرکارچادر کاٹنے کی قینچیکھونٹا
 ہموار کرنے والی ہتھوڑی
 سنبہ
 سخت لکڑی کا ٹکڑابرقی سولڈرنگ آئرنفلکس
4
4
Fit the top and handles
Fit the top and handles
Hollow the top (Fig. 134), fit it to the body, wire its inner arc and solder it on. Cross handle: a strip about 1 3/4 in wide, wired with No. 12 B.W.G., bent to shape; cut two holes in the top with a small sharp chisel and solder the ends inside and on top. Back handle (Fig. 136): wire and bend it, solder a small boss under its upper part, and solder it opposite the spout with a thumb ring at the top. Solder three small hollowed studs under the bottom.
اس مرحلے کے لیے مواد:
ٹین چڑھی چادر1 top, handles, studsلوہے کا تار1 No. 12 B.W.G.ٹن-سیسے کا ٹانکہ1 ٹکڑادرکار اوزار:
چادر کاٹنے کی قینچیہموار کرنے والی ہتھوڑی فولادی چھینیبرقی سولڈرنگ آئرنفلکس
5
5
Clean and paint
Clean and paint
Clean with turpentine and whiting. Give two good coats of paint: red inside and green outside suit it.
اس مرحلے کے لیے مواد:
 روغنی رنگ2 coats
درکار اوزار:
 تارپین
 کیلشیم کاربونیٹ (سفیدہ)
مواد
4- 1 top, handles, studsپلیس ہولڈر
- 1 No. 12 B.W.G.پلیس ہولڈر
- 4 ٹکڑےپلیس ہولڈر
- 2 coatsپلیس ہولڈر
درکار اوزار
12- پلیس ہولڈر
- پلیس ہولڈر
- پلیس ہولڈر
- پلیس ہولڈر
- پلیس ہولڈر
- پلیس ہولڈر
- پلیس ہولڈر
- پلیس ہولڈر
- پلیس ہولڈر
- پلیس ہولڈر
- پلیس ہولڈر
- پلیس ہولڈر
منسلک بلیو پرنٹ مواد



یہ بلوپرنٹ بناتا ہے

CC0 پبلک ڈومین
یہ بلیو پرنٹ CC0 کے تحت جاری کیا گیا ہے۔ آپ اجازت لیے بغیر اس کام کو نقل، ترمیم، تقسیم اور کسی بھی مقصد کے لیے استعمال کرنے کے لیے آزاد ہیں۔
میکر کی حمایت کریں ان کے بلیو پرنٹ کے ذریعے پروڈکٹس خرید کر جہاں وہ میکر کمیشن وینڈرز کی طرف سے مقرر، کماتے ہیں، یا اس بلیو پرنٹ کی نئی تکرار بنائیں اور آمدنی شیئر کرنے کے لیے اسے اپنے بلیو پرنٹ میں کنکشن کے طور پر شامل کریں۔