
Współpraca
SZTUKA
Piękno i dobre samopoczucie
RZEMIOSŁO
KULTURA I HISTORIA
ROZRYWKA
ŚRODOWISKO
JEDZENIE I NAPOJE
INŻYNIERIA ODWROTNA
NAUKI
LEKKOATLETYKA
TECHNOLOGIA
URZĄDZENIA DO NOSZENIA
Four-Passenger Coasting Bobsled: Iron-Shod Ash Runners, Hinged Rear Sled and Hoop Steering Wheel (Boy Mechanic, 1915)
Woody

Autor

Woody

13. listopad 2026NO
6
0
0
0
0

Four-Passenger Coasting Bobsled: Iron-Shod Ash Runners, Hinged Rear Sled and Hoop Steering Wheel (Boy Mechanic, 1915)

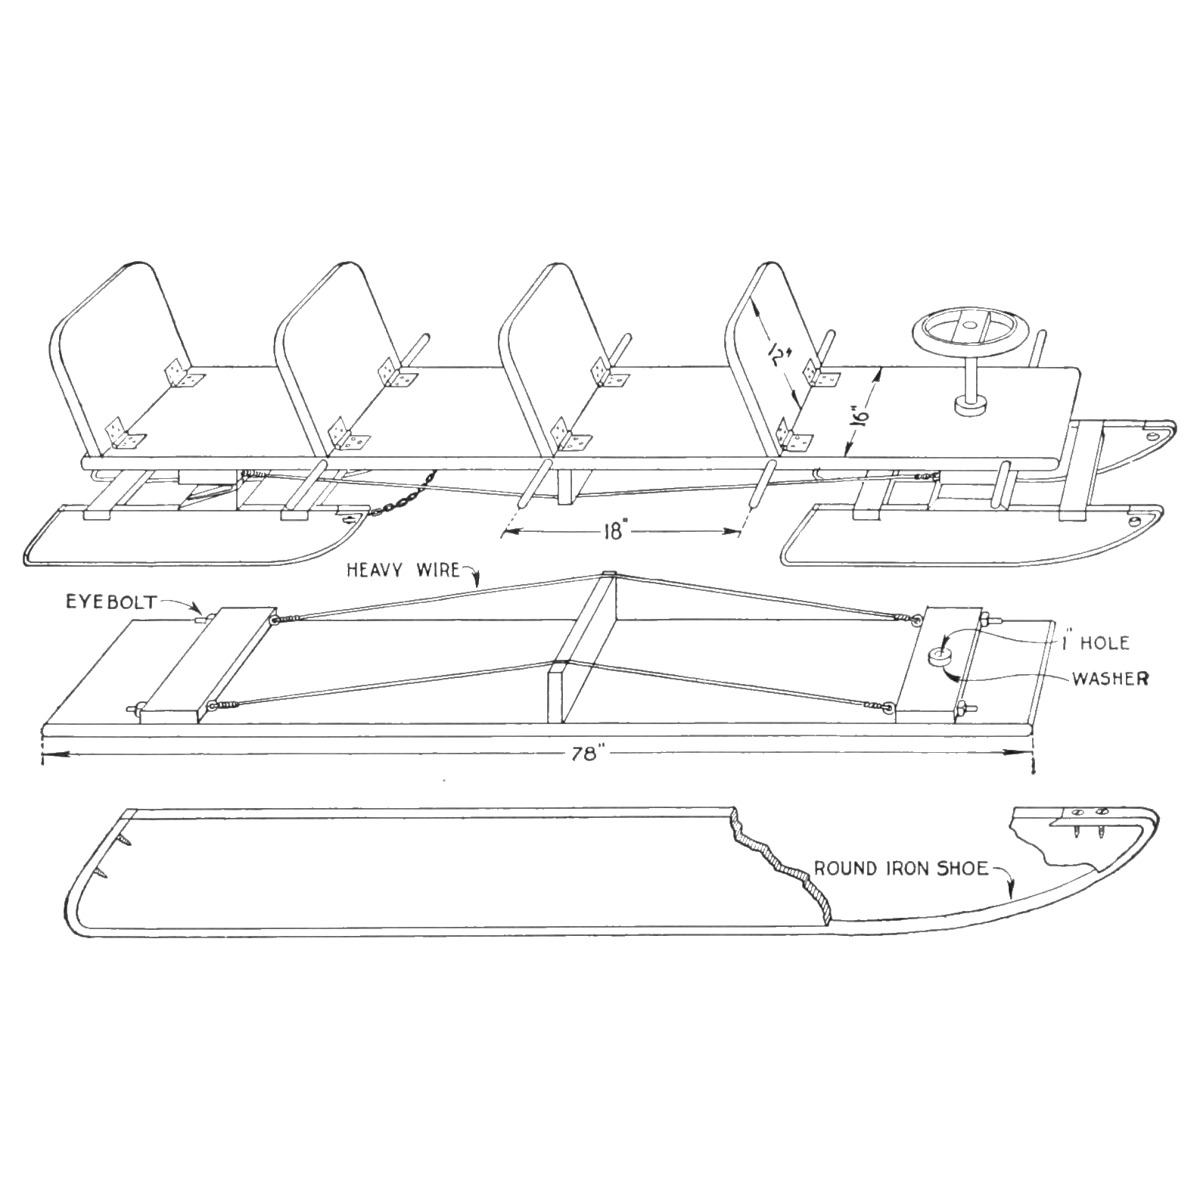
R. H. Allen's four-passenger coasting bob from The Boy Mechanic, Book 2 (1915): a 6-1/2 ft top board with four hinged seat backs, carried on two short sleds with ash runners shod in 5/8 in round iron. The rear sled rocks on a wedge and hinges to follow the ground; the front sled steers by a broom-handle post and a wheel made from a nail-keg hoop. Every size is his.
Średniozaawansowany
About 3 days

Instrukcje

1

His list of materials in centimetres

Wczytywanie notatnika Jupyter…
2

Read The Boy Mechanic, Book 2

"Any wood may be used for the sled, except for the runners, which should be made of ash." His list of materials: 1 top 6-1/2 ft x 16 in x 1-1/4 in; 4 runners 22 x 4 x 1 in; 4 crosspieces 16 x 3 x 1 in; 3 pieces 16 x 5 x 2 in; 1 piece 16 x 5 x 1 in; 1 shore 16 x 3 x 1 in; 4 seat backs 12 x 16 x 1 in; 1 dowel 3 ft x 1 in; 4 rods 5/8 in x 30 in; 4 eyebolts 1/2 x 6 in; 3 hinges 5 in strap; 8 hinges 3 in strap.
3

Shape and shoe the runners

Cut one ash runner to shape and use it as the pattern for the other three. Cut a groove about 1/4 in deep along the under edge to take the curve of a 5/8 in round iron rod. Bend each rod to fit in the groove, up the back of the runner and over the top at the front; flatten the ends and drill two holes in each for wood screws (a blacksmith can flatten them, he says). Screw the irons on.

Materiały do tego kroku:

Deska z drewna liściastegoDeska z drewna liściastego1 sztuka
Okrągły pręt żelaznyOkrągły pręt żelazny4 sztuk
Wkręty do drewnaWkręty do drewna1 sztuka

Potrzebne narzędzia:

Piła ręcznaPiła ręczna

Piłka włosowaPiłka włosowa
DłutaDłuta
Kuźnia węglowaKuźnia węglowa
KowadłoKowadło
Młotek kowalskiMłotek kowalski
Imadło warsztatoweImadło warsztatowe
Wiertarka ręcznaWiertarka ręczna
OłówekOłówek
4

Build the two sleds

Notch the top edges of each pair of runners for the 16 x 3 in crosspieces, near the ends, so the crosspieces lie flush with the runner tops and the notches of each pair line up. Fit them snugly, fasten with long, slim wood screws, and stiffen each joint inside with a small metal brace.

Materiały do tego kroku:

Deska sosnowaDeska sosnowa1 sztuka
Wkręty do drewnaWkręty do drewna1 sztuka
Kątownik montażowyKątownik montażowy8 sztuk

Potrzebne narzędzia:

Piła ręcznaPiła ręczna
DłutaDłuta
Wiertarka ręcznaWiertarka ręczna
5

Make the rocking rear joint

Cut a heavy 2 x 5 in crosspiece sloping across its width, from 2 in thick at one edge to a feather edge at the other. Fix the three large strap hinges to the sloping face, and fasten the piece solidly on the rear sled's runners with its centre 8 in from their front ends. This lets the rear sled rock but not turn sideways.

Materiały do tego kroku:

Deska sosnowaDeska sosnowa1 sztuka
Zawias pasowy żelaznyZawias pasowy żelazny3 sztuk
Wkręty do drewnaWkręty do drewna1 sztuka

Potrzebne narzędzia:

Piła ręcznaPiła ręczna
Strug ręcznyStrug ręczny
Wiertarka ręcznaWiertarka ręczna
6

Mount the front sled crosspiece

Fasten the supporting crosspiece on top of the front sled's runners with its centre 11 in from their front ends.

Materiały do tego kroku:

Deska sosnowaDeska sosnowa1 sztuka
Wkręty do drewnaWkręty do drewna1 sztuka

Potrzebne narzędzia:

Wiertarka ręcznaWiertarka ręczna
Miara zwijanaMiara zwijana
7

Brace the top board

Round both ends of the top board and plane it smooth. Underneath, fit two crosspieces, each with two 1/2 in holes bored through its width near the ends for the eyebolts: one with its centre 12 in from the rear end, the other 8 in from the front. Screw them on. Set the shore in the centre of the board, run wires over it between the eyebolts, and draw the eyebolts up until the wire is taut over the shore, so the long board cannot sag.

Materiały do tego kroku:

Deska sosnowaDeska sosnowa1 sztuka
Śruba oczkowaŚruba oczkowa4 sztuk
Drut żelaznyDrut żelazny1 sztuka
Wkręty do drewnaWkręty do drewna1 sztuka

Potrzebne narzędzia:

Piła ręcznaPiła ręczna
Strug ręcznyStrug ręczny
Świder korbowy z wiertłemŚwider korbowy z wiertłem
Miara zwijanaMiara zwijana
8

Fit the seat backs and foot rests

Round the top corners of the four backs and cut the bottom ends at a slight angle for a slant. Hinge them to the top board with the small strap hinges every 18 in, starting at the rear. Bore 1 in holes about 1 in deep in the edges of the top board every 18 in, beginning about 5 in from the front, and drive in pins 4 in long cut from the dowel, as foot rests.

Materiały do tego kroku:

Deska sosnowaDeska sosnowa1 sztuka
Zawias pasowy żelaznyZawias pasowy żelazny8 sztuk
Kołki z twardego drewnaKołki z twardego drewna1 sztuka
Wkręty do drewnaWkręty do drewna1 sztuka

Potrzebne narzędzia:

Piła ręcznaPiła ręczna
Świder korbowy z wiertłemŚwider korbowy z wiertłem
Miara zwijanaMiara zwijana
9

Make the steering

Cut a broom handle to 18 in and fasten one end in a hole bored centrally in the 5 in crosspiece of the front sled. Bore a hole in the top board through the centre of the crosspiece underneath; put two metal washers on the stick and run it up through the hole, then fasten a hardwood collar to it just above the board so the top cannot lift off the sled. For the wheel, fasten a piece of wood across a nail-keg hoop, cover the hoop with garden hose and wrap it with twine; bore the centre of the crosspiece to fit the broom handle and screw it on.

Materiały do tego kroku:

MiotłaMiotła1 sztuka
Podkładka płaskaPodkładka płaska2 sztuk
Deska z drewna liściastegoDeska z drewna liściastego1 sztuka
Obręcz żelaznaObręcz żelazna1 sztuka
Wąż gumowy zbrojonyWąż gumowy zbrojony1 sztuka
Sznurek jutowySznurek jutowy1 sztuka
Wkręty do drewnaWkręty do drewna1 sztuka

Potrzebne narzędzia:

Piła ręcznaPiła ręczna
Świder korbowy z wiertłemŚwider korbowy z wiertłem
Wiertarka ręcznaWiertarka ręczna
10

Join the sleds and fit the ropes

Fasten the rear sled to the top board with screws through the free wings of the hinges into the crosspiece. Bore holes in the front ends of all runners and attach a chain or rope: the rear one's loop to the underside of the top board, the front one for drawing the sled.

Materiały do tego kroku:

Wkręty do drewnaWkręty do drewna1 sztuka
Łańcuch żelaznyŁańcuch żelazny1 sztuka

Potrzebne narzędzia:

Świder korbowy z wiertłemŚwider korbowy z wiertłem
Wiertarka ręcznaWiertarka ręczna
11

Troubleshooting

Bobsled troubleshooting.

Flow

Loading...
12

History and honest limits

From "Four-Passenger Coasting Bobsled" by R. H. Allen, in **The Boy Mechanic, Book 2**, Popular Mechanics, 1915 (Project Gutenberg 44585; checked on the archive.org scan boymechanicbook200chic2, pp. 24-26). The runner shape comes from his drawing, not from figures. The scan calls the steering collar a hardwood collar; the Gutenberg text drops "hardwood". The tools and metric figures are ours.

Materiały

15

Wymagane narzędzia

12

Według tego planu powstaje

Powiązane blueprinty

Te blueprinty dzielą się wiedzą — technikami, materiałami lub zasadami
CC0 Domena publiczna

Ten plan jest udostępniany na licencji CC0. Możesz go swobodnie kopiować, modyfikować, rozpowszechniać i wykorzystywać do dowolnych celów, bez konieczności uzyskiwania zgody.

Wesprzyj Makera kupując produkty przez jego plan, za co zarabia Prowizja Makera ustalony przez sprzedawców, lub stwórz nową iterację tego planu i dołącz go jako połączenie w swoim własnym planie, aby dzielić się przychodami.

Dyskusja

(0)

Zaloguj się aby dołączyć do dyskusji

Ładowanie komentarzy...