Współpraca
SZTUKA
Piękno i dobre samopoczucie
RZEMIOSŁO
KULTURA I HISTORIA
ROZRYWKA
ŚRODOWISKO
JEDZENIE I NAPOJE
INŻYNIERIA ODWROTNA
NAUKI
LEKKOATLETYKA
TECHNOLOGIA
URZĄDZENIA DO NOSZENIA
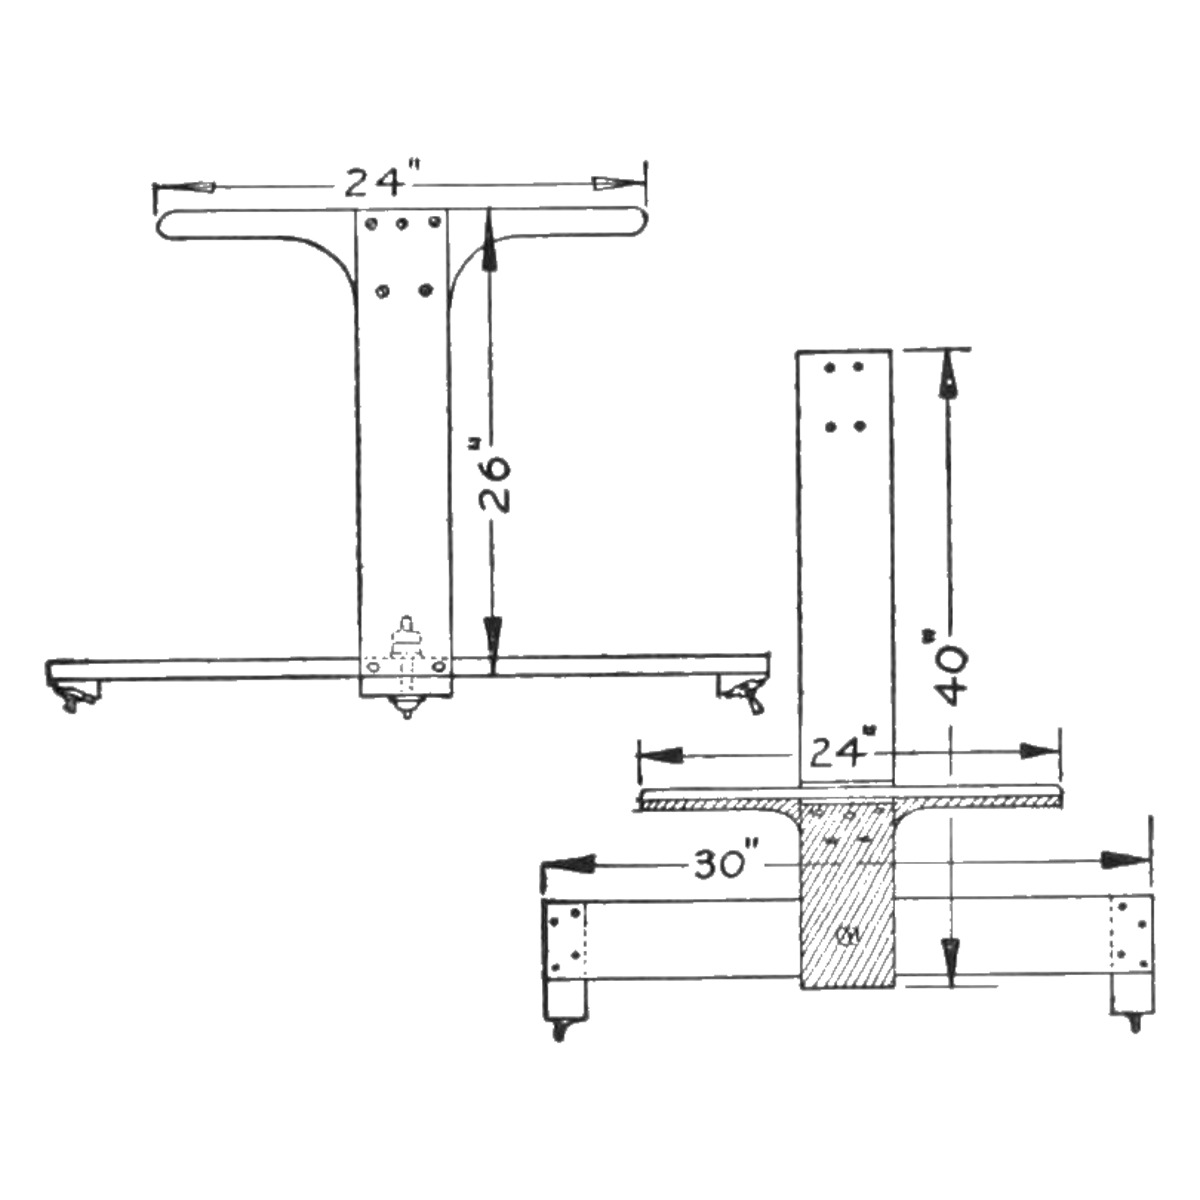


Ice Glider: Three-Skate Push Scooter With a Steering Crosspiece and Spiked Pusher (Boy Mechanic, 1915)
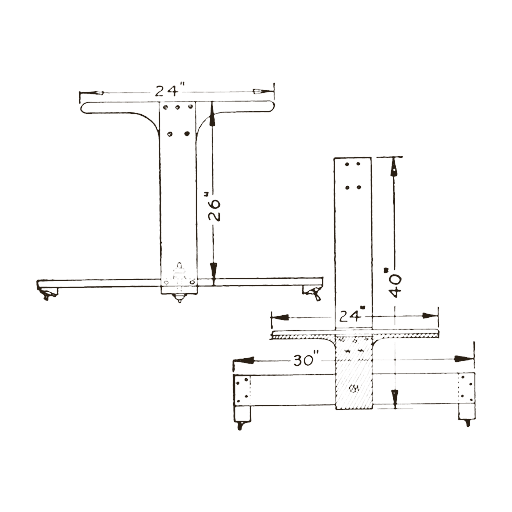
Mildred E. Thomas's ice glider from The Boy Mechanic, Book 2 (1915), "similar to an ice yacht, only a great deal smaller": a 40 in rear board on one skate, bolted to a 30 in front crosspiece on two skates tilted about 30 deg, with a 26 in upright and a handle to steer. It is pushed along with a spiked block strapped to one shoe.
Początkujący
About 1 day
Instrukcje
1
1
Her sizes, and the skate angle
Her sizes, and the skate angle
Wczytywanie notatnika Jupyter…
2
2
Read The Boy Mechanic, Book 2
Read The Boy Mechanic, Book 2
"The enthusiastic pushmobilist need not put aside his hobby during the winter, as an amusement device for use on ice, which will surpass the very best pushmobile, can be easily made as shown in the illustration."
3
3
Make the front crosspiece
Make the front crosspiece
Cut the front crosspiece 30 in long and about 8 in wide, with its front and back edges cut on a slant. Fasten a tapering block to each end so that the skates on them stand at an angle of about 30 deg, edges outward, and fix a skate to each block with screws through holes drilled in the top plates (or with straps).
Materiały do tego kroku:
 Deska sosnowa1 sztuka
 Deska z drewna liściastego1 sztuka
 Łyżwa2 sztuk
 Wkręty do drewna1 sztuka
Potrzebne narzędzia:
 Piła ręczna
 Strug ręczny
 Kątomierz
 Wiertarka ręczna
 Ołówek
 Miara zwijana
4
4
Build the upright and handle
Build the upright and handle
In the centre of the crosspiece build an upright 26 in high: nail a piece to its front and back edges so that, on the slanted edges, they stand sloping toward the rear. Fasten a handle 24 in long between the two uprights at the top.
Materiały do tego kroku:
Deska sosnowa1 sztukaDeska z drewna liściastego1 sztuka Gwoździe1 sztukaWkręty do drewna1 sztuka
Potrzebne narzędzia:
Piła ręczna MłotekWiertarka ręczna
5
5
Make the rear board and join it
Make the rear board and join it
Cut the rear board 8 in wide and 40 in long and fasten the third skate in a perfectly straight position on its rear end. Bore a hole in the front end of the board and bolt it to the centre of the front crosspiece, so the crosspiece turns to guide the glider.
Materiały do tego kroku:
Deska sosnowa1 sztukaŁyżwa1 sztuka Śruba zamkowa1 sztuka
 Podkładka płaska2 sztukWkręty do drewna1 sztuka
Potrzebne narzędzia:
Piła ręczna Świder korbowy z wiertłemWiertarka ręczna
6
6
Make the pusher
Make the pusher
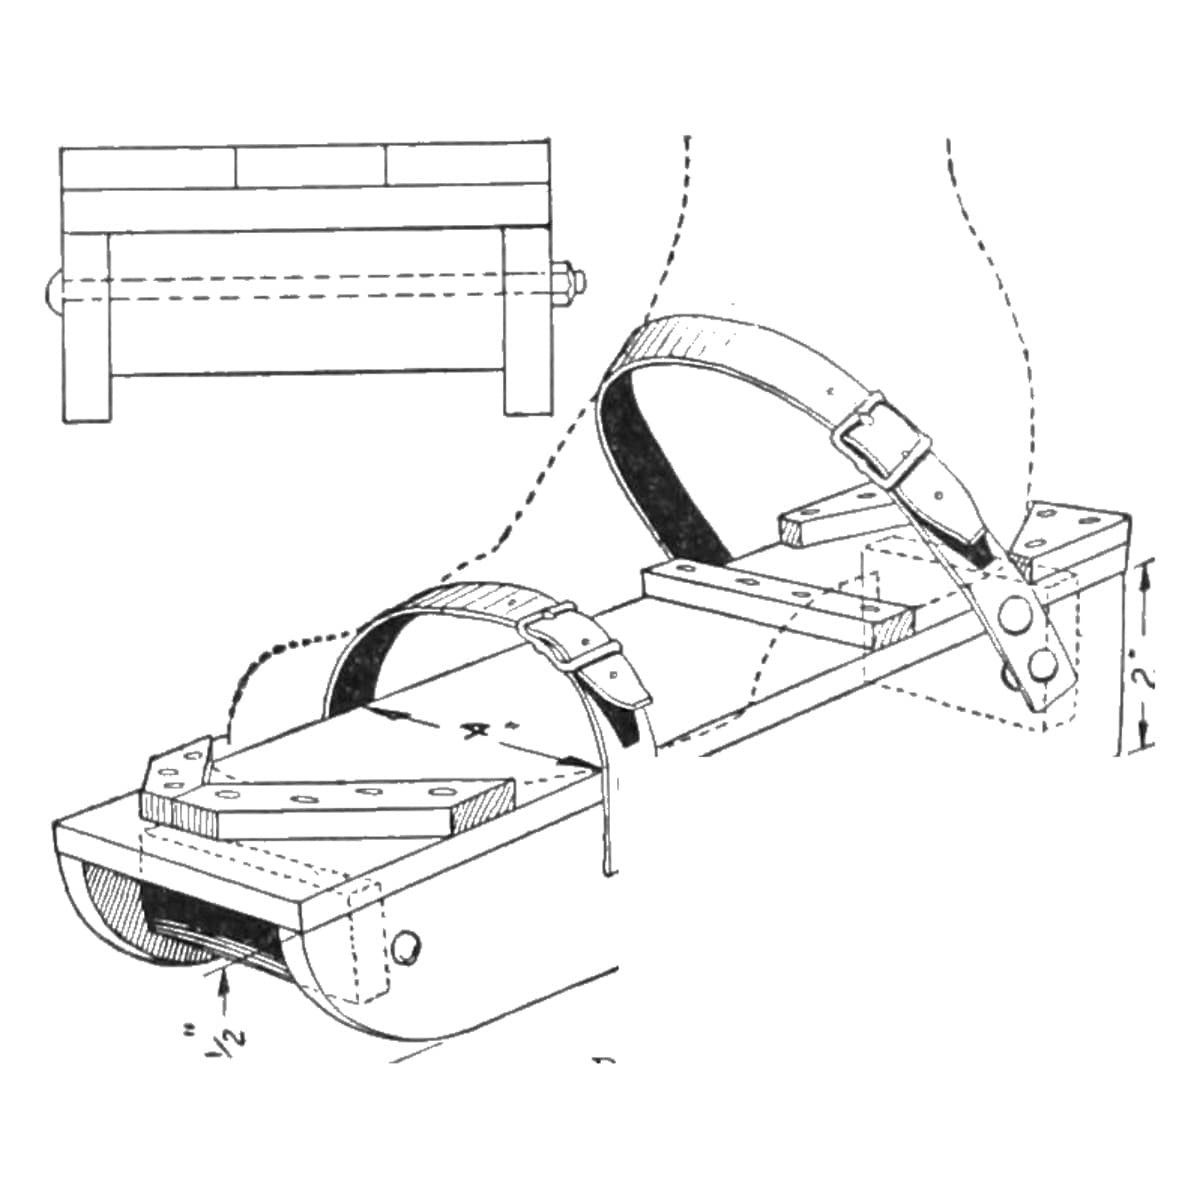
Drive nails through a block of wood so their points project on the underside, and strap the block to one shoe. Or use sole leather instead of the block, with small slots cut in the sides for the straps and nails driven through so the points project. Push the glider along like a pushmobile.
Materiały do tego kroku:
Deska z drewna liściastego1 sztukaGwoździe1 sztuka Rzemień skórzany1 sztuka
Potrzebne narzędzia:
Piła ręcznaMłotek7
7
Troubleshooting
Troubleshooting
Ice glider troubleshooting.
Flow
Loading...
8
8
History and honest limits
History and honest limits
From "An Ice Glider" by Mildred E. Thomas, in **The Boy Mechanic, Book 2**, Popular Mechanics, 1915 (Project Gutenberg 44585; checked on the archive.org scan boymechanicbook200chic2, pp. 31-32). She gives no board thicknesses, bolt size or block taper, only the 30 deg skate angle. The tools and metric figures are ours.
Materiały
8- 1 sztukaZastępnik
- 1 sztukaZastępnik
- 2 sztukZastępnik
- 3 sztukZastępnik
- 2 sztukZastępnik
- 1 sztukaZastępnik
- 2 sztukZastępnik
- 1 sztukaZastępnik
Według tego planu powstaje
Powiązane blueprinty
Te blueprinty dzielą się wiedzą — technikami, materiałami lub zasadami
CC0 Domena publiczna
Ten plan jest udostępniany na licencji CC0. Możesz go swobodnie kopiować, modyfikować, rozpowszechniać i wykorzystywać do dowolnych celów, bez konieczności uzyskiwania zgody.
Wesprzyj Makera kupując produkty przez jego plan, za co zarabia Prowizja Makera ustalony przez sprzedawców, lub stwórz nową iterację tego planu i dołącz go jako połączenie w swoim własnym planie, aby dzielić się przychodami.