Crochet — The Chain Stitch and Single Crochet Foundation
Crochet is the art of making fabric with a single hooked needle and a continuous strand of yarn, building one loop at a time. Unlike knitting, which holds dozens of active loops on needles simultaneously, crochet has only one active loop at any moment — every stitch is completed before the next begins. This makes crochet fundamentally impossible to unravel from the working end (the live loop must be actively pulled through), which is why crocheted fabric does not 'run' the way knitted fabric does when a stitch is dropped.
The origins of crochet are debated, but the craft as we know it emerged in Europe in the early 19th century. The earliest published crochet patterns appear in Dutch and German needlework magazines in the 1820s. During the Irish Famine of the 1840s, crochet became an economic lifeline: Irish women produced fine crochet lace for export to fund food purchases, teaching the craft through convents and cooperatives. Irish crochet lace — three-dimensional motifs joined with a mesh ground — became fashionable across Europe and remains a recognized lace tradition.
Crochet uses more yarn than knitting for the same area of fabric (roughly 30% more) because each stitch wraps the yarn multiple times. The resulting fabric is thicker, stiffer, and less elastic than knitted fabric. This makes crochet ideal for structured objects — amigurumi toys, baskets, bags, blankets, and sculptural forms — where the fabric needs to hold its shape without stretching.
Instrukcje
Choose a hook and yarn
Choose a hook and yarn
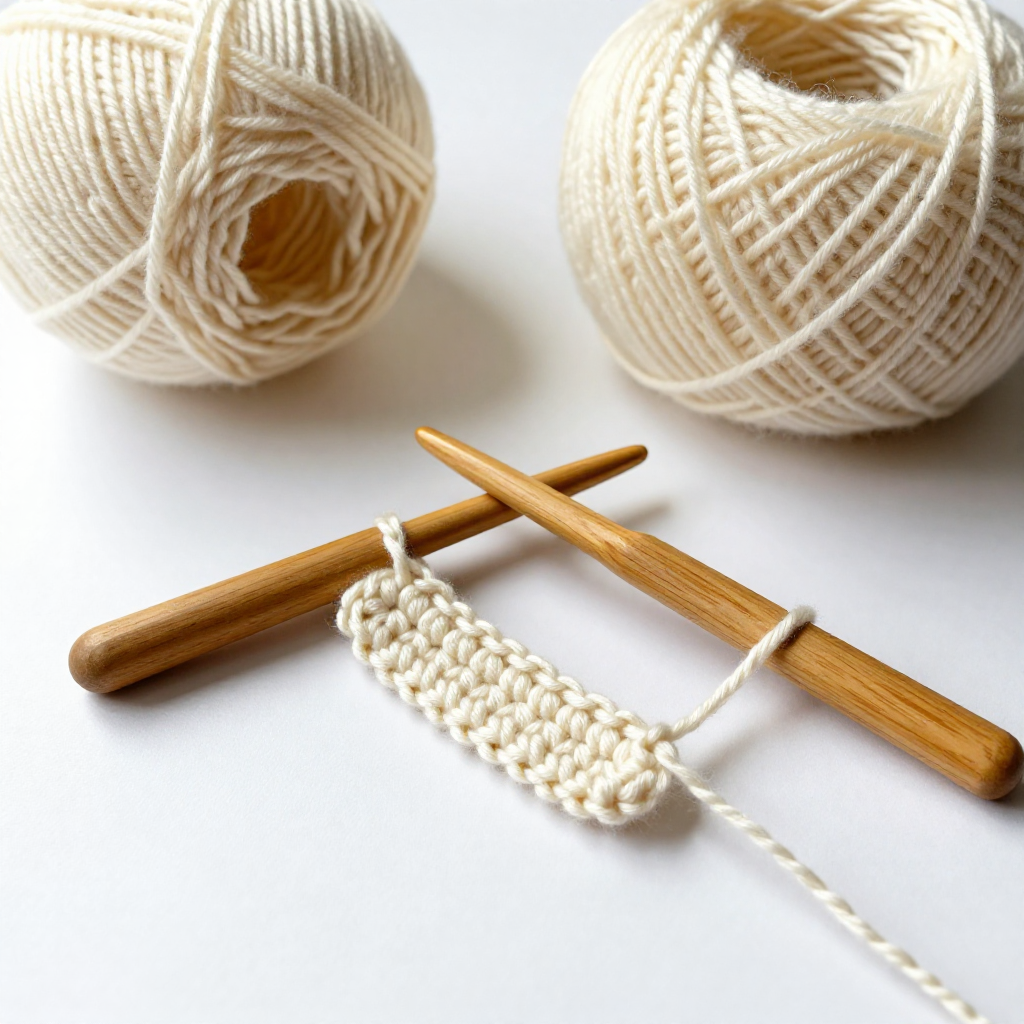
Start with a 5 mm crochet hook and medium-weight (worsted/aran) wool or acrylic yarn in a light color — light yarn makes it easier to see the stitch structure. Crochet hooks are sized by the diameter of the shaft: 5 mm matches medium-weight yarn. The hook has a throat (the curved notch that catches the yarn), a shaft (the smooth cylindrical section that determines stitch size), and a handle. Hold the hook in your dominant hand like a pencil (thumb and forefinger near the throat) or like a knife (hand over the top, thumb on the flat). Both grips work — use whichever feels natural.
Materiały do tego kroku:
 Crochet Hook Set1 zestaw
 Wool Yarn Skein (Undyed)1 sztuka
Make a slip knot
Make a slip knot
Make a loop in the yarn about 15 cm from the end. Reach through the loop and pull the working yarn (the strand connected to the ball) through to form a new loop. Place this loop on the crochet hook and tighten gently by pulling the tail. The slip knot should slide freely on the hook — snug enough to stay on but loose enough to slide. This is your first loop, the starting point for the chain. The slip knot does not count as a stitch.
Tension the yarn in your non-dominant hand
Tension the yarn in your non-dominant hand
Wrap the working yarn around your non-dominant hand to create tension. A common method: drape the yarn over your index finger, under the middle finger, over the ring finger, and hold the tail between thumb and middle finger. The yarn should flow smoothly but with enough friction that it does not slip freely. Consistent tension produces even stitches. Hold the slip knot (on the hook) between your thumb and middle finger of the yarn hand, pinching just below the hook. This anchors the work while you crochet.
Crochet the chain — the foundation of everything
Crochet the chain — the foundation of everything
Yarn over: wrap the working yarn over the hook from back to front (the hook catches the yarn in its throat). Pull through: draw the hook with the caught yarn through the loop already on the hook. You have made one chain stitch. One loop remains on the hook — always one loop. Repeat: yarn over, pull through, yarn over, pull through. Each repetition adds one chain stitch. Make 21 chains for a practice swatch. The chain is the foundation row of almost every crochet project — it serves the same role as the cast-on in knitting. Count your chains from the hook backward, not including the loop on the hook.
Identify the parts of the chain
Identify the parts of the chain
Look at your chain. The front shows a series of interlocking V-shapes — each V is one chain stitch. The back shows a ridge of bumps running down the center — these are the back bars. When you work into the chain on the next row, you will insert your hook under the top two loops of each V (the standard method) or under the back bar only (the back-bar method, which produces a neater edge). For beginners, the standard method is easier: push the hook under both loops of the V from front to back, with the hook facing down.
Single crochet — Row 1
Single crochet — Row 1
Skip the first chain from the hook (this skipped chain is the turning chain — it provides height for the row). Insert the hook into the second chain from the hook, under the top two loops. Yarn over and pull through the chain — you now have two loops on the hook. Yarn over again and pull through both loops on the hook — one loop remains. You have made one single crochet stitch. Insert the hook into the next chain, yarn over and pull through (two loops on hook), yarn over and pull through both (one loop remains). Repeat in every chain across. You should have 20 single crochet stitches.
Chain 1 and turn
Chain 1 and turn
At the end of the row, chain 1 (this is the turning chain — it lifts the yarn to the height of the next row). Turn the work 180 degrees so the other side faces you. The turning chain does NOT count as a stitch in single crochet — your first single crochet of the new row goes into the first stitch (the last stitch of the previous row, which is now closest to your hook). This is a common source of confusion: in taller stitches (double crochet, treble), the turning chain DOES count as a stitch, but in single crochet it does not.
Continue rows — build the swatch
Continue rows — build the swatch
Work single crochet into every stitch across the row. At the end, chain 1, turn. Repeat. Count your stitches at the end of each row — you should have 20 every time. If you have 19, you missed the last stitch (it often hides at the edge). If you have 21, you accidentally worked into the turning chain. Keeping a consistent stitch count is the single most important skill in crochet — once you can maintain 20 stitches row after row, you can make anything rectangular: scarves, blankets, dishcloths, bags.
Compare the fabric to knitting
Compare the fabric to knitting
After 15-20 rows, examine your single crochet swatch. The fabric is thicker and stiffer than a knitted swatch in the same yarn. It does not curl (unlike stockinette). The front and back look slightly different but the fabric is nearly reversible. Each stitch forms a small square knot rather than a V-loop, giving the surface a pebbly texture. Try stretching it — crochet stretches less than knitting in both directions. This structural density is why crochet is preferred for baskets, amigurumi (stuffed toys that need to hold their shape), bags, and potholders where you need a firm, opaque fabric.
Fasten off
Fasten off
When the swatch is the size you want, cut the yarn leaving a 15 cm tail. Yarn over and pull the tail completely through the last loop — this locks the final stitch. Thread the tail onto a yarn needle (blunt tapestry needle) and weave it through 5-6 stitches on the wrong side of the fabric, then trim. The fabric is finished. Unlike knitting, where binding off requires working across an entire row, crochet fastens off in a single motion — another advantage of having only one active loop at a time.
Understand what comes next
Understand what comes next
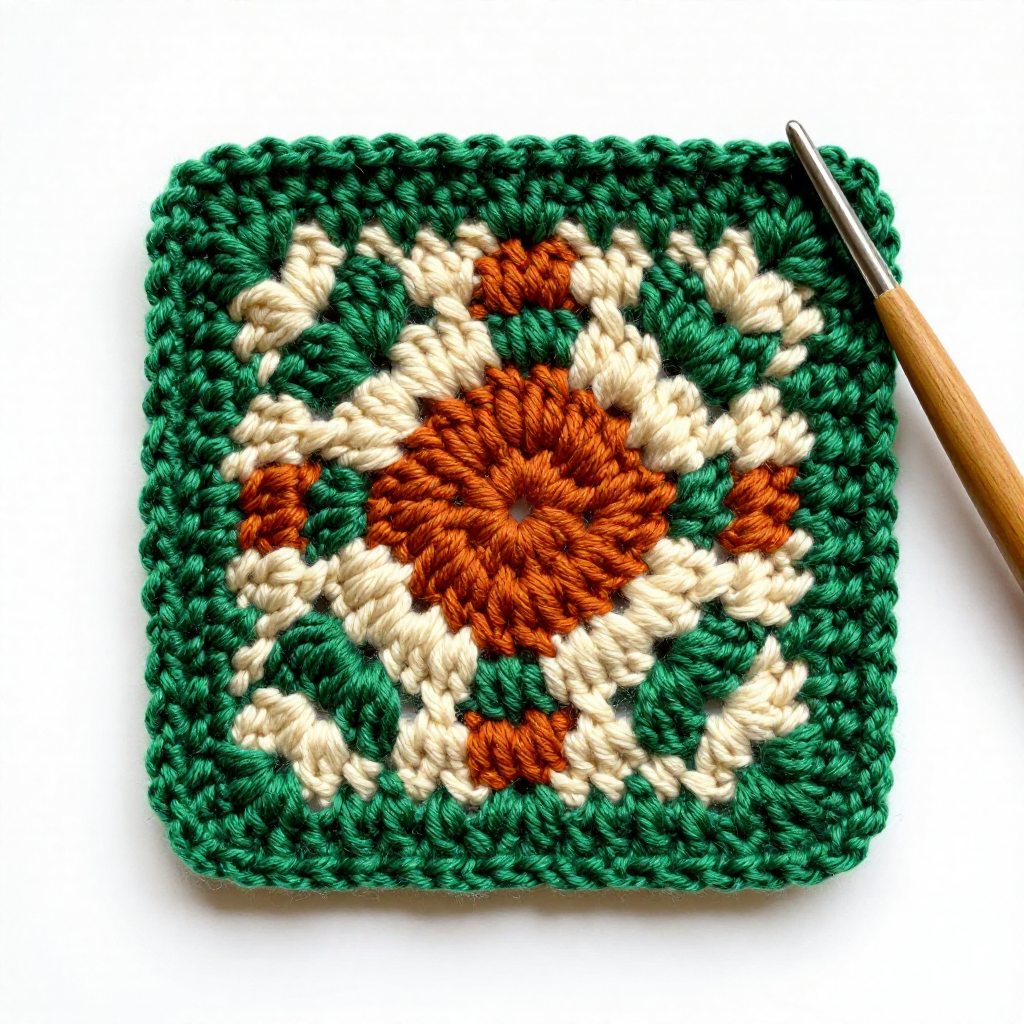
The chain and single crochet are the foundation. From here, every crochet stitch is a variation on the same motion — yarn over, insert hook, pull through — with additional yarn overs that create taller stitches. Half double crochet: one extra yarn over before inserting, pulled through three loops. Double crochet: one extra yarn over, pulled through in two passes of two loops. Treble crochet: two extra yarn overs, pulled through in three passes. The taller the stitch, the more open and drapey the fabric. Granny squares, lace shawls, and mesh bags all use taller stitches. But every one of them starts with the chain and builds on the single crochet foundation you just learned.
Materiały
2- 1 zestawPlaceholder
- 1 sztukaPlaceholder
Materiały z połączonych planów
Powiązane blueprinty
Te blueprinty dzielą się wiedzą — technikami, materiałami lub zasadami
Related blueprints
Other builds that share materials, tools, or techniques with this one.

CC0 Domena publiczna
Ten plan jest udostępniany na licencji CC0. Możesz go swobodnie kopiować, modyfikować, rozpowszechniać i wykorzystywać do dowolnych celów, bez konieczności uzyskiwania zgody.
Wesprzyj Makera kupując produkty przez jego plan, za co zarabia Prowizja Makera ustalony przez sprzedawców, lub stwórz nową iterację tego planu i dołącz go jako połączenie w swoim własnym planie, aby dzielić się przychodami.