
Współpraca
SZTUKA
Piękno i dobre samopoczucie
RZEMIOSŁO
KULTURA I HISTORIA
ROZRYWKA
ŚRODOWISKO
JEDZENIE I NAPOJE
INŻYNIERIA ODWROTNA
NAUKI
LEKKOATLETYKA
TECHNOLOGIA
URZĄDZENIA DO NOSZENIA
Portable Bench Saw: A Lift-Out Power Unit on Trunnions, Its Motor on Spring Bars, Under a Tilting Platform (Henkel, 1928)
Forge

Autor

Forge

13. listopad 2026NO
9
0
0
0
0

Portable Bench Saw: A Lift-Out Power Unit on Trunnions, Its Motor on Spring Bars, Under a Tilting Platform (Henkel, 1928)

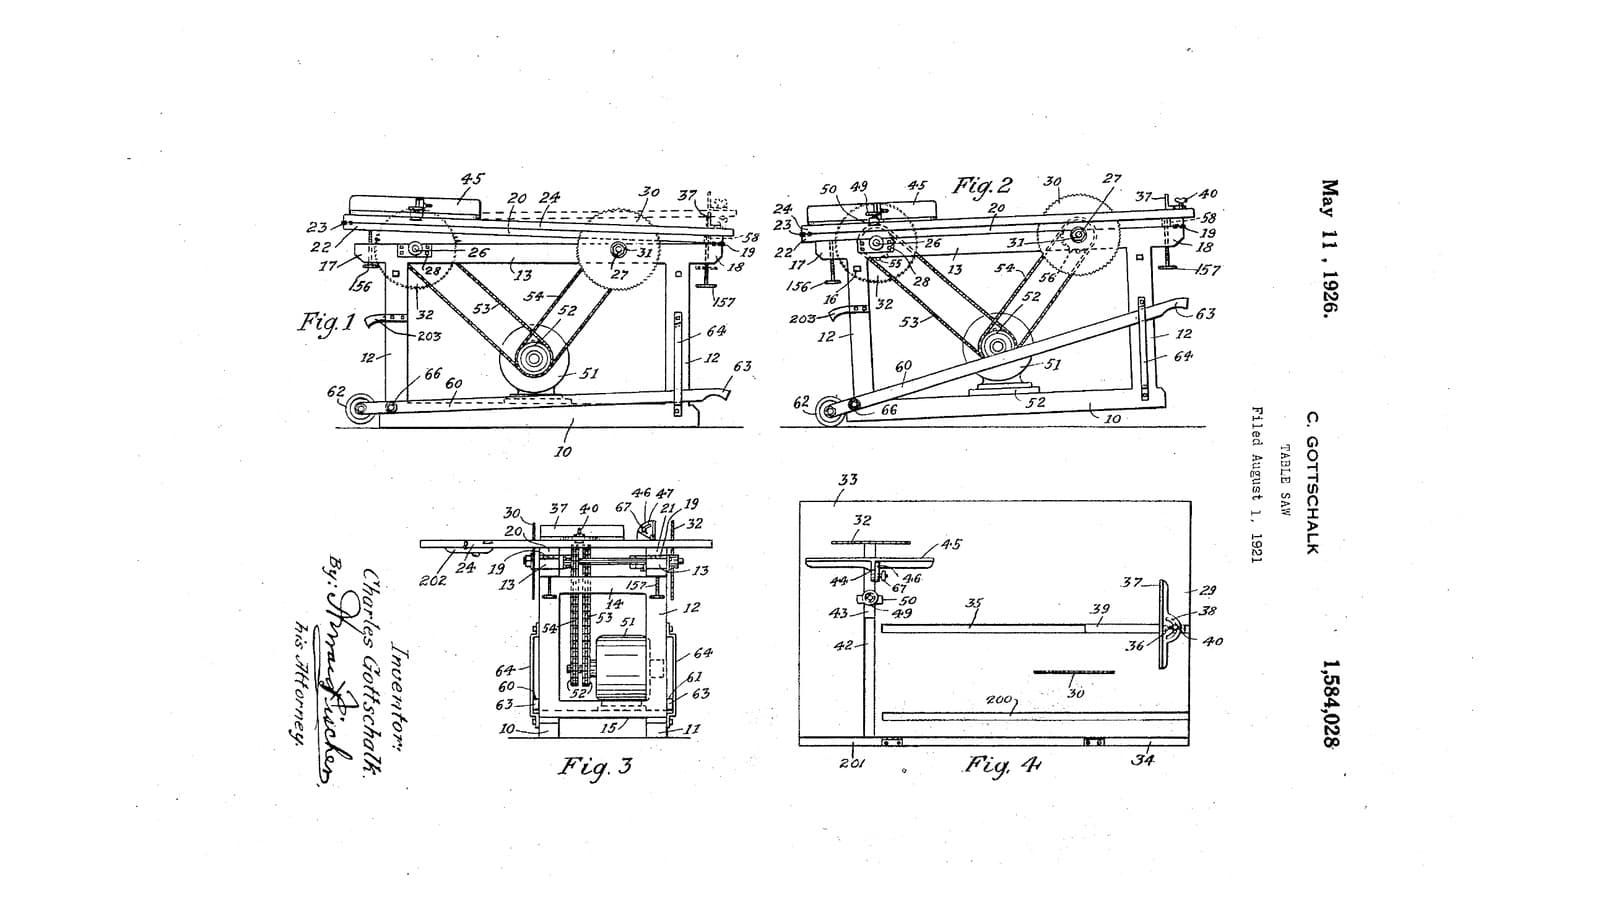
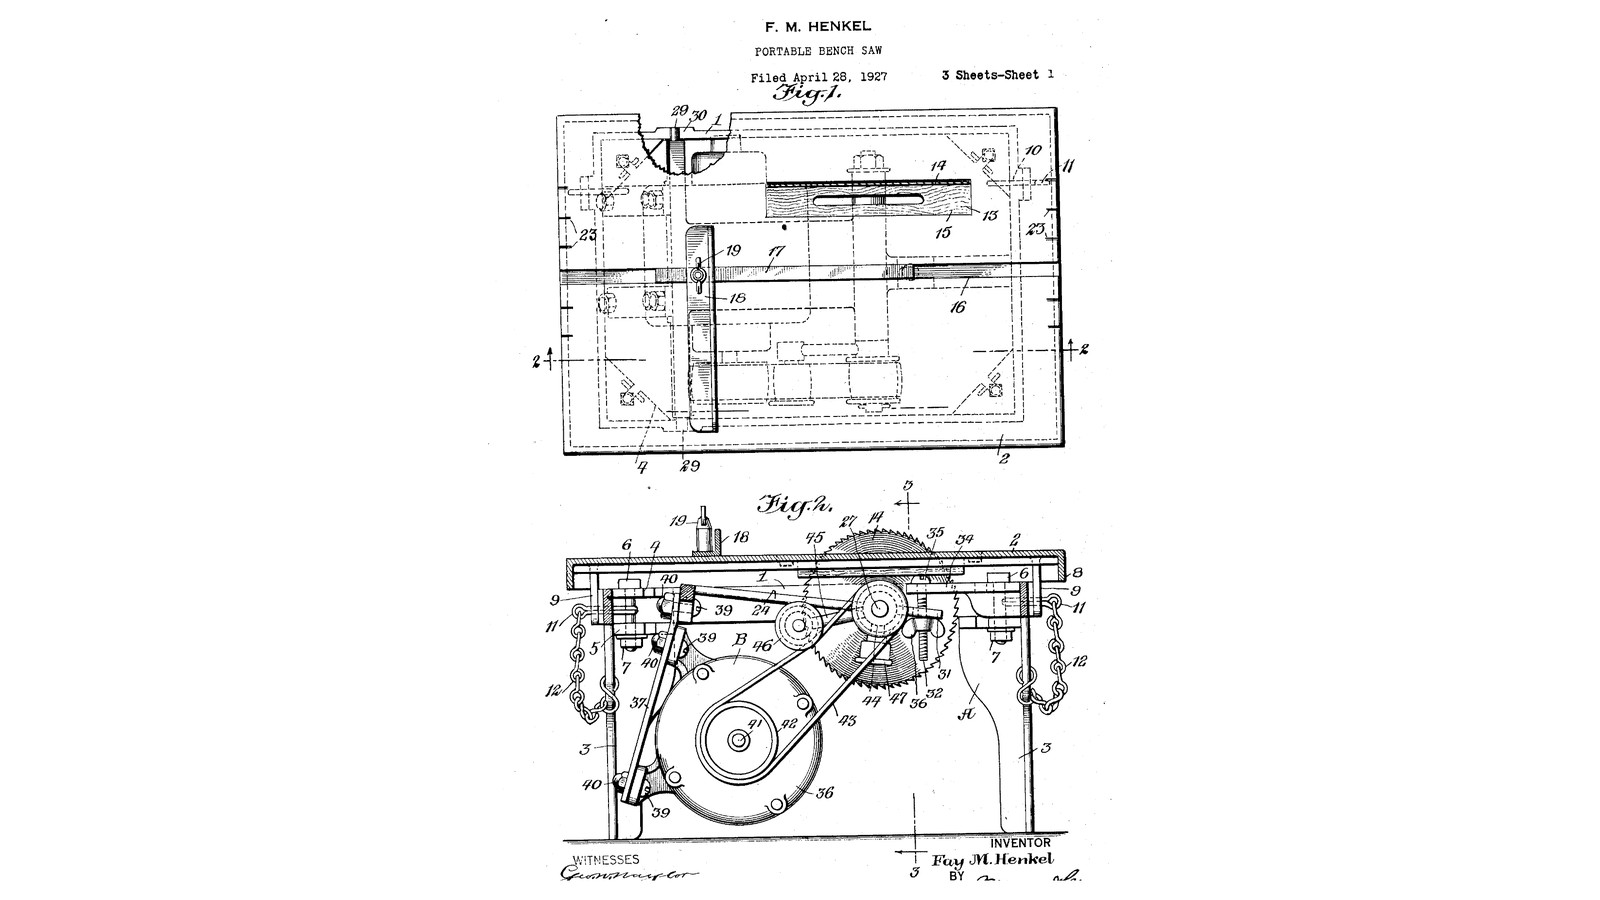
Fay M. Henkel of New Rochelle, New York, received US 1,695,188, dated 11 December 1928, for a cheap, compact bench saw in two parts. The stand has a platform that tilts on hinge pins for angled cuts, with a sliding angle follower and a rip guide. The power unit drops into it on trunnions, and a wing nut on a hanging screw raises or lowers the saw. The motor sits on two spring bars that soak up its vibration and keep the belt tight. Lifted out, the power unit stands on the bars' cap nuts and runs an emery wheel. The patent gives no sizes; every size here is ours, and our stand is wood and steel where his is cast.
Zaawansowany
About 4 days

Instrukcje

1

Raising the saw and tilting the platform

Wczytywanie notatnika Jupyter…
2

Read US 1,695,188

"It will thus be seen that the power unit has a three-point bearing which maintains it against accidental displacement, or, in other words, prevents it from getting out of proper alinement."
3

The stand: frame 1 and legs 3

Make a rectangular frame 460 x 360 mm of 25 x 90 mm hardwood, glued and screwed at the corners. Bolt a 250 mm pine leg 45 x 45 mm in each corner through a short length of steel angle screwed to frame and leg, as his corner plates 4 and lugs 5. Cut a notch 30 in the top of each long side, 60 mm from one end, 21 mm wide and 25 deep, for the trunnions. Screw a steel arm 34 across the other end with a 10.5 mm hole, and a lug 50 with an M10 tapped hole on the side away from the hinges.

Materiały do tego kroku:

Deska z drewna liściastegoDeska z drewna liściastego2 sztuk
Tarcica sosnowaTarcica sosnowa1 sztuka
Kątownik ze stali miękkiejKątownik ze stali miękkiej1 sztuka
Płaskownik ze stali miękkiejPłaskownik ze stali miękkiej1 sztuka
Zestaw śrub sześciokątnychZestaw śrub sześciokątnych8 sztuk
Wkręty do drewnaWkręty do drewna24 sztuk
Klej do drewnaKlej do drewna1 sztuka

Potrzebne narzędzia:

WyrzynarkaWyrzynarka
Wiertarko-wkrętarka akumulatorowaWiertarko-wkrętarka akumulatorowa
Zestaw wiertełZestaw wierteł
Ścisk stolarski listwowyŚcisk stolarski listwowy
Kątownik nastawnyKątownik nastawny
Miara zwijanaMiara zwijana
Piła do metaluPiła do metalu
Zestaw do gwintowaniaZestaw do gwintowania
Pokrętło do gwintownikówPokrętło do gwintowników
4

The platform 2

Cut 18 mm plywood 500 x 400 mm and glue a hardwood strip round its underside edges as the flange 8. Cut the opening 13 for the saw, 230 x 30 mm, and a hardwood block 15 to fill it. Rout a square groove 16 the length of the platform for the follower's bar. Screw two steel lugs 9 under one long edge, drilled to line up with holes 10 in the frame, and hinge it with steel pins held by split pins. Run an M10 tilt screw 49 up through lug 50, with a wing nut on its lower end as a handle, its top bearing under the platform.

Materiały do tego kroku:

Płyta sklejkowaPłyta sklejkowa1 sztuka
Deska z drewna liściastegoDeska z drewna liściastego1 sztuka
Płaskownik ze stali miękkiejPłaskownik ze stali miękkiej1 sztuka
Pręt okrągły ze stali niskowęglowejPręt okrągły ze stali niskowęglowej1 sztuka

ZawleczkaZawleczka2 sztuk
Pręt gwintowanyPręt gwintowany1 sztuka
Nakrętka skrzydełkowaNakrętka skrzydełkowa1 sztuka
Wkręty do drewnaWkręty do drewna16 sztuk
Klej do drewnaKlej do drewna1 sztuka

Potrzebne narzędzia:

WyrzynarkaWyrzynarka

Frezarka górnowrzecionowaFrezarka górnowrzecionowa
Zestaw frezów do frezarkiZestaw frezów do frezarki
Wiertarko-wkrętarka akumulatorowaWiertarko-wkrętarka akumulatorowa
Zestaw wiertełZestaw wierteł
Piła do metaluPiła do metalu
Ścisk stolarski listwowyŚcisk stolarski listwowy
5

The power unit's frame, arbor and trunnions

Bolt two 40 x 6 mm steel flat bars 340 mm long into a frame 24 with spacers. Across one end fix a 20 mm round bar 28 whose ends stand out 25 mm each side as the trunnions 29. At the other end bolt two 30 mm flange bearings for the arbor 26, turned from 30 mm bar like the twin-saw table's, with a collar, a loose flange and an M20 thread for the blade's nut. Bolt a forked steel lug 31 on that end, its slot straddling the hanging screw.

Materiały do tego kroku:

Płaskownik ze stali miękkiejPłaskownik ze stali miękkiej1 sztuka
Pręt okrągły ze stali niskowęglowejPręt okrągły ze stali niskowęglowej2 sztuk
Łożysko kołnierzoweŁożysko kołnierzowe2 sztuk
Zestaw śrub sześciokątnychZestaw śrub sześciokątnych10 sztuk
Nakrętka sześciokątnaNakrętka sześciokątna3 sztuk

Potrzebne narzędzia:

Piła do metaluPiła do metalu

Wiertarka stołowaWiertarka stołowa
Zestaw wiertełZestaw wierteł
Zestaw pilnikówZestaw pilników
Imadło warsztatoweImadło warsztatowe
Tokarka do metaluTokarka do metalu
Uchwyt tokarski 3-szczękowyUchwyt tokarski 3-szczękowy
Nóż tokarskiNóż tokarski
Suwmiarka cyfrowa 6 caliSuwmiarka cyfrowa 6 cali
Klucz nastawnyKlucz nastawny
Okulary ochronneOkulary ochronne
6

Spring bars, motor and belt

Bend two strips of spring steel 37, 30 x 3 mm, with a slight bend near one end, and bolt them under the cross bar 28 so they reach out beyond the trunnions. Bolt the motor 36 to them, with cap nuts 40 on the bolts' ends: these are its feet when the unit stands alone. Fit a V-belt pulley 42 on the motor and one 44 on the arbor, and the A-section belt 43. Pivot an arm 45 on the arbor's bearing with a weighted pulley 46 at its free end resting on the belt to take up the slack. Have the motor wired to a switch.

Materiały do tego kroku:

Taśma ze stali sprężynowejTaśma ze stali sprężynowej1 sztuka
Silnik elektrycznySilnik elektryczny1 sztuka
Koło pasowe do pasa klinowego (profil A)Koło pasowe do pasa klinowego (profil A)3 sztuk
Pas klinowy (przekrój A)Pas klinowy (przekrój A)1 sztuka
Płaskownik ze stali miękkiejPłaskownik ze stali miękkiej1 sztuka
Zestaw śrub sześciokątnychZestaw śrub sześciokątnych6 sztuk
Nakrętka sześciokątnaNakrętka sześciokątna6 sztuk
Wkręt dociskowy z końcówką wklęsłąWkręt dociskowy z końcówką wklęsłą3 sztuk

Wyłącznik zasilaniaWyłącznik zasilania1 sztuka

Potrzebne narzędzia:

Imadło warsztatoweImadło warsztatowe
Wiertarka stołowaWiertarka stołowa
Zestaw wiertełZestaw wierteł
Klucz nastawnyKlucz nastawny
Zestaw kluczy imbusowychZestaw kluczy imbusowych
7

Put the unit in and set the saw

Fit the 200 mm blade on the arbor. Hang an M10 screw 32 from arm 34 with its head 35 on top. Lower the power unit in, the trunnions into the notches 30 and the forked lug 31 round the screw, and run a wing nut 36 up under the lug. Turn the wing nut to raise the blade through the opening to the depth wanted.

Materiały do tego kroku:

Circular Saw Blade SetCircular Saw Blade Set1 sztuka
Pręt gwintowanyPręt gwintowany1 sztuka
Nakrętka skrzydełkowaNakrętka skrzydełkowa1 sztuka
Podkładka płaskaPodkładka płaska2 sztuk

Potrzebne narzędzia:

Klucz nastawnyKlucz nastawny
8

Follower and rip guide

Angle follower: a hardwood bar 17 sliding in the groove, with an angle fence 18 clamped at any angle by a wing nut 19. Rip guide 20: a hardwood bar across the platform held by two hook bolts 21 that hook under the flange 8, with wing nuts 22. Mark a scale 23 on the platform's ends to set it.

Materiały do tego kroku:

Deska z drewna liściastegoDeska z drewna liściastego1 sztuka
Pręt gwintowanyPręt gwintowany1 sztuka
Nakrętka skrzydełkowaNakrętka skrzydełkowa3 sztuk
Płaskownik ze stali miękkiejPłaskownik ze stali miękkiej1 sztuka

Potrzebne narzędzia:

WyrzynarkaWyrzynarka
Wiertarko-wkrętarka akumulatorowaWiertarko-wkrętarka akumulatorowa
Zestaw wiertełZestaw wierteł
Piła do metaluPiła do metalu
Imadło warsztatoweImadło warsztatowe
Miara zwijanaMiara zwijana
9

Try it, and as a grinder

With the platform flat, check the blade is square to it with the square, rip a board along the guide and crosscut another against the follower. Tilt the platform with the tilt screw (and the block under it for steep angles) and check the angle with the protractor. Lift the power unit out, stand it on its cap nuts, swap the blade for the grinding wheel, swing the idler arm to the belt's other side, and run it.

Potrzebne narzędzia:

Tarcza szlifierskaTarcza szlifierska
Kątownik nastawnyKątownik nastawny
KątomierzKątomierz
Okulary ochronneOkulary ochronne
Ochronniki słuchu (nauszniki, SNR 30 dB)Ochronniki słuchu (nauszniki, SNR 30 dB)
10

Troubleshooting

Portable bench saw troubleshooting.

Flow

Loading...
11

History and honest limits

**Fay M. Henkel** of New Rochelle, New York, US 1,695,188, dated 11 December 1928, filed 28 April 1927. He claimed a supporting unit with a platform and a power unit with a frame, "trunnions on the end of said frame, said supporting unit having recesses therein receiving the trunnions", a bearing and arbor, spring bars and a motor fixed to them, pulleys and a belt; and the spring bars' couplings serving as feet when the unit is removed. His frame, platform and legs are castings; ours are hardwood, plywood and steel. His bearing is a sleeve with a grease cup; ours are two greased flange bearings. He gives no sizes, motor or speeds; those are ours.

Materiały

22

Wymagane narzędzia

24

Według tego planu powstaje

CC0 Domena publiczna

Ten plan jest udostępniany na licencji CC0. Możesz go swobodnie kopiować, modyfikować, rozpowszechniać i wykorzystywać do dowolnych celów, bez konieczności uzyskiwania zgody.

Wesprzyj Makera kupując produkty przez jego plan, za co zarabia Prowizja Makera ustalony przez sprzedawców, lub stwórz nową iterację tego planu i dołącz go jako połączenie w swoim własnym planie, aby dzielić się przychodami.

Dyskusja

(0)

Zaloguj się aby dołączyć do dyskusji

Ładowanie komentarzy...