Współpraca
SZTUKA
Piękno i dobre samopoczucie
RZEMIOSŁO
KULTURA I HISTORIA
ROZRYWKA
ŚRODOWISKO
JEDZENIE I NAPOJE
INŻYNIERIA ODWROTNA
NAUKI
LEKKOATLETYKA
TECHNOLOGIA
URZĄDZENIA DO NOSZENIA
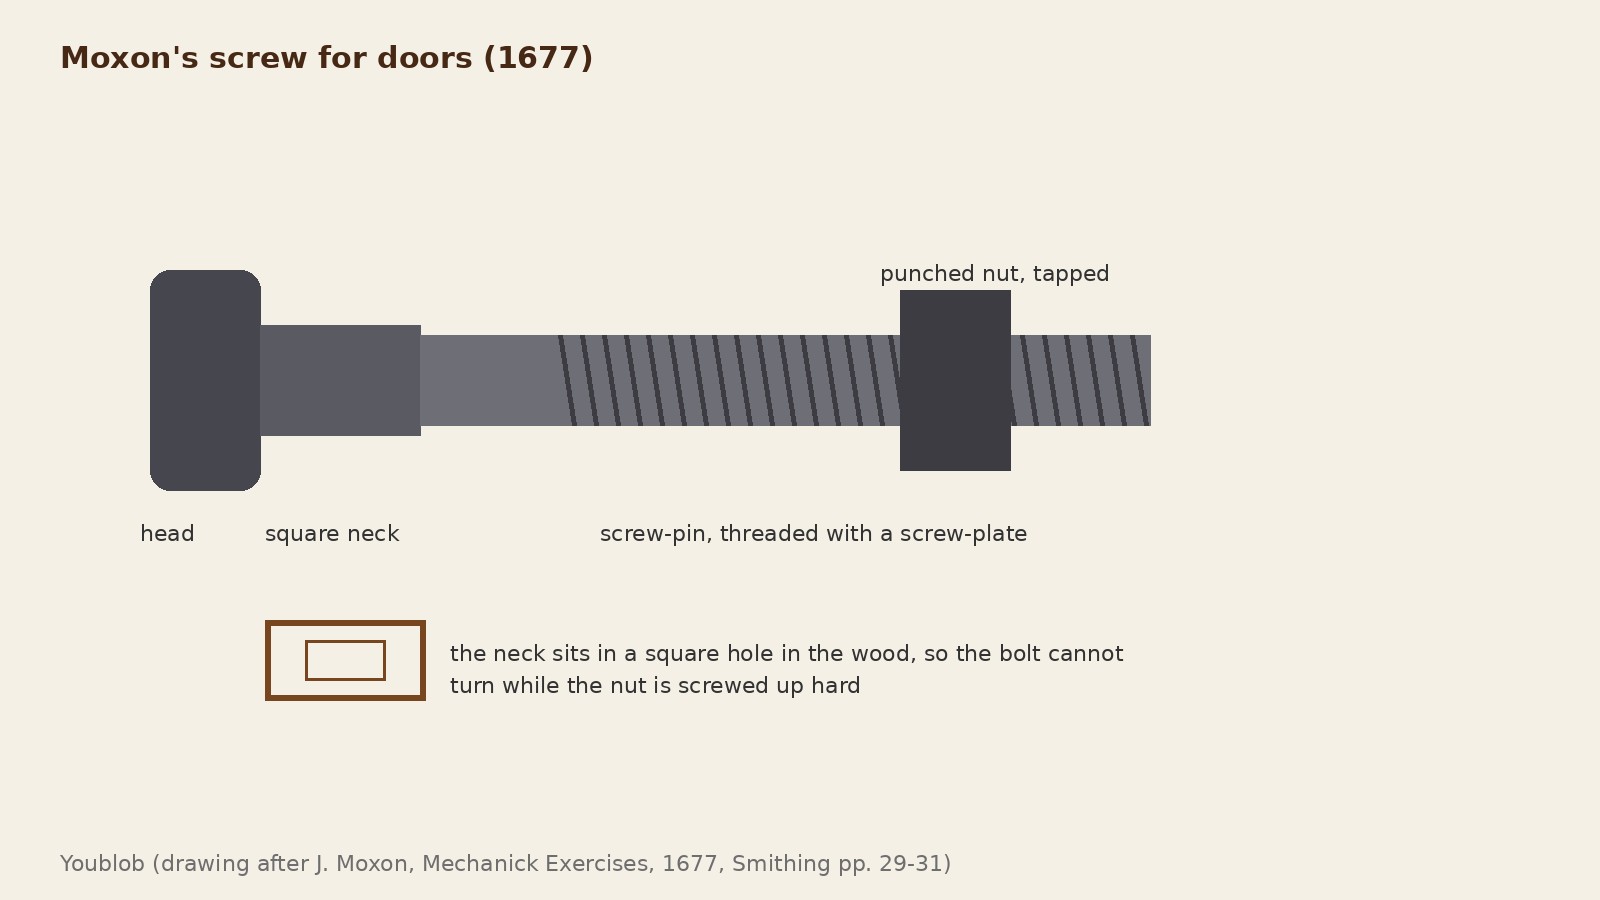


Forged Square-Neck Door Bolt and Nut, Threaded with a Screw-Plate (Moxon, 1677)
Joseph Moxon's 1677 way to make the screw bolt for a door: a square iron bar forged down to a square neck and round pin, the head cut off with a chisel, the pin threaded with a screw-plate, and a punched iron nut threaded with a tap. The square neck sits in a square hole so the bolt cannot turn while the nut is tightened.
Średniozaawansowany
About an hour per bolt
Instrukcje
1
1
Choosing the hole
Choosing the hole
Wczytywanie notatnika Jupyter…
2
2
Read Mechanick Exercises
Read Mechanick Exercises
"The Shank of the Screw for Doors and many other purposes must be Forged square near the Head, because it must be let into a square hole that it may not twist about when the Nut is turned about hard upon the Screw-Pin."
3
3
Forge the square neck
Forge the square neck
Take a square iron bar as near the size of the head as you can. At a flame (white) heat lay the shank length flat on the near side of the anvil and hammer it down to thickness; do not strike over the edge or you cut the iron. Reheat, turn it, and hammer the other two sides close up to the head.
Materiały do tego kroku:
 Pręt z kutego żelaza1 sztuka
Potrzebne narzędzia:
 Kuźnia kowalska
 Kowadło
 Młotek
 Szczypce kowalskie
4
4
Round the pin, cut the head
Round the pin, cut the head
Hammer down the corners of the part meant for the thread and round it. Set the chisel at the head thickness, strike half through, turn and cut each side half through until it comes off. Square the shoulder: reheat, grip in square-nosed tongs, set the shank in the vice with the shoulder on the jaws, and hammer the head.
Potrzebne narzędzia:
Kuźnia kowalska Przecinak kowadłowySzczypce kowalskie
 Ciężkie imadło warsztatoweMłotek
5
5
Punch the nut
Punch the nut
Forge a nut blank from the bar. Harden the point of a steel punch of the hole's size (no tempering: the hot iron softens it). At a blood-red heat punch from one side until the far side bulges, turn it, set it flat, and punch through over the hole of a bolster. Dip the punch in water whenever it changes colour. Let forged work cool on the floor or hearth; never quench it.
Materiały do tego kroku:
Pręt z kutego żelaza1 sztukaPotrzebne narzędzia:
Kuźnia kowalskaKowadło Przebijak na gorącoMłotek
 Kadź hartowniczaSzczypce kowalskie
6
6
Thread the pin
Thread the pin
File the shank and head, file the pin round, and taper its end by the depth of the screw-plate's threads. Find the screw-plate hole the pin just slides through, turn the pin in it, and file off the marks it cuts: the pin is then true. Set the bolt head down in the vice, press the next smaller hole (groove diameter equal to the pin) hard down on it, and turn the plate evenly.
Potrzebne narzędzia:
 Pilniki (pilnik ręczny)Ciężkie imadło warsztatowe
 Zestaw do gwintowania
7
7
Tap the nut
Tap the nut
Fit the tap to the round hole of the nut; it must match the pin (try it in the same screw-plate hole). Set the nut flat in the vice and turn the tap hard round by its handle, or by the square hole near the screw-plate handle, until it cuts the thread.
Potrzebne narzędzia:
Ciężkie imadło warsztatoweZestaw do gwintowania8
8
Troubleshooting
Troubleshooting
Screw bolt troubleshooting.
Flow
Loading...
9
9
History and honest limits
History and honest limits
From Joseph Moxon, **Mechanick Exercises, or the Doctrine of Handy-Works** (1677), Smithing, Numb. I pp. 10-11 and Numb. II pp. 29-31 (checked on the archive.org scan mechanickexercis00moxo). He gives no sizes or nut shape; the metric example and the tool heads are ours.
Materiały
1- 1 sztukaZastępnik
Wymagane narzędzia
10- Zastępnik
- Zastępnik
- Zastępnik
- Zastępnik
- Zastępnik
- Zastępnik
- Zastępnik
- Zastępnik
- Zastępnik
- Zastępnik
Według tego planu powstaje

Powiązane blueprinty
Te blueprinty dzielą się wiedzą — technikami, materiałami lub zasadami
CC0 Domena publiczna
Ten plan jest udostępniany na licencji CC0. Możesz go swobodnie kopiować, modyfikować, rozpowszechniać i wykorzystywać do dowolnych celów, bez konieczności uzyskiwania zgody.
Wesprzyj Makera kupując produkty przez jego plan, za co zarabia Prowizja Makera ustalony przez sprzedawców, lub stwórz nową iterację tego planu i dołącz go jako połączenie w swoim własnym planie, aby dzielić się przychodami.