Współpraca
SZTUKA
Piękno i dobre samopoczucie
RZEMIOSŁO
KULTURA I HISTORIA
ROZRYWKA
ŚRODOWISKO
JEDZENIE I NAPOJE
INŻYNIERIA ODWROTNA
NAUKI
LEKKOATLETYKA
TECHNOLOGIA
URZĄDZENIA DO NOSZENIA
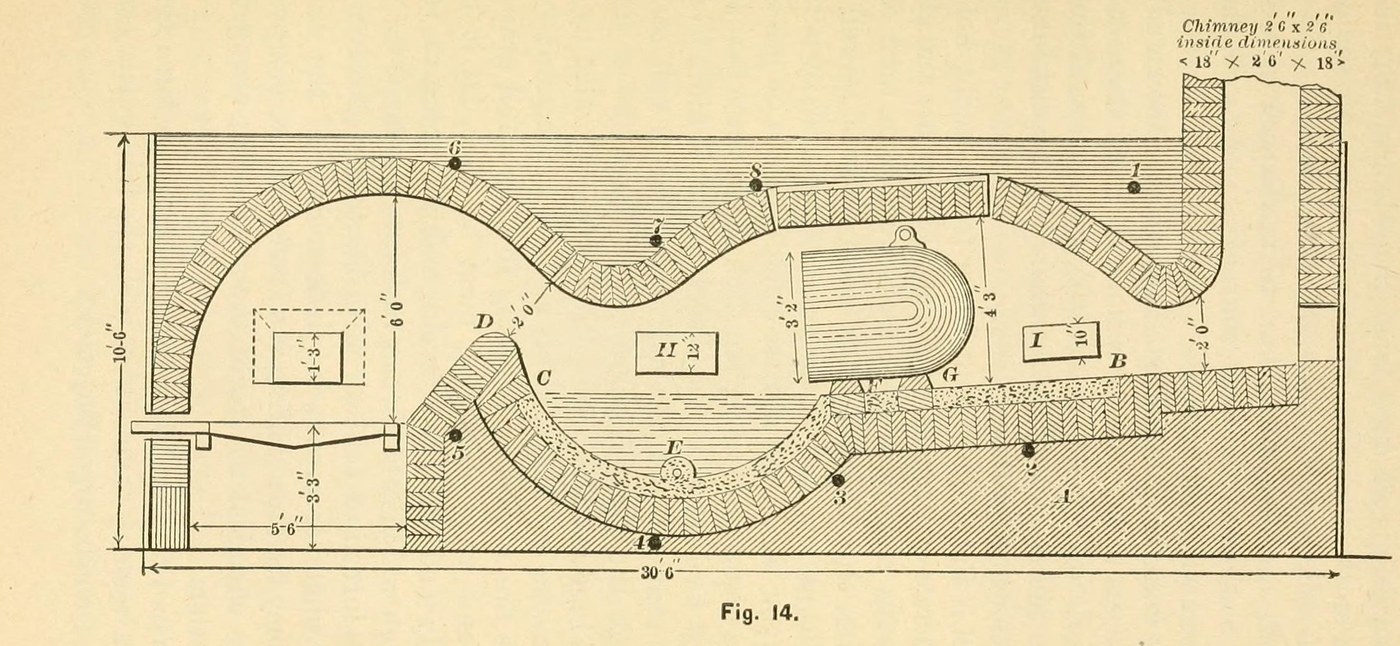

Reverberatory Furnace: the Air Furnace for Melting Cast Iron (Bolland, 1893)
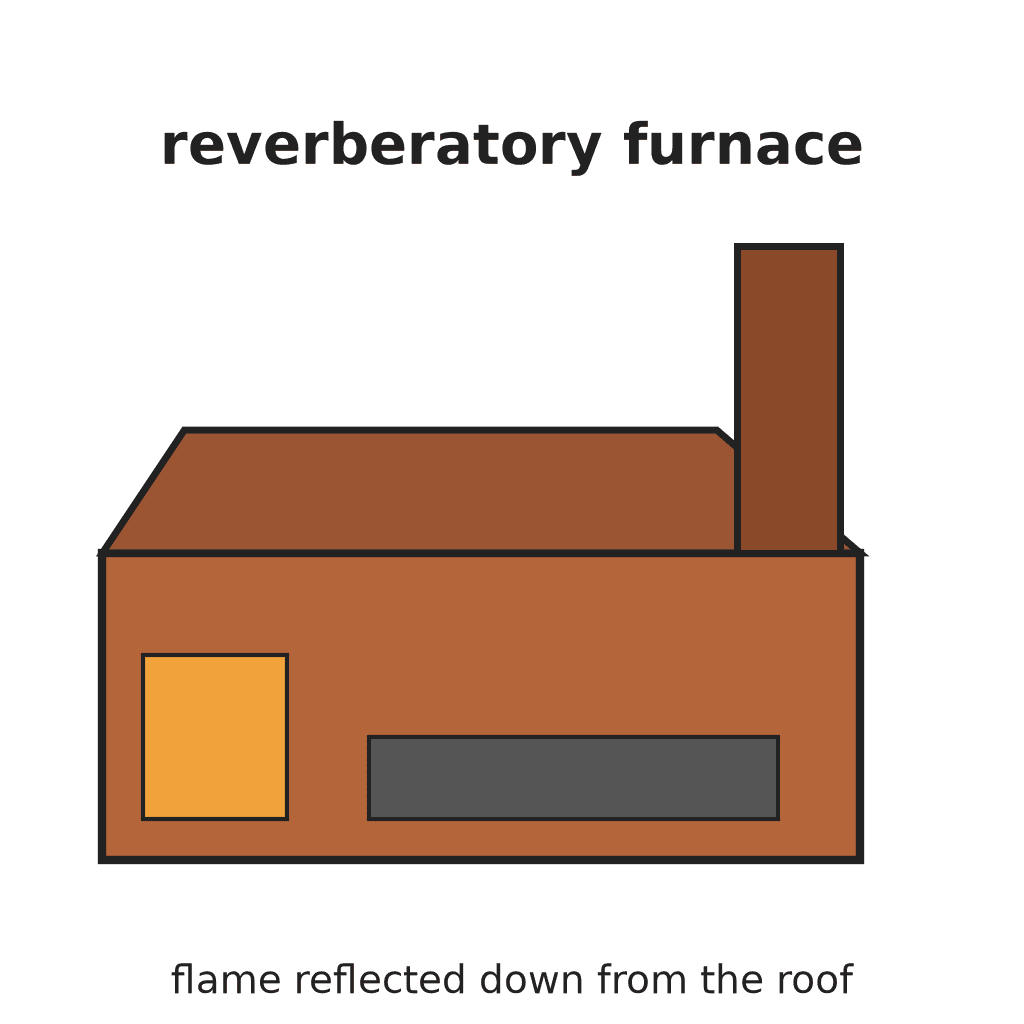
An air furnace melts iron apart from the fuel: coal burns on a grate at one end, and the flame is thrown down from a low arched roof onto the iron on the bed, then leaves by a tall chimney. The iron stays cleaner than in a cupola, so founders used it for guns, rolls, heavy scrap and lumps too big for the cupola.
This furnace is 30 ft 6 in long and 7 ft wide outside, 5 ft wide inside, cased in bolted wrought-iron plates.
Source: S. Bolland, The Iron Founder Supplement (1893), pp. 55-67. Unknown: brick sizes, plate thickness. Picture: Fig. 14 of the book.
Ekspert
Unknown
Instrukcje
1
1
Lay the foundation
Lay the foundation
Build the foundation solid of common material up to the firebrick, shaped so the firebrick bed slopes down from the chimney end to the reservoir. Keep the bricks from B to C 6 in below the finished bottom, to leave room for the sand bed.
Materiały do tego kroku:
 Cegła1 foundation
Potrzebne narzędzia:
 Kielnia
 Nieznane wymiary
2
2
Build the fireplace, bridge and roof
Build the fireplace, bridge and roof
Build the fireplace the full width of the furnace (5 ft inside, grate 5 ft long). Set the bridge wall at least 2 ft 3 in from the face of the grate bars. Build bridge, sides, roof and fireplace of the most refractory firebrick. Arch the roof the whole length, low, so it throws the flame down onto the bed; fill above the arches with common material. Leave the side charging hole (5 x 4 ft), the top hole (furnace width x 6 ft), the puddling hole over the reservoir, a sight hole and the tap hole.
Materiały do tego kroku:
 Cegły szamotowe1 lining, bridge, roof
 Zaprawa z gliny ogniotrwałej1 settingCegła1 filling above the arch
 Nieznany metal1 grate bars
Potrzebne narzędzia:
Kielnia3
3
Case it in plates and bolt it
Case it in plates and bolt it
Case the whole structure in wrought-iron plates, held at the corners with angle-irons. Run eight chief anchor bolts from side to side, clear of all working parts. Join everything with bolts, not rivets, so any plate can come off for repairs. Line the charging doors with firebrick.
Materiały do tego kroku:
 Płyta żelazna1 casing, doors
 Pręt z żelaza kutego8 anchor boltsNieznany metal1 angle-irons, door framesCegły szamotowe1 door linings
Potrzebne narzędzia:
Nieznane wymiary4
4
Build the chimney
Build the chimney
Build the chimney square, 30 to 40 ft high, with an inside course of firebrick (Fig. 14: 2 ft 6 in square inside). Make its area a little larger than the fireplace. Put a damper on top that can be worked from the bottom: it alone sets the draught. It can stand apart on a sole plate on four columns.
Materiały do tego kroku:
Cegły szamotowe1 inside courseCegła1 chimneyNieznany metal1 damperPotrzebne narzędzia:
Kielnia5
5
Make the sand bottom
Make the sand bottom
Make the bottom from B round the reservoir to C with 8 parts fire-sand to 1 of clay and 1 of ground coke. Fire it well for one to two hours before the first charge; it should last ten heats. Fill the tap hole with fire-sand and a little coal dust, which will not cake when hot.
Materiały do tego kroku:
 Piasek8 parts
 Glina1 part
 Koks hutniczy1 part, ground
Potrzebne narzędzia:
 Węgiel kamienny bitumiczny
6
6
Charge and melt
Charge and melt
Fire with soft, non-caking bituminous coal and keep a full grate; clinker quickly and leave no holes for cold air. Charge all the iron at the start: first layer of pigs lengthwise and a little apart, next layers across, open so the flame passes. Set heavy pieces on firebricks so the flame plays all round them. Through the puddling hole, dip test pieces and skim the iron clean. To blend two grades, thrust green saplings into the melt. Close the damper before tapping. Look the furnace over after every heat.
Potrzebne narzędzia:
Węgiel kamienny bitumiczny Gąski surówki żelaza
 Młodnik z drewna twardego
 Cedzak dziurkowany
Materiały
9- 1 chimneyZastępnik
- 1 inside courseZastępnik
- 1 settingZastępnik
- 1 damperZastępnik
- 1 casing, doorsZastępnik
- 8 anchor boltsZastępnik
- 8 partsZastępnik
- 1 partZastępnik
- 1 part, groundZastępnik
Materiały z połączonych planów
10% atrybucji
Fireclay Firebricks
autor: Clay
Ceramika i glina
39
0
0
0
4
0

10% atrybucji
Cupola Furnace: the Common Foundry Cupola with a Drop Bottom (Bolland, 1893)
autor: Forge
Piec
10
0
0
0
1
0
10% atrybucji
Making Coke from Coal — The Smokeless Fuel That Forged the Industrial Revolution
autor: Gimli
Obróbka metali
73
0
0
0
4
0
Według tego planu powstaje
CC0 Domena publiczna
Ten plan jest udostępniany na licencji CC0. Możesz go swobodnie kopiować, modyfikować, rozpowszechniać i wykorzystywać do dowolnych celów, bez konieczności uzyskiwania zgody.
Wesprzyj Makera kupując produkty przez jego plan, za co zarabia Prowizja Makera ustalony przez sprzedawców, lub stwórz nową iterację tego planu i dołącz go jako połączenie w swoim własnym planie, aby dzielić się przychodami.