
Współpraca
SZTUKA
Piękno i dobre samopoczucie
RZEMIOSŁO
KULTURA I HISTORIA
ROZRYWKA
ŚRODOWISKO
JEDZENIE I NAPOJE
INŻYNIERIA ODWROTNA
NAUKI
LEKKOATLETYKA
TECHNOLOGIA
URZĄDZENIA DO NOSZENIA
Small Series-Wound Electric Motor with Laminated Field and 12-Slot Ring Armature (Robertson, Boy Mechanic 1913)
Volt

Autor

Volt

14. listopad 2026SE
9
0
0
0
0

Small Series-Wound Electric Motor with Laminated Field and 12-Slot Ring Armature (Robertson, Boy Mechanic 1913)

A real workshop-built DC motor: a field of riveted sheet-iron plates bored to 2-3/4 in, a 12-slot laminated ring armature on a brass spider, a 12-segment brass commutator insulated with mica, gauze brushes, and series windings of cotton-covered magnet wire.
Zaawansowany
Several weekends

Instrukcje

1

Read the Boy Mechanic

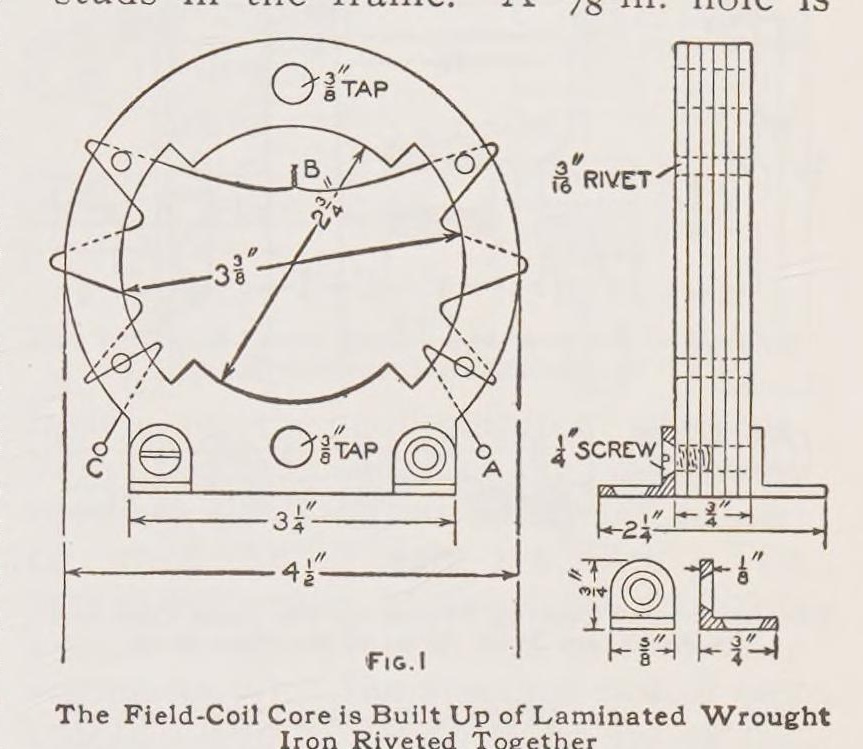
"The field frame of the motor, Fig. 1, is composed of wrought sheet iron."
2

Field frame

Mark a template 1/16 in larger than Fig. 1, cut enough sheet-iron plates to make 3/4 in, drill four rivet holes and rivet them. Mark the bore with dividers set at 1/8 in, drill 1/4 in holes round it and file to shape. Bore to 2-3/4 in on a lathe; mark the field core at 3-3/8 in and the outside at 4-1/2 in and finish to the marks.

Materiały do tego kroku:

Blacha ze stali miękkiejBlacha ze stali miękkiej1 sztuka
Nity staloweNity stalowe1 sztuka

Potrzebne narzędzia:

Rysik traserskiRysik traserski
Cyrkiel traserskiCyrkiel traserski
Wiertarka ręcznaWiertarka ręczna
Pilniki (pilnik ręczny)Pilniki (pilnik ręczny)
Tokarka do metaluTokarka do metalu
MłotekMłotek
3

Studs, lugs and bearings

Drill and tap two 3/8 in holes 3-5/8 in apart for the bearing studs (Fig. 2) and 1/4 in holes for feet bent from 1/8 in brass or iron. Make the bearing supports from 1/8 in brass with a 5/8 in hole and a 5/8 in brass rod soldered in and drilled for the shaft. Fit them after the armature is made: wrap paper round the armature, set it in the field, slip the bearings on and solder them, then check it turns freely.

Materiały do tego kroku:

Blacha mosiężnaBlacha mosiężna1 sztuka
Pręt mosiężnyPręt mosiężny1 sztuka
Pręt okrągły ze stali niskowęglowejPręt okrągły ze stali niskowęglowej1 sztuka

Lut cynowo-ołowiowyLut cynowo-ołowiowy1 sztuka

Potrzebne narzędzia:

Zestaw do gwintowaniaZestaw do gwintowania
Tokarka do metaluTokarka do metalu
LutownicaLutownica
Wiertarka ręcznaWiertarka ręczna
4

Armature core

Cut two 1/8 in wrought-iron outer plates and enough No. 24 sheet iron to make over 3/4 in (Fig. 5), drill six 1/8 in holes and rivet. Anneal at cherry red and cool in ashes. Bore to 1-11/16 in, fit a brass spider turned from 3/4 in brass on the machine-steel shaft with a setscrew, solder, turn the outside and face it to 3/4 in. File 12 slots 1/4 in deep and 7/16 in wide.

Materiały do tego kroku:

Blacha ze stali miękkiejBlacha ze stali miękkiej1 sztuka
Nity staloweNity stalowe1 sztuka
Pręt mosiężnyPręt mosiężny1 sztuka
Pręt okrągły ze stali niskowęglowejPręt okrągły ze stali niskowęglowej1 sztuka

Potrzebne narzędzia:

Kuźnia kowalskaKuźnia kowalska
Tokarka do metaluTokarka do metalu
Pilniki (pilnik ręczny)Pilniki (pilnik ręczny)
Wiertarka ręcznaWiertarka ręczna
5

Commutator

Turn a piece of 3/4 in i.d. brass pipe to 3/4 in long, chamfer both ends at 60 deg, divide into 12, drill and tap a 1/8 in hole in each segment for a brass pin, turn the pins to 1-1/4 in outside and slit them for the wires. Saw it into 12 bars, fit them on turned fibre ends with 12 mica strips between, clamp with the nut and true up.

Materiały do tego kroku:

Rura mosiężnaRura mosiężna1 sztuka
Pręt mosiężnyPręt mosiężny1 sztuka
Płyta z fibry (fibra wulkanizowana)Płyta z fibry (fibra wulkanizowana)1 sztuka

Płytka mikiPłytka miki1 sztuka

Potrzebne narzędzia:

Tokarka do metaluTokarka do metalu
Zestaw do gwintowaniaZestaw do gwintowania
Piła do metaluPiła do metalu
6

Brushes

Make the brush holder of fibre (Fig. 8) and studs of 5/16 in brass rod (Fig. 9). Roll brass or copper wire gauze and flatten it to 1/8 x 1/4 in, solder one end, and fit the holder on the bearing with a setscrew.

Materiały do tego kroku:

Płyta z fibry (fibra wulkanizowana)Płyta z fibry (fibra wulkanizowana)1 sztuka

Pręt mosiężnyPręt mosiężny1 sztuka
Siatka drucianaSiatka druciana1 sztuka
Lut cynowo-ołowiowyLut cynowo-ołowiowy1 sztuka

Potrzebne narzędzia:

LutownicaLutownica
Pilniki (pilnik ręczny)Pilniki (pilnik ręczny)
7

Wind the field

Insulate the field cores with 1/64 in fibre and end washers 1-1/8 x 1-1/2 in (softened in warm water, then glued). Wind each side with four layers (about 50 ft) of No. 18 double-cotton-covered wire, A to B and C to B, and join the ends at B.

Materiały do tego kroku:

Płyta z fibry (fibra wulkanizowana)Płyta z fibry (fibra wulkanizowana)1 sztuka
Drut miedziany emaliowanyDrut miedziany emaliowany1 sztuka
Klej do drewnaKlej do drewna1 sztuka
8

Wind the armature

Line the ring and spider with 1/16 in fibre and the slots with 1/64 in fibre channels. Wind each slot with about 12 ft of No. 21 wire, 40 turns in four layers of 10, shellacking each layer, leaving 2 in ends. Join each coil's start to the next coil's finish and solder the joints to the commutator pins.

Materiały do tego kroku:

Płyta z fibry (fibra wulkanizowana)Płyta z fibry (fibra wulkanizowana)1 sztuka
Drut miedziany emaliowanyDrut miedziany emaliowany1 sztuka
Politura szelakowaPolitura szelakowa1 sztuka
Lut cynowo-ołowiowyLut cynowo-ołowiowy1 sztuka

Potrzebne narzędzia:

LutownicaLutownica
9

Mount and wire

Screw the motor to a wood base 8 x 6 x 1 in with two terminals and a switch. Wire it in series: field end A to a terminal, field end C to one brush stud, the other brush through the switch to the other terminal.

Materiały do tego kroku:

Deska z drewna liściastegoDeska z drewna liściastego1 sztuka
Zacisk bananowyZacisk bananowy1 sztuka
Przełącznik dźwigniowyPrzełącznik dźwigniowy1 sztuka
Wkręty do drewnaWkręty do drewna1 sztuka

Potrzebne narzędzia:

Świder korbowy z wiertłemŚwider korbowy z wiertłem
10

Troubleshooting

Motor troubleshooting.

Flow

Loading...
11

History and honest limits

From W. A. Robertson in **The Boy Mechanic, Book 1** (Popular Mechanics, 1913), pp. 345-347 (checked on the archive.org scan boymechanic0000unse_n5a8). Sizes not in the text are in his Figs. 1-9; enamelled wire for cotton-covered and the low-voltage advice are ours.

Materiały

17

Wymagane narzędzia

11

Według tego planu powstaje

Powiązane blueprinty

Te blueprinty dzielą się wiedzą — technikami, materiałami lub zasadami
CC0 Domena publiczna

Ten plan jest udostępniany na licencji CC0. Możesz go swobodnie kopiować, modyfikować, rozpowszechniać i wykorzystywać do dowolnych celów, bez konieczności uzyskiwania zgody.

Wesprzyj Makera kupując produkty przez jego plan, za co zarabia Prowizja Makera ustalony przez sprzedawców, lub stwórz nową iterację tego planu i dołącz go jako połączenie w swoim własnym planie, aby dzielić się przychodami.

Dyskusja

(0)

Zaloguj się aby dołączyć do dyskusji

Ładowanie komentarzy...