SZTUKA
Piękno i dobre samopoczucie
RZEMIOSŁO
KULTURA I HISTORIA
ROZRYWKA
ŚRODOWISKO
JEDZENIE I NAPOJE
INŻYNIERIA ODWROTNA
NAUKI
LEKKOATLETYKA
TECHNOLOGIA
URZĄDZENIA DO NOSZENIA
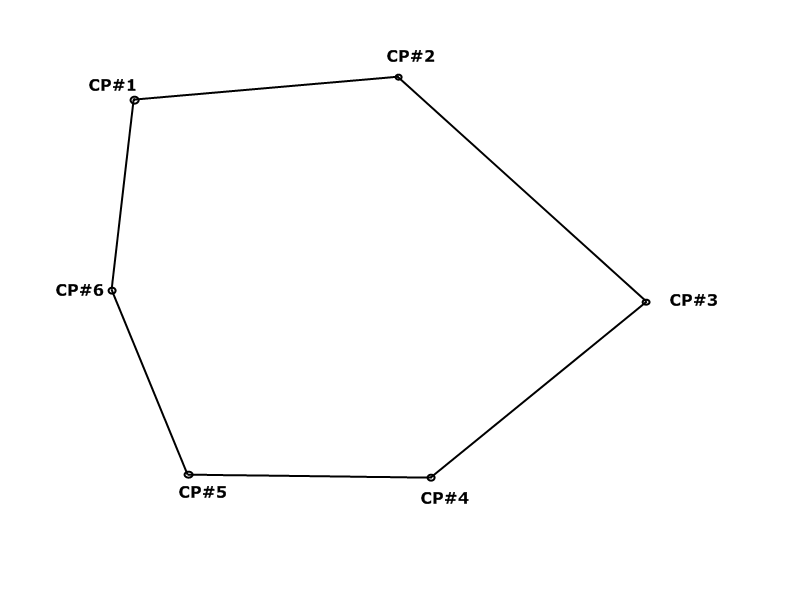


Running a Closed Traverse
A plane table maps what it can see from a couple of stations. To survey a whole site — round a building, through woodland, along a boundary — you walk a chain of stations from one to the next, measuring the length of each leg and the angle at each corner, and finish back where you began.
The reason it closes is the reason anyone trusts it. You know in advance what the angles of a closed polygon must add up to, and you know the trip must end at its own starting point. Both are checks nature provides for free, and the difference between what you measured and what must be true is your error — measured, not estimated.
This rung is the arithmetic heart of surveying. It is also where a survey stops being a collection of readings and becomes a set of coordinates you can build from.
Zaawansowany
2 days
Instrukcje
1
1
Choose and mark the stations
Choose and mark the stations
Pick stations that are intervisible, on firm ground, safe to stand on, and as few as the site allows. Drive a peg with a nail in its head at each, and number them.
Fewer, longer legs are better than many short ones: angular error enters once per station, so every extra corner is another chance to be wrong, while a longer leg costs you nothing extra in angle. Mark them well enough to find again — a survey you cannot reoccupy cannot be extended or checked.
Materiały do tego kroku:
 Kołki drewniane12 sztuk
 Gwoździe ocynkowane20 sztuk
Potrzebne narzędzia:
 Młotek ciesielski
 Zestaw chorągiewek i szpilek geodezyjnych
2
2
Measure every leg twice, in both directions
Measure every leg twice, in both directions
Tape each leg forwards and then backwards. The two should agree to within about a thousandth of the length; if they do not, measure again before moving on.
A blunder in a distance — a whole tape length missed, a misread metre — is the single most damaging error in a traverse, and unlike small random errors it cannot be adjusted away. It is also the easiest to catch, because a blunder never repeats identically. Measuring twice costs minutes; finding a 30-metre blunder after you have plotted everything costs the whole day.
Potrzebne narzędzia:
 Miara zwijana
3
3
Measure the angle at each station, both faces
Measure the angle at each station, both faces
At each station sight back to the previous one and forward to the next, and read the included angle. Then invert the telescope, swing it through, and read the same angle on the other face.
Averaging the two faces cancels most of the instrument's own mechanical errors in one move — it is the angular equivalent of balancing the sights when levelling. Always turn the angle the same way around the traverse, clockwise or anticlockwise, and never mix the two: it is a mistake that produces perfectly plausible numbers.
Potrzebne narzędzia:
 Kompas z klinometrem (typu Brunton)
 Statyw fotograficzny
4
4
Check the angles before you leave
Check the angles before you leave
The interior angles of a closed polygon with n sides must sum to (n-2)×180 degrees. Add yours up on the spot.
If the sum is out by more than a small tolerance, one angle is wrong, and you are still standing on the site where it can be remeasured. Doing this check at the desk that evening means going back. This is the same principle as the co-spot and the control slide in the two batches before this one: build the check into the work, not after it.
5
5
Reduce the traverse to coordinates
Reduce the traverse to coordinates
Wczytywanie notatnika Jupyter…
6
6
Plot it and look at it
Plot it and look at it
Plot the adjusted coordinates on squared paper at a sensible scale, and compare the shape with the site you just walked.
Coordinates are easy to get wrong in ways arithmetic checks cannot catch — a bearing carried the wrong way, an angle used as exterior instead of interior — and every one of those produces a plot that looks obviously wrong to anyone who was there. This is the plane table's lesson applied in reverse: draw it, because your eyes check things no column of figures can.
Materiały do tego kroku:
 Papier milimetrowy10 sztuk
Potrzebne narzędzia:
 Linijka
 Kątomierz
Materiały
3- 12 sztukZastępnik
- 20 sztukZastępnik
- 10 sztukZastępnik
Wymagane narzędzia
7- Zastępnik
- 1 vendor sell this, none ship to you yetZastępnik
- Zastępnik
- Zastępnik
- Zastępnik
- Zastępnik
Powiązane blueprinty
Te blueprinty dzielą się wiedzą — technikami, materiałami lub zasadami

CC0 Domena publiczna
Ten plan jest udostępniany na licencji CC0. Możesz go swobodnie kopiować, modyfikować, rozpowszechniać i wykorzystywać do dowolnych celów, bez konieczności uzyskiwania zgody.
Wesprzyj Makera kupując produkty przez jego plan, za co zarabia Prowizja Makera ustalony przez sprzedawców, lub stwórz nową iterację tego planu i dołącz go jako połączenie w swoim własnym planie, aby dzielić się przychodami.