Współpraca
SZTUKA
Piękno i dobre samopoczucie
RZEMIOSŁO
KULTURA I HISTORIA
ROZRYWKA
ŚRODOWISKO
JEDZENIE I NAPOJE
INŻYNIERIA ODWROTNA
NAUKI
LEKKOATLETYKA
TECHNOLOGIA
URZĄDZENIA DO NOSZENIA
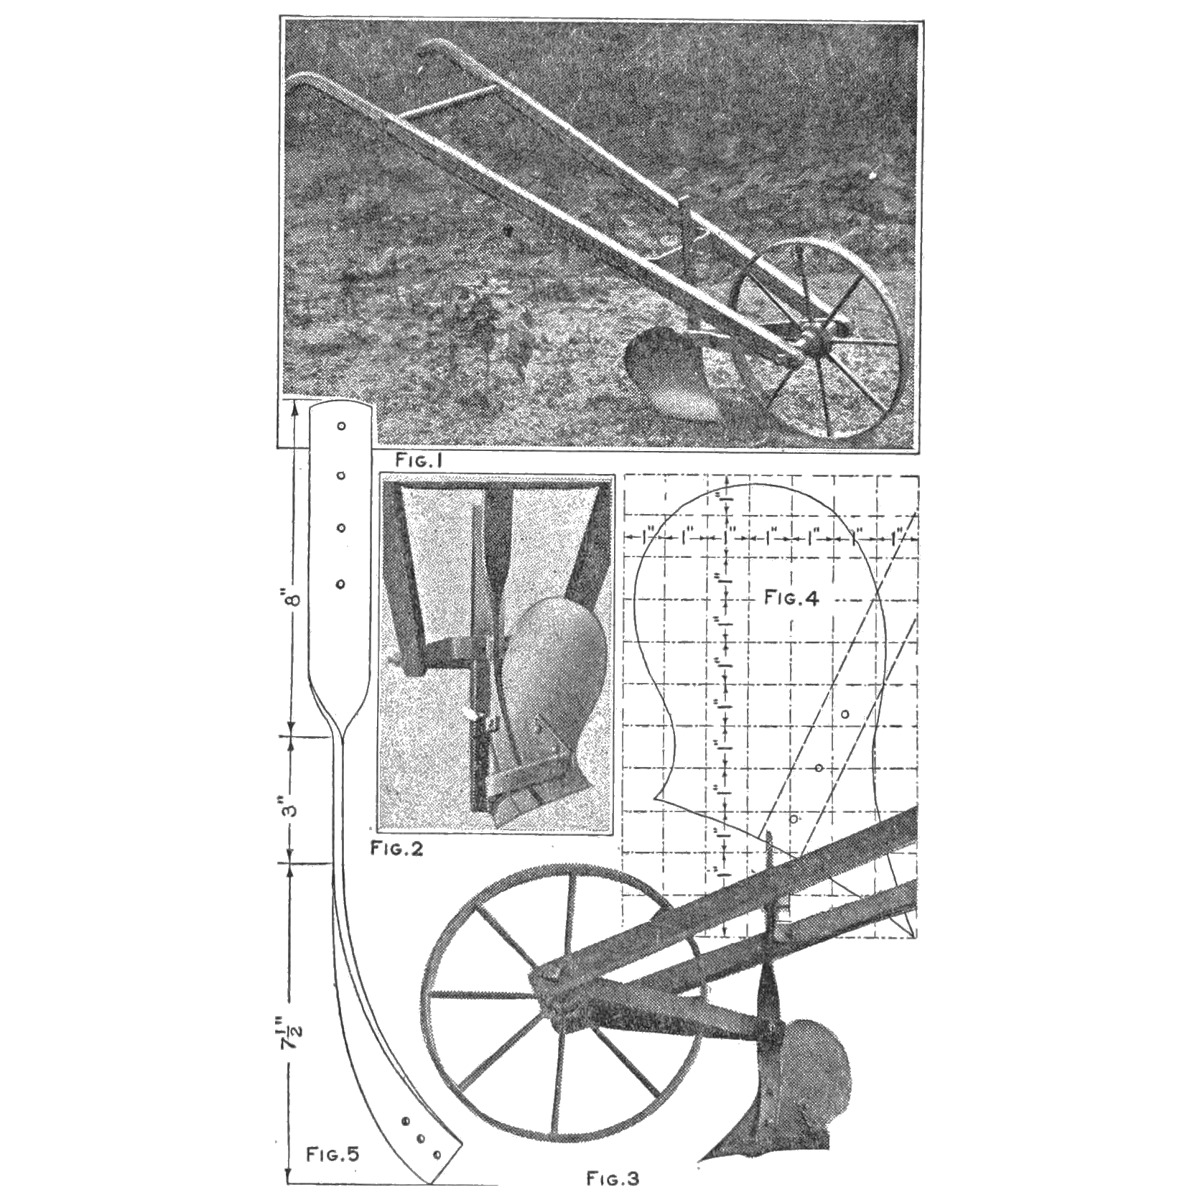


Garden Hand Plow From Scrap: Wheelbarrow Wheel, Ripped Spruce Handles and a Shovel-Blade Moldboard (Boy Mechanic, 1919)
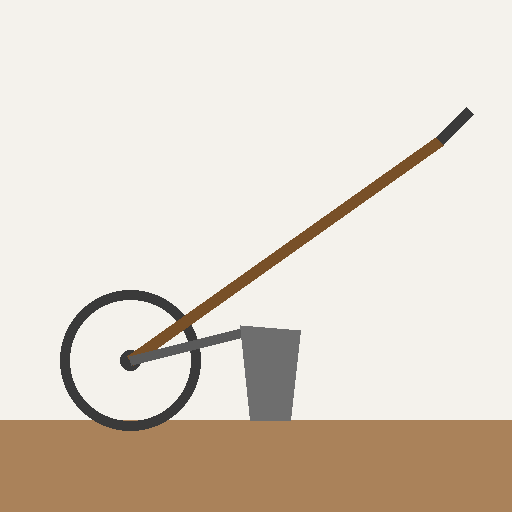
T. T. Sturgeon's hand plow from The Boy Mechanic, Book 3 (1919), "worth about $5 at an outlay of 25 cents": a 16 in wheelbarrow wheel, handles ripped from one spruce strip, iron-strap braces, an adjustable vertical strap, and a moldboard and share cut from an old shovel blade to his grid pattern.
Średniozaawansowany
About 1 day
Instrukcje
1
1
His cut list in centimetres
His cut list in centimetres
Wczytywanie notatnika Jupyter…
2
2
Read The Boy Mechanic, Book 3
Read The Boy Mechanic, Book 3
"The labor of spading a garden of even moderate size is sufficient to warrant the person who undertakes the job in making a hand plow like that shown in the illustration."
3
3
Make the handles
Make the handles
Mark both handles on a 7/8 by 4 in spruce strip 5 ft long, one curved grip at each end on opposite edges. Cut the curves with a keyhole saw, then rip the board into the two handles; smooth them and trim the grips with a sharp knife. Cut a section of broomstick for the upper brace.
Materiały do tego kroku:
 Deska z drewna liściastego1 sztuka
 Miotła1 sztuka
Potrzebne narzędzia:
 Piłka włosowa
 Piła wzdłużna
 Nóż do skóry
 Ołówek
4
4
Make the iron parts
Make the iron parts
Lower brace: iron 1/4 by 1-1/4 by 12 in, drilled for 1/4 in bolts, bent at right angles 1-1/2 in from each end, with a 1/4 in hole at the middle. Vertical support: 1/4 by 1-1/4 by 18 in, four 1/4 in adjusting holes 1 in apart at the top, three 1/4 in holes at the bottom for the moldboard, and a 5/16 in hole at the 7-1/2 in mark. Two braces 14 in long of 1/4 by 1-1/4 in, a 3/8 in hole at the front of each for the 3/8 by 10 in axle bolt and a 5/16 in hole at the other end, each 1 in from the end. Landside: 1/8 by 3/4 by 12 in.
Materiały do tego kroku:
 Płaskownik ze stali miękkiej3 sztuk
Potrzebne narzędzia:
 Piła do metalu
 Wiertarka ręczna
 Imadło warsztatowe
 Młotek
 Pilniki (pilnik ręczny)
 Miara zwijana
5
5
Cut the moldboard
Cut the moldboard
Draw his moldboard (Fig. 4) on cardboard ruled in 1 in squares, tracing the outline square by square, and mark the bolt holes. Trace it on an old shovel blade, using the thickest part for the point of the share. Cut it out, smooth the edges and sharpen the cutting edge. Drill for 1/4 in bolts to the vertical strap and 3/16 in bolts to the landside.
Materiały do tego kroku:
 Łopata1 sztuka
 Kartonowe arkusze na szablony1 sztuka
Potrzebne narzędzia:
OłówekPiła do metalu Szlifierka kątowaPilniki (pilnik ręczny)Wiertarka ręczna
6
6
Shape and assemble
Shape and assemble
Curve the moldboard and fit it to the supports as in Figs. 1-3. Bend the 12 in landside strip under the moldboard and bolt it on. Assemble on the 16 in wheel and 3/8 in axle bolt, with wheel and landside in line (Fig. 2) and the landside's rear edge raised slightly (Fig. 3); set the vertical strap's height for the operator in its adjusting holes. Paint the plow and oil the smoothed cutting parts.
Materiały do tego kroku:
 Koło do taczki1 sztuka
 Śruba zamkowa6 sztuk
 Nakrętka sześciokątna6 sztuk
 Podkładka płaska6 sztuk
 Farba olejna1 sztuka
 Olej maszynowy1 sztuka
Potrzebne narzędzia:
Imadło warsztatoweMłotek Pędzel szeroki
7
7
Troubleshooting
Troubleshooting
Garden plow troubleshooting.
Flow
Loading...
8
8
History and honest limits
History and honest limits
From "Garden Plow Made of Pick-Up Material" by T. T. Sturgeon, in **The Boy Mechanic, Book 3**, Popular Mechanics, 1919 (Project Gutenberg 71856; checked on the archive.org scan boymechanic0003unse, pp. 227-228). The moldboard shape is his Fig. 4 grid. The keyhole saw is a coping saw here; the tools and metric figures are ours.
Materiały
11- 1 sztukaZastępnik
- 1 sztukaZastępnik
- 3 sztukZastępnik
- 1 sztukaZastępnik
- 1 sztukaZastępnik
- 1 sztukaZastępnik
- 6 sztukZastępnik
- 6 sztukZastępnik
- 6 sztukZastępnik
- 1 sztukaZastępnik
- 1 sztukaZastępnik
Wymagane narzędzia
12- Zastępnik
- Zastępnik
- Zastępnik
- 1 vendor sell this, none ship to you yetZastępnik
- Zastępnik
- Zastępnik
- Zastępnik
- Zastępnik
- Zastępnik
- 1 vendor sell this, none ship to you yetZastępnik
- 1 vendor sell this, none ship to you yetZastępnik
- Zastępnik
Według tego planu powstaje
Powiązane blueprinty
Te blueprinty dzielą się wiedzą — technikami, materiałami lub zasadami
CC0 Domena publiczna
Ten plan jest udostępniany na licencji CC0. Możesz go swobodnie kopiować, modyfikować, rozpowszechniać i wykorzystywać do dowolnych celów, bez konieczności uzyskiwania zgody.
Wesprzyj Makera kupując produkty przez jego plan, za co zarabia Prowizja Makera ustalony przez sprzedawców, lub stwórz nową iterację tego planu i dołącz go jako połączenie w swoim własnym planie, aby dzielić się przychodami.