SZTUKA
Piękno i dobre samopoczucie
RZEMIOSŁO
KULTURA I HISTORIA
ROZRYWKA
ŚRODOWISKO
JEDZENIE I NAPOJE
INŻYNIERIA ODWROTNA
NAUKI
LEKKOATLETYKA
TECHNOLOGIA
URZĄDZENIA DO NOSZENIA


Plastic Syringe Set: Moulded Barrel and a Soft Polyethylene Piston
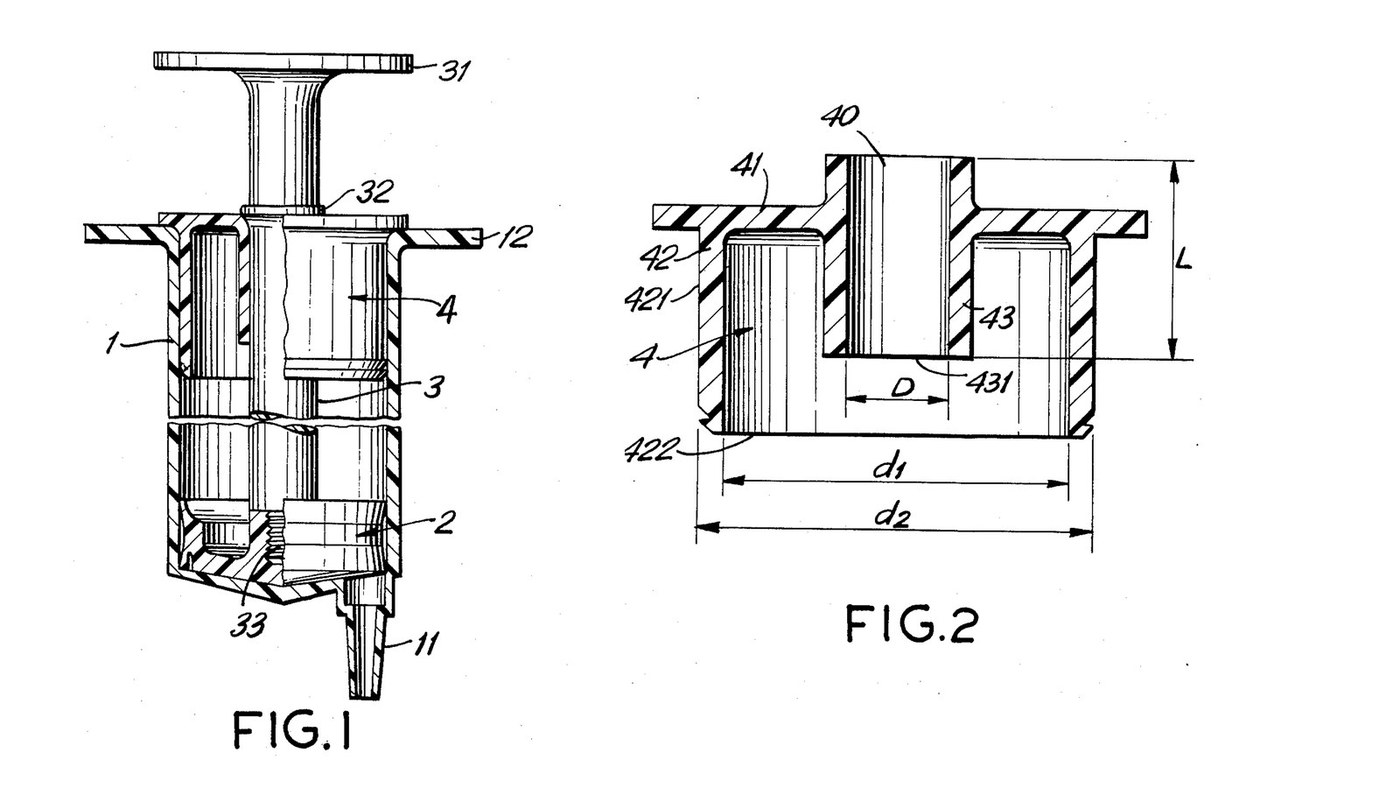
Four moulded parts make a plastic syringe with no rubber seal and no grease: a stiff barrel with a taper nozzle, a bell-shaped piston whose thin polyethylene lips seal against the wall, a slim plunger shaft, and a cap whose long sleeve guides the shaft so it cannot bend and tilt the piston (Adorján & Dávid, US 4,704,105, 1987). Mould one set of moulds per size for a set of syringes for hydraulic models.
The piston figures are the patent's. Polypropylene, LDPE, the sizes and the mould making are ours. Not for medical use. The picture: Figs. 1-2.
Zaawansowany
3 days (moulds) + 1 hour per batch
Instrukcje
1
1
The moulding process
The moulding process
Drying, mould, injection, cooling and inspection all follow this blueprint. The steps below add only what the syringe needs.
2
2
Mill the barrel mould
Mill the barrel mould
Mill a two-plate mould for the barrel (1): a stiff-walled tube closed at one end by a nozzle (11) with a standard needle taper (ours: the Luer taper), and two finger grips (12) at the open end. One mould per syringe size you want, for example 5, 50 and 60 ml (ours).
Potrzebne narzędzia:
 Frezarka
 Blok aluminiowy formy wtryskowej (2-płytowej)
 Rama formy wtryskowej
3
3
Mill the piston mould
Mill the piston mould
The piston (2) is a bell: a rim 5-7 mm high whose two edges flare out into lips 0.3-0.5 mm thick, a front groove 0.3-0.5 mm wide and 2-2.5 mm deep, and a central shank. The lips must come out 0.2-0.6 mm wider than the barrel bore; the rim between them no wider than the bore.
Potrzebne narzędzia:
FrezarkaBlok aluminiowy formy wtryskowej (2-płytowej)Rama formy wtryskowej Suwmiarka cyfrowa 6 cali
4
4
Mill the shaft and cap moulds
Mill the shaft and cap moulds
Shaft (3): thumb rest (31), a bead (32) and an end projection (33) a little larger than the piston's bore. Cap (4): a disc with an outer collar (42) that force-fits the barrel and an inner sleeve (43) at least as long as the shaft is thick.
Potrzebne narzędzia:
FrezarkaBlok aluminiowy formy wtryskowej (2-płytowej)Rama formy wtryskowej5
5
Mould the barrels
Mould the barrels
Mould the barrels from virgin plastic. The patent asks only for a rigid plastic; ours: polypropylene.
Materiały do tego kroku:
 Granulat polipropylenowy1 batch
Potrzebne narzędzia:
 Suszarka do granulatu
 Wtryskarka
6
6
Mould the pistons
Mould the pistons
Mould the pistons from virgin polyethylene, which the patent wants at 65-90 degrees Shore (scale not stated). Ours: LDPE; check your grade's data sheet.
Materiały do tego kroku:
 Granulat LDPE1 batch
Potrzebne narzędzia:
Suszarka do granulatuWtryskarka7
7
Mould the shafts and caps
Mould the shafts and caps
Mould shafts and caps. These may be reprocessed plastic, as they never touch the liquid. Ours: polypropylene.
Materiały do tego kroku:
Granulat polipropylenowy1 batchPotrzebne narzędzia:
Wtryskarka8
8
Check the lip size
Check the lip size
Measure the barrel bore and a piston's lips. The lips must be 0.2-0.6 mm wider than the bore. Adjust the mould if not.
Potrzebne narzędzia:
Suwmiarka cyfrowa 6 cali9
9
Snap the shaft into the piston
Snap the shaft into the piston
Push the shaft's projection through the small bore at the back of the piston until it snaps into the wider cavity behind it.
10
10
Assemble
Assemble
Push the piston into the barrel. Thread the shaft through the cap's sleeve and force the cap's outer collar into the open end of the barrel. Its end face now stops the piston when you draw it fully back.
11
11
Lock the cap
Lock the cap
Press two dents, opposite each other, through the barrel wall into the cap collar with a hot tool so the cap cannot pull out. Ours: a soldering iron tip.
Potrzebne narzędzia:
 Lutownica elektryczna
12
12
Test the seal
Test the seal
Draw water and push it out, along the whole stroke, with no grease. It should move smoothly from the start and not leak past the lips. Note the size and file it into your set.
Potrzebne narzędzia:
 Woda
 Zlewka szklana
Materiały
2- 1 batchZastępnik
- 1 batchZastępnik
Wymagane narzędzia
9- Zastępnik
- Zastępnik
- Zastępnik
- Zastępnik
- Zastępnik
- Zastępnik
- Zastępnik
- Zastępnik
Według tego planu powstaje


Powiązane blueprinty
Te blueprinty dzielą się wiedzą — technikami, materiałami lub zasadami
CC0 Domena publiczna
Ten plan jest udostępniany na licencji CC0. Możesz go swobodnie kopiować, modyfikować, rozpowszechniać i wykorzystywać do dowolnych celów, bez konieczności uzyskiwania zgody.
Wesprzyj Makera kupując produkty przez jego plan, za co zarabia Prowizja Makera ustalony przez sprzedawców, lub stwórz nową iterację tego planu i dołącz go jako połączenie w swoim własnym planie, aby dzielić się przychodami.