Współpraca
SZTUKA
Piękno i dobre samopoczucie
RZEMIOSŁO
KULTURA I HISTORIA
ROZRYWKA
ŚRODOWISKO
JEDZENIE I NAPOJE
INŻYNIERIA ODWROTNA
NAUKI
LEKKOATLETYKA
TECHNOLOGIA
URZĄDZENIA DO NOSZENIA
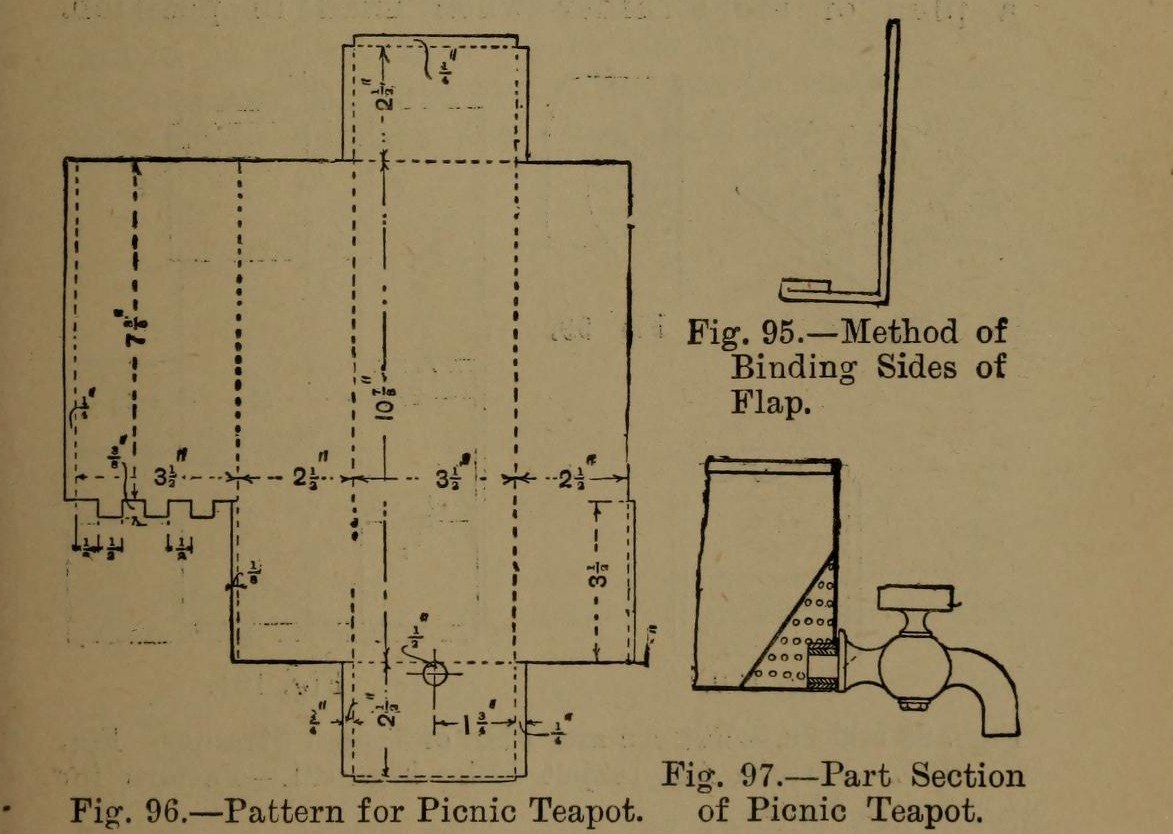


Teapot: a Tinplate Picnic Teapot with Cock and Strainer (Hasluck, 1907)
A square tinplate teapot from a picnic outfit: folded from one blank, with a hinged lid, and a cock at the bottom behind a perforated strainer that holds back the leaves.
Blank 1 ft 4 1/4 in by 1 ft 0 3/8 in; lid 4 1/8 by 4 in.
Source: Paul N. Hasluck, Tinplate Work (1907), pp. 37-39. Unknown: folding order, solder, the cock. Picture: Figs. 96-97 of the book.
Średniozaawansowany
Unknown
Instrukcje
1
1
Cut the body blank
Cut the body blank
Cut a piece of tin 1 ft 4 1/4 in long by 1 ft 0 3/8 in wide and mark the pattern of Fig. 96 on it, with the hole for the cock tube. Not given: the folding order. Ours: bend it up on the dotted lines and solder the seams.
Materiały do tego kroku:
 Arkusz blachy białej1 body
 Lut cynowo-ołowiowy1 sztuka
Potrzebne narzędzia:
 Rysik traserski
 Nożyce do blachy
 Palik
 Pobijak drewniany
 Lutownica elektryczna
 Topnik
2
2
Fit the cock and strainer
Fit the cock and strainer
Solder a tube about 1/2 in long into the hole for the cock (Fig. 97) and fit the cock to it. Develop the strainer (Fig. 98): top curve radius 1 13/16 in, chord corner to corner 2 15/16 in. Perforate it and solder it across the corner in front of the tube (Fig. 99).
Materiały do tego kroku:
 Rura mosiężna1 1/2 in
 Kurek spustowy1 sztukaArkusz blachy białej1 strainerLut cynowo-ołowiowy1 sztuka
Potrzebne narzędzia:
 Cyrkiel traserskiNożyce do blachy
 Wykrojnik do blachy
 Klocek z drewna twardegoLutownica elektrycznaTopnik
3
3
Make the hinged lid
Make the hinged lid
Cut the lid (Fig. 100) 4 1/8 by 4 in; the inner rectangle 3 1/2 by 3 1/2 in leaves 1/4 in to bend up. Cut hinge projections 1/2 in wide by 5/8 in deep with equal spaces, the outer ones only 1/4 in wide. Bend them round a wire 1/16 in thick. Hasluck adds that the teapot may be enamelled dark green.
Materiały do tego kroku:
Arkusz blachy białej1 lid Drut żelazny1 1/16 in
Potrzebne narzędzia:
Nożyce do blachyPalikPobijak drewnianyMateriały
5- 1 lidZastępnik
- 2 sztukZastępnik
- 1 1/2 inZastępnik
- 1 sztukaZastępnik
- 1 1/16 inZastępnik
Materiały z połączonych planów



Według tego planu powstaje
CC0 Domena publiczna
Ten plan jest udostępniany na licencji CC0. Możesz go swobodnie kopiować, modyfikować, rozpowszechniać i wykorzystywać do dowolnych celów, bez konieczności uzyskiwania zgody.
Wesprzyj Makera kupując produkty przez jego plan, za co zarabia Prowizja Makera ustalony przez sprzedawców, lub stwórz nową iterację tego planu i dołącz go jako połączenie w swoim własnym planie, aby dzielić się przychodami.