
Współpraca
SZTUKA
Piękno i dobre samopoczucie
RZEMIOSŁO
KULTURA I HISTORIA
ROZRYWKA
ŚRODOWISKO
JEDZENIE I NAPOJE
INŻYNIERIA ODWROTNA
NAUKI
LEKKOATLETYKA
TECHNOLOGIA
URZĄDZENIA DO NOSZENIA
V-Slide Tubing Cutter: Two Slide Halves Held on the Ways by One Spring Clip, a Reamer on the Frame (Thewes, 1938)
Forge

Autor

Forge

13. listopad 2026NO
13
0
0
0
0

V-Slide Tubing Cutter: Two Slide Halves Held on the Ways by One Spring Clip, a Reamer on the Frame (Thewes, 1938)

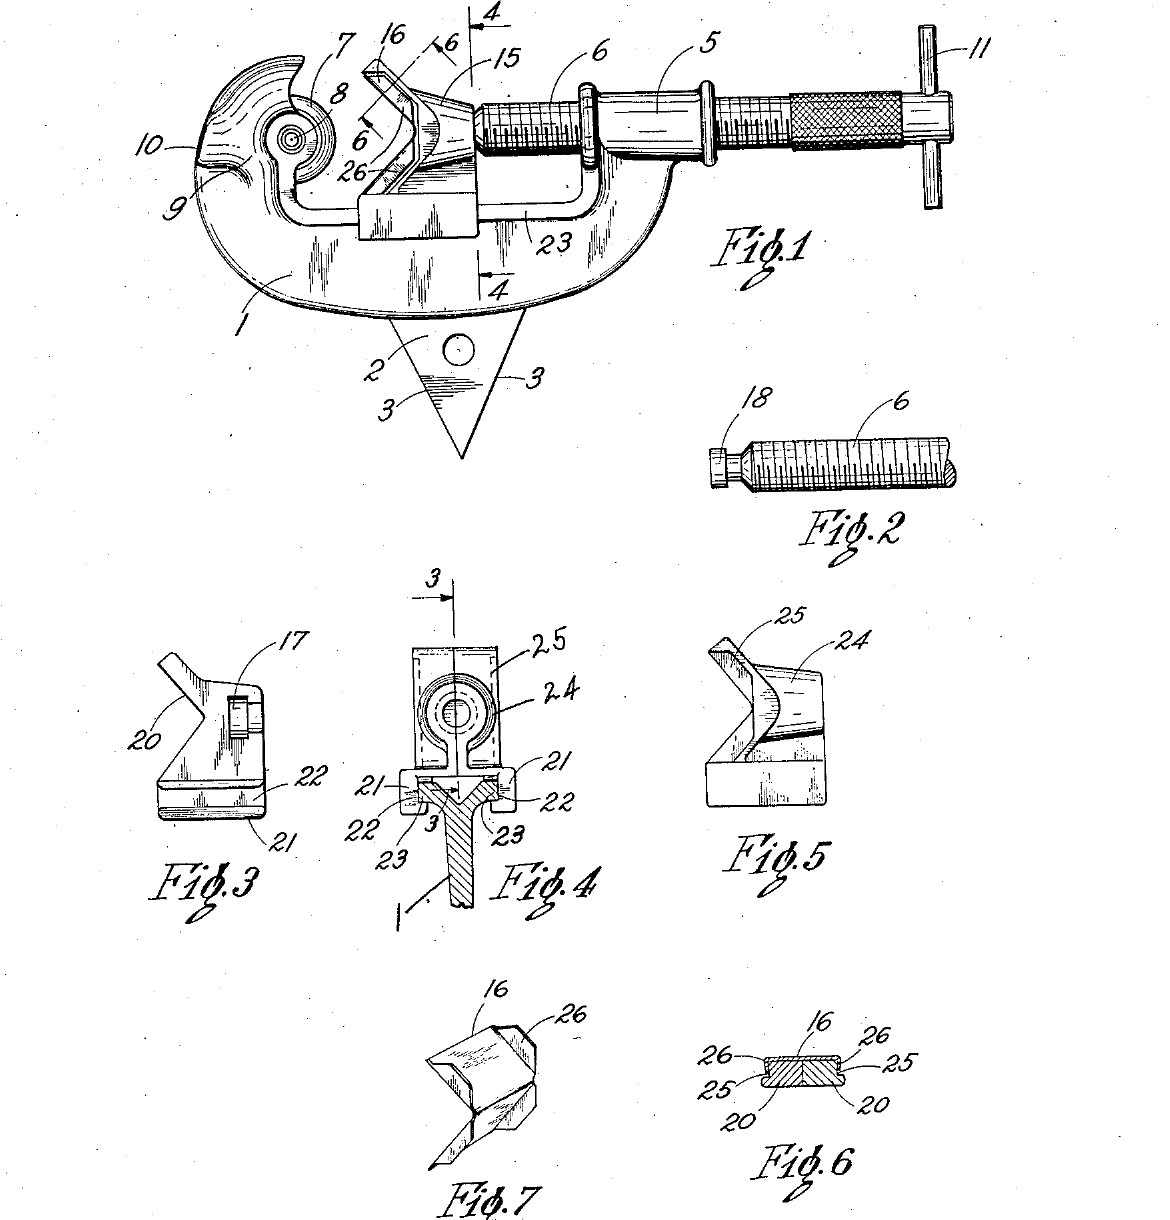
William O. Thewes of North Ridgeville, Ohio, received US 2,130,934, dated 20 September 1938 and assigned to The Ridge Tool Company, for a cutter for thin copper and brass tubing. A C-frame carries a cutting wheel at one end and a feed screw at the other. The screw pushes a V-slide that holds the tube against the wheel. The slide is two halves on ways along the frame, held together by one V-shaped spring clip, which is also the face the tube bears on. A triangular reamer on the side of the frame cleans the cut end, and the frame is its handle. We saw the frame from steel plate and pin the reamer in. His parts were die cast. All sizes are ours.
Średniozaawansowany
About 3 days

Instrukcje

1

Where the tube sits

Wczytywanie notatnika Jupyter…
2

Read US 2,130,934

"With my improved cutter the ways or guides are integral with the frame and are uninterrupted throughout the length of the frame, and the slide is held in close sliding engagement on the ways without the use of bolts or rivets."
3

Print the template

Frame, slide half, end section, reamer and clip blank at 1:1 on A4, with the 8 and 28 mm tubes drawn in. print at 100 % (check the 50 mm bar).
Plik projektowyPDFCC0 - Free
4

Saw out the frame

Glue the frame outline on 16 mm plate. Drill a row of holes inside the C, saw to them, and file to the line. Saw the 7 mm wheel slot down through the wheel post with two cuts, break out the middle and file it flat. Drill the 5 mm wheel pin and 4 mm tie pin holes across the slot. Drill 8.5 mm along the screw axis through the other post and tap it M10.

Materiały do tego kroku:

Blacha gruba ze stali niskowęglowejBlacha gruba ze stali niskowęglowej1 sztuka

Potrzebne narzędzia:

Piła do metaluPiła do metalu
Zestaw pilnikówZestaw pilników
Wiertarka stołowaWiertarka stołowa
Imadło maszynoweImadło maszynowe
Zestaw wiertełZestaw wierteł
Zestaw do gwintowaniaZestaw do gwintowania
PunktakPunktak
Rysik traserskiRysik traserski
Imadło warsztatoweImadło warsztatowe
Olej do cięciaOlej do cięcia
5

File the ways

Along the bottom bar, between the posts, file a groove 2 mm deep and 4 mm high in both faces, 3 mm below the top edge. This leaves a T-shaped rib along the top: the ways. Keep it straight and the same all along, so the slide runs smoothly from end to end.

Potrzebne narzędzia:

Zestaw pilnikówZestaw pilników
Zestaw pilników iglakówZestaw pilników iglaków
Imadło warsztatoweImadło warsztatowe
Suwmiarka cyfrowa 6 caliSuwmiarka cyfrowa 6 cali
6

Turn the cutting wheel

Chuck a tool steel bar and face it. Turn the end to 20 mm across for 10 mm, centre drill and drill a 5 mm hole 10 mm deep, and turn the edge to a 50 degree vee, 25 degrees each side, sharp in the middle of the 6 mm width. Part it off 6 mm long and take the burr off the hole.

Materiały do tego kroku:

Pręt ze stali narzędziowejPręt ze stali narzędziowej1 sztuka

Potrzebne narzędzia:

Tokarka do metaluTokarka do metalu
Uchwyt tokarski 3-szczękowyUchwyt tokarski 3-szczękowy
Nóż tokarskiNóż tokarski
Przecinak tokarskiPrzecinak tokarski
Zestaw nawiertakówZestaw nawiertaków
Zestaw wiertełZestaw wierteł
Suwmiarka cyfrowa 6 caliSuwmiarka cyfrowa 6 cali
Okulary ochronneOkulary ochronne
7

Make the reamer

Saw a triangle with 22 mm sides from 3 mm flat tool steel and drill its 4 mm hole. Grind each edge to a 60 degree bevel from both sides, so all three edges cut. Saw a 3 mm wide slot, 22 mm long and 8 mm deep, in the middle of the frame's bottom edge, 50 mm from the wheel end, and drill the 4 mm pin hole across it.

Materiały do tego kroku:

Płaskownik ze stali narzędziowejPłaskownik ze stali narzędziowej1 sztuka

Potrzebne narzędzia:

Piła do metaluPiła do metalu
Szlifierka stołowaSzlifierka stołowa
Wiertarka stołowaWiertarka stołowa
Zestaw wiertełZestaw wierteł
Zestaw pilnikówZestaw pilników
Okulary ochronneOkulary ochronne
8

Harden and temper

Heat the wheel and the reamer to a cherry red, until a magnet no longer sticks, and quench it in water, moving it about. Rub it bright with a stone, warm it on a piece of steel plate over the fire, and quench again as soon as it turns a light straw colour.

Potrzebne narzędzia:

Palenisko kowalskiePalenisko kowalskie
Kleszcze kowalskieKleszcze kowalskie
Mały magnesMały magnes
Kadź hartowniczaKadź hartownicza
WodaWoda
OsełkaOsełka
Rękawice spawalniczeRękawice spawalnicze
Okulary ochronneOkulary ochronne
9

Make the slide halves

Saw two pieces of 10 mm plate to the slide outline, one the mirror of the other, and file the V. On the inner face of each, saw and file a pocket for half the screw head and a slot for its neck. Saw and file a step along the bottom edge of each half so its lip fits the groove under the ways (end section on the template). File a shallow notch in the outer face of each half, beside the V, for the clip's tongues.

Materiały do tego kroku:

Blacha gruba ze stali niskowęglowejBlacha gruba ze stali niskowęglowej1 sztuka

Potrzebne narzędzia:

Piła do metaluPiła do metalu
Zestaw pilnikówZestaw pilników
Zestaw pilników iglakówZestaw pilników iglaków
Imadło warsztatoweImadło warsztatowe
Suwmiarka cyfrowa 6 caliSuwmiarka cyfrowa 6 cali
Rysik traserskiRysik traserski
10

Bend the V clip

Cut the clip blank from 0.5 mm spring steel strip. Bend the four tongues up at right angles, then fold the blank to 90 degrees on the dashed line, over the slide's V.

Materiały do tego kroku:

Taśma ze stali sprężynowejTaśma ze stali sprężynowej1 sztuka

Potrzebne narzędzia:

Piła do metaluPiła do metalu
Zestaw pilnikówZestaw pilników
Imadło warsztatoweImadło warsztatowe
Młotek ślusarski z kulistym rąbemMłotek ślusarski z kulistym rąbem
11

Make the feed screw

Cut 120 mm of M10 threaded rod. Chuck it and turn the end to a 9 mm head 4 mm long on a 6 mm neck 3 mm long. Drill a 6 mm hole across the other end and push a 70 mm piece of 6 mm rod through it for the T-handle. Peen it both sides so it stays put.

Materiały do tego kroku:

Pręt gwintowanyPręt gwintowany1 sztuka
Pręt ze stali niskowęglowejPręt ze stali niskowęglowej1 sztuka

Potrzebne narzędzia:

Tokarka do metaluTokarka do metalu
Uchwyt tokarski 3-szczękowyUchwyt tokarski 3-szczękowy
Nóż tokarskiNóż tokarski
Przecinak tokarskiPrzecinak tokarski
Wiertarka stołowaWiertarka stołowa
Zestaw wiertełZestaw wierteł
Młotek ślusarski z kulistym rąbemMłotek ślusarski z kulistym rąbem
Piła do metaluPiła do metalu
12

Assemble

Fit the wheel in its slot with the 5 mm pin, and the 4 mm tie pin above it, peened. Tap the reamer into its slot and pin it. Screw the feed screw through the boss. Put the halves on the ways from the sides, closing them round the screw head, and spring the clip over their V so its tongues snap into the notches. Oil the ways and the screw.

Materiały do tego kroku:

Kołek stalowyKołek stalowy3 sztuk

Potrzebne narzędzia:

Młotek ślusarski z kulistym rąbemMłotek ślusarski z kulistym rąbem
PunktakPunktak
Imadło warsztatoweImadło warsztatowe
Olej do cięciaOlej do cięcia
13

Cut a copper tube

Mark a copper tube and hold it in a vice with soft jaws, or by hand for small tubes. Open the screw, drop the cutter over the tube, and screw the slide in until the wheel just touches. Turn the cutter once round, give the screw about a quarter turn, and go on until the tube parts. The wheel should run in its own groove; the end should be square and not squeezed oval. Clean the inside of the end with a deburring tool.

Materiały do tego kroku:

Rura miedzianaRura miedziana1 sztuka

Potrzebne narzędzia:

Imadło warsztatoweImadło warsztatowe

GradownikGradownik
Suwmiarka cyfrowa 6 caliSuwmiarka cyfrowa 6 cali
14

Ream the end

Hold the frame like a T-handle, put the reamer's point in the cut end, and turn it a few times to take off the fin the wheel has turned in.

Potrzebne narzędzia:

Imadło warsztatoweImadło warsztatowe
15

Troubleshooting

Tubing cutter troubleshooting.

Flow

Loading...
16

History and honest limits

**William O. Thewes** of North Ridgeville, Ohio, US 2,130,934, dated 20 September 1938, filed 4 November 1935, assigned to The Ridge Tool Company. Earlier slides needed notched ways, which weaken the frame, or bolts that come loose; he claimed "a V block reciprocable on the guideway and comprising two sections, and a face plate clamping said sections together". A later certificate corrects "same" to "frame" and "base" to "boss". His frame and slide were die cast and the reamer cast into the frame; ours are sawn from plate and the reamer is pinned. The patent gives no sizes; all of ours are ours.

Materiały

8

Wymagane narzędzia

28

Pliki projektowe

1

Według tego planu powstaje

CC0 Domena publiczna

Ten plan jest udostępniany na licencji CC0. Możesz go swobodnie kopiować, modyfikować, rozpowszechniać i wykorzystywać do dowolnych celów, bez konieczności uzyskiwania zgody.

Wesprzyj Makera kupując produkty przez jego plan, za co zarabia Prowizja Makera ustalony przez sprzedawców, lub stwórz nową iterację tego planu i dołącz go jako połączenie w swoim własnym planie, aby dzielić się przychodami.

Dyskusja

(0)

Zaloguj się aby dołączyć do dyskusji

Ładowanie komentarzy...