Współpraca
SZTUKA
Piękno i dobre samopoczucie
RZEMIOSŁO
KULTURA I HISTORIA
ROZRYWKA
ŚRODOWISKO
JEDZENIE I NAPOJE
INŻYNIERIA ODWROTNA
NAUKI
LEKKOATLETYKA
TECHNOLOGIA
URZĄDZENIA DO NOSZENIA
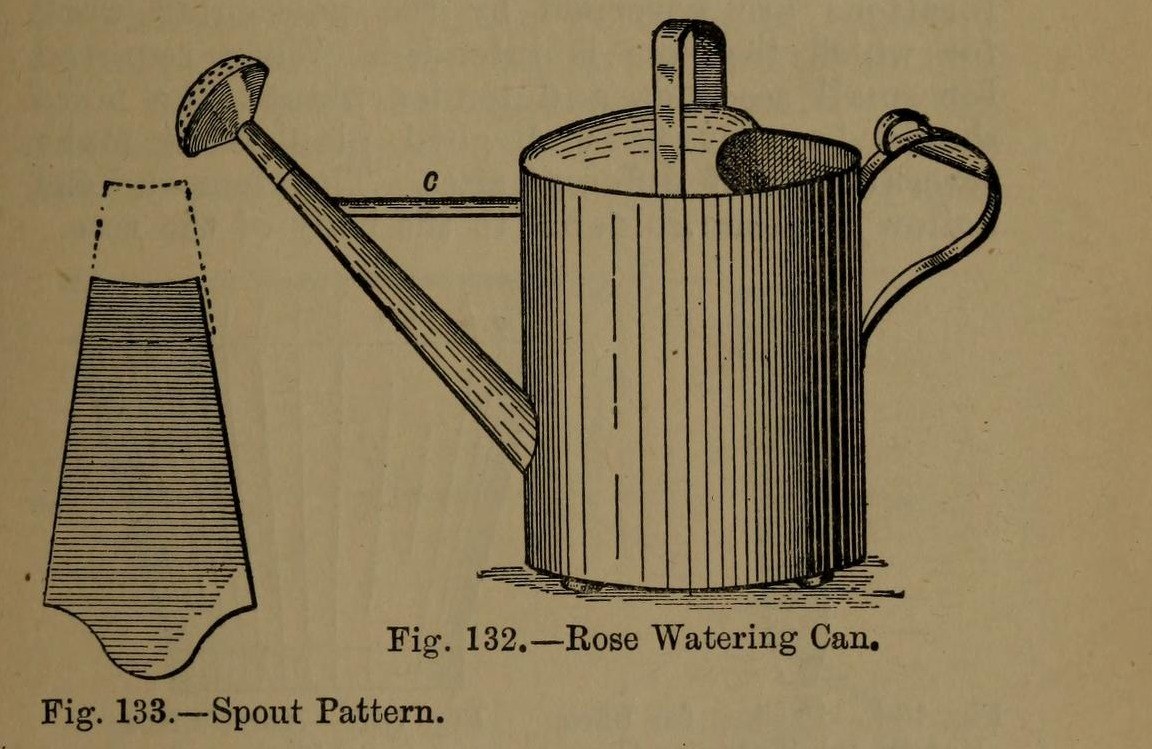


Watering Can: the Tinplate Rose Watering-Can (Hasluck, 1907)
A tinsmith's garden watering can: a round body from one sheet 2 ft 1 in x 8 1/2 in, a two-piece spout with a perforated rose, a hollowed top with a cross handle, and a back handle with a thumb ring. Tinplate or galvanised iron.
Variable: the rose. Its pattern diameter is the rose diameter x 4 / 3; finer holes for seedlings.
Source: Paul N. Hasluck, Tinplate Work (1907), pp. 54-57. Unknown: solder. Picture: Figs. 132-135 of the book.
Średniozaawansowany
Unknown
Instrukcje
1
1
Make the body and bottom
Make the body and bottom
Cut a sheet 2 ft 1 in by 8 1/2 in. Wire one edge, sink it in the crease iron, round it and groove the seam; solder the seam inside. Cut the spout hole opposite the seam, 2 1/2 in from the bottom. Edge the bottom to fit, beat it up and solder it from inside.
Materiały do tego kroku:
 Arkusz blachy białej1 body, bottom
 Drut żelazny1 edge
 Lut cynowo-ołowiowy1 sztuka
Potrzebne narzędzia:
 Nożyce do blachy
 Palik
 Pobijak drewniany
 Lutownica elektryczna
 Topnik
2
2
Make and fit the spout
Make and fit the spout
Cut the spout in two pieces (Fig. 133), bend them to shape and solder the seams. Solder the larger piece into the body. Make it longer for plants out of reach, with an elbow for plants up high. Make the stay: a taper strip as long as the gap between can and spout, bent to a half-round section and soldered in.
Materiały do tego kroku:
Arkusz blachy białej1 spout, stayLut cynowo-ołowiowy1 sztukaPotrzebne narzędzia:
Nożyce do blachyPalikLutownica elektrycznaTopnik3
3
Make the rose
Make the rose
Set out the rose body (Fig. 135): its diameter is the rose diameter x 4 / 3, so a 3 in rose needs a 4 in pattern, with lines a b at right angles. Bend it over a funnel stake and solder the seam. Hollow a disc for the front, with edges for capping on. Inside the hollow, mark circles and pierce them at intervals with a bradawl over a hard wood block; very fine for seedlings. Solder front and stem to the rose body. Several roses of different sizes are useful.
Materiały do tego kroku:
Arkusz blachy białej1 roseLut cynowo-ołowiowy1 sztukaPotrzebne narzędzia:
 Cyrkiel traserskiNożyce do blachyPalik
 Młotek do planowania
 Szydło
 Klocek z drewna twardegoLutownica elektrycznaTopnik
4
4
Fit the top and handles
Fit the top and handles
Hollow the top (Fig. 134), fit it to the body, wire its inner arc and solder it on. Cross handle: a strip about 1 3/4 in wide, wired with No. 12 B.W.G., bent to shape; cut two holes in the top with a small sharp chisel and solder the ends inside and on top. Back handle (Fig. 136): wire and bend it, solder a small boss under its upper part, and solder it opposite the spout with a thumb ring at the top. Solder three small hollowed studs under the bottom.
Materiały do tego kroku:
Arkusz blachy białej1 top, handles, studsDrut żelazny1 No. 12 B.W.G.Lut cynowo-ołowiowy1 sztukaPotrzebne narzędzia:
Nożyce do blachyMłotek do planowania Przecinak stalowyLutownica elektrycznaTopnik
5
5
Clean and paint
Clean and paint
Clean with turpentine and whiting. Give two good coats of paint: red inside and green outside suit it.
Materiały do tego kroku:
 Farba olejna2 coats
Potrzebne narzędzia:
 Terpentyna
 Węglan wapnia (kreda malarska)
Materiały
4- 1 top, handles, studsZastępnik
- 1 No. 12 B.W.G.Zastępnik
- 4 sztukZastępnik
- 2 coatsZastępnik
Wymagane narzędzia
12- Zastępnik
- Zastępnik
- Zastępnik
- Zastępnik
- Zastępnik
- Zastępnik
- Zastępnik
- Zastępnik
- Zastępnik
- Zastępnik
- Zastępnik
- Zastępnik
Materiały z połączonych planów



Według tego planu powstaje

CC0 Domena publiczna
Ten plan jest udostępniany na licencji CC0. Możesz go swobodnie kopiować, modyfikować, rozpowszechniać i wykorzystywać do dowolnych celów, bez konieczności uzyskiwania zgody.
Wesprzyj Makera kupując produkty przez jego plan, za co zarabia Prowizja Makera ustalony przez sprzedawców, lub stwórz nową iterację tego planu i dołącz go jako połączenie w swoim własnym planie, aby dzielić się przychodami.