Сотрудничество
ИСКУССТВО
КРАСОТА И ЗДОРОВЬЕ
РЕМЕСЛО
КУЛЬТУРА И ИСТОРИЯ
РАЗВЛЕЧЕНИЯ
ЭКОЛОГИЯ
ЕДА И НАПИТКИ
ОБРАТНАЯ ИНЖЕНЕРИЯ
НАУКИ
СПОРТ
ТЕХНОЛОГИИ
НОСИМЫЕ УСТРОЙСТВА
Friction Plunger Churn: Cream Pumped Through Openings You Close a Little More as It Thickens
Buttercup

Создано

Buttercup

10. ноябрь 2026IE
1
0
0
0
0

Friction Plunger Churn: Cream Pumped Through Openings You Close a Little More as It Thickens

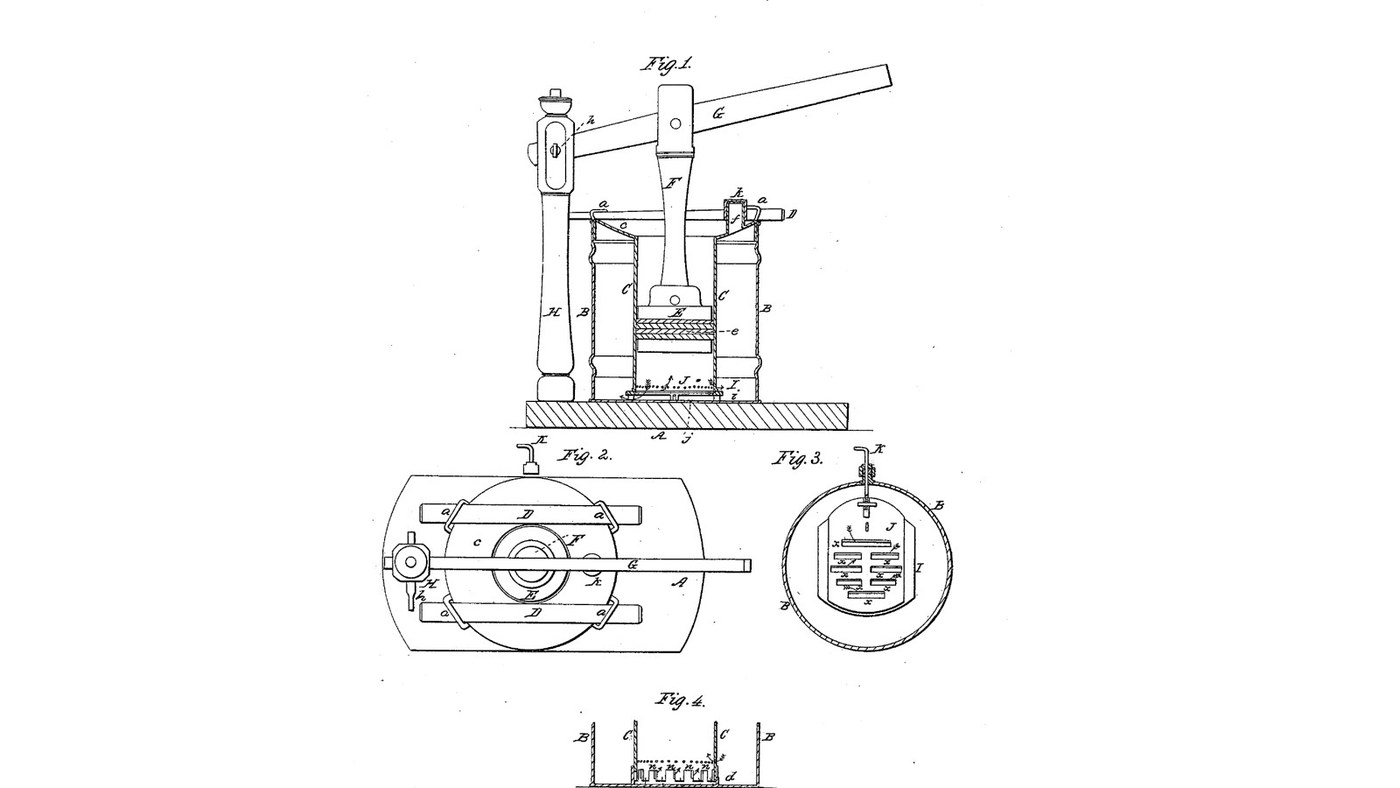
John J. Lehaye of Reading, Pennsylvania, received US 25,162, dated 16 August 1859, for a churn that works by friction. A hollow cylinder stands inside the cream vessel on two slotted plates. A packed plunger, worked by a long lever, draws the cream from the vessel into the cylinder through the slots and drives it back. A screw rod through a stuffing box in the vessel's side slides the upper plate, so the openings can be narrowed as the churning goes on. Lehaye gives no sizes; every size here is ours.
Средний
About 2 days, plus printing

Инструкции

1

How hard the cream is rubbed through the openings

Загрузка блокнота Jupyter…
2

A piston that draws through a grate, the week before

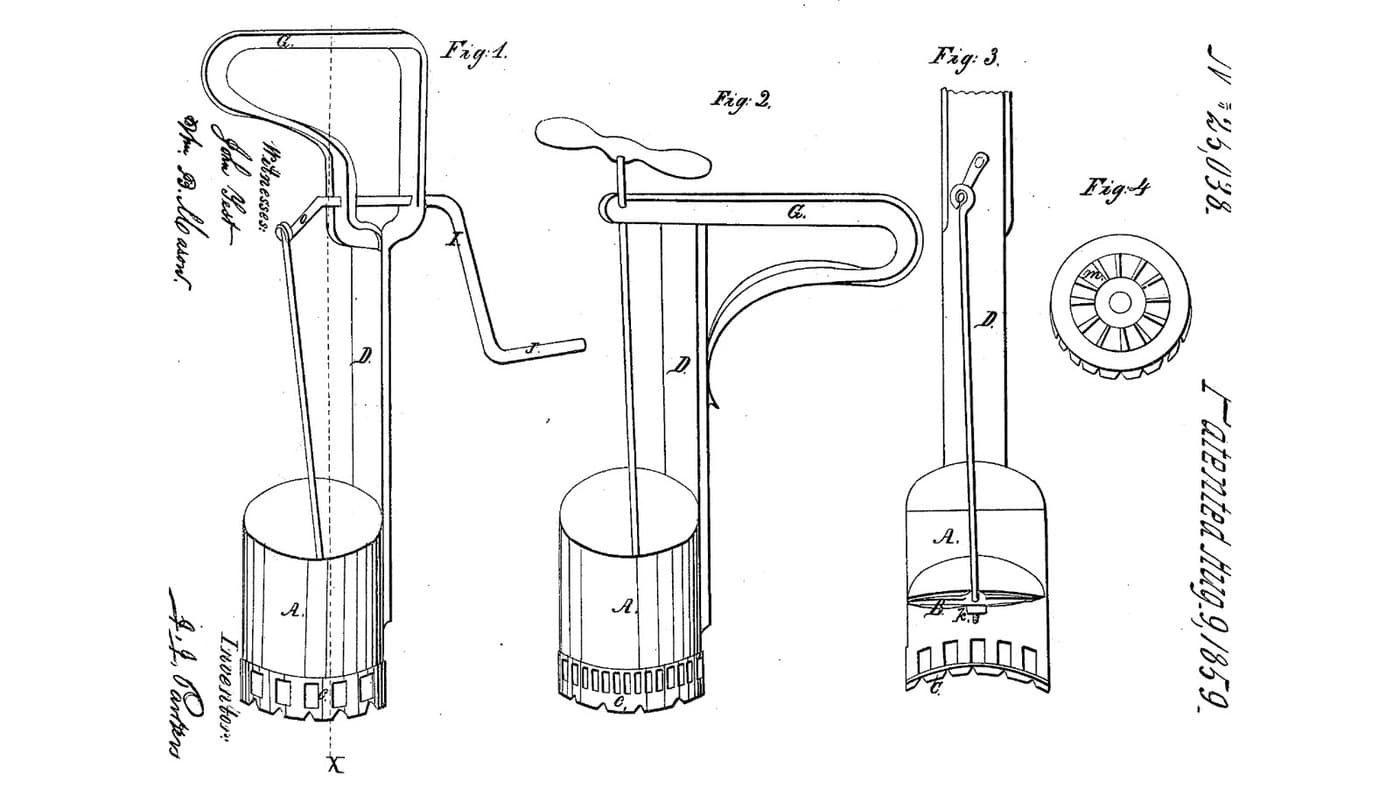
Parker's beater pumped eggs through fixed openings. Lehaye's openings close a little more as the cream thickens.
3

Read US 25,162

"By causing the cream to pass and repass through contracted openings, and with considerable force, the friction of the cream against the edges of the openings has the effect of rapidly separating the butter from the whey at the same time the constant change in the course of the cream agitates the latter as effectually as the ordinary dashers."
4

Print the plate I

The 200 mm lower plate on four 20 mm legs i, with six 8 x 50 mm openings 18 mm apart and two guide flanges for plate J. Print it legs up. PETG, 0.2 mm layers, 30 % infill, 4 walls.
Файл дизайнаSTLCC0 - Free
5

Print the plate J

The 116 x 64 mm sliding plate with six openings matching plate I's and a boss at one end for rod K's nut. PETG, 0.2 mm layers, 30 % infill, 4 walls.
Файл дизайнаSTLCC0 - Free
6

Print the cylinder rings

One 86.5 mm ring of the cylinder C, 160 mm across with a 3 mm wall and a spigot on top. Print three. PETG, 0.2 mm layers, 30 % infill, 4 walls.
Файл дизайнаSTLCC0 - Free
7

Print the bottom cylinder ring

The bottom ring, with an 18 mm notch in its lower edge for rod K. PETG, 0.2 mm layers, 30 % infill, 4 walls.
Файл дизайнаSTLCC0 - Free
8

Print the plunger's upper plate

A 152 mm plate with a hub bored 6.4 mm across for rod F's pin. PETG, 0.2 mm layers, 30 % infill, 4 walls.
Файл дизайнаSTLCC0 - Free
9

Print the plunger's lower plate

The plain 152 mm plate with a 6.4 mm hole in the middle. PETG, 0.2 mm layers, 30 % infill, 4 walls.
Файл дизайнаSTLCC0 - Free
10

Print the stuffing box's inner half

The flanged boss that sits inside the bucket, with an O-ring groove in its face and two 4.4 mm screw holes. PETG, 0.2 mm layers, 30 % infill, 4 walls.
Файл дизайнаSTLCC0 - Free
11

Print the stuffing box's outer half

The flanged boss outside the bucket, with a groove in its bore for a 6 mm O-ring round rod K. PETG, 0.2 mm layers, 30 % infill, 4 walls.
Файл дизайнаSTLCC0 - Free
12

Print the vent tube

The 20 mm tube through the flange that lets the gases out. PETG, 0.2 mm layers, 30 % infill, 4 walls.
Файл дизайнаSTLCC0 - Free
13

Print the vent's cover k

The push-on cover for the vent tube. PETG, 0.2 mm layers, 30 % infill, 4 walls.
Файл дизайнаSTLCC0 - Free
14

Base A and column H

Cut an 18 mm plywood base 750 x 400 mm. Stand a hardwood column 70 x 70 mm, 643 mm tall, on it 290 mm from where the bucket's middle will be, glued and screwed from under the base. Saw a slot 24 mm wide and 100 mm deep in its top and bore it 12.4 mm across 40 mm below the top for the pin h.

Материалы для этого шага:

Лист фанерыЛист фанеры1 штука
Доска из твёрдой древесиныДоска из твёрдой древесины1 штука
Столярный клейСтолярный клей1 штука
Шурупы по деревуШурупы по дереву6 штук

Необходимые инструменты:

ЭлектролобзикЭлектролобзик
Ножовка по деревуНожовка по дереву
СтамескиСтамески
Аккумуляторная дрельАккумуляторная дрель
Набор перовых свёрлНабор перовых свёрл
Набор свёрлНабор свёрл
Столярный угольникСтолярный угольник
РулеткаРулетка
15

Bucket B and the stuffing box

Screw the bucket's floor to the base. Drill a 20.4 mm hole in its side 30 mm above the floor, facing away from the column, and two 4.4 mm holes 19 mm either side of it. Lay a 30 x 2 mm O-ring in the inner half's groove, fit the halves inside and outside the wall and draw them together with two stainless M4 screws and lock nuts. Fill the bucket with water to check the box does not leak, then empty it.

Материалы для этого шага:

Ведро на 20 литровВедро на 20 литров1 штука
Шурупы по деревуШурупы по дереву4 штук
Уплотнительное кольцо круглого сеченияУплотнительное кольцо круглого сечения2 штук

Машинные винтыМашинные винты2 штук
Самоконтрящаяся гайка с нейлоновым кольцомСамоконтрящаяся гайка с нейлоновым кольцом2 штук

Филамент PETGФиламент PETG1 штука

Необходимые инструменты:

3D-принтер FDM3D-принтер FDM
Аккумуляторная дрельАккумуляторная дрель
Набор перовых свёрлНабор перовых свёрл
Набор свёрлНабор свёрл
Набор отвёртокНабор отвёрток
Разводной ключРазводной ключ
ВодаВода
16

Plates I and J, and rod K

Press an M6 nut into plate J's boss. Lay J on plate I between its flanges and stand I on its legs in the middle of the bucket's floor. Cut 170 mm of M6 stainless threaded rod, bend 40 mm of one end to an L for a handle, push the straight end in through the stuffing box with a 6 mm O-ring in its bore and screw it into J's nut. Turn K both ways: J slides until its openings line up with I's, and closes them after 8 mm.

Материалы для этого шага:

Шестигранная гайкаШестигранная гайка1 штука
Шпилька резьбоваяШпилька резьбовая1 штука
Уплотнительное кольцо круглого сеченияУплотнительное кольцо круглого сечения1 штука

Необходимые инструменты:

Ножовка по металлуНожовка по металлу
Слесарные тискиСлесарные тиски
Разводной ключРазводной ключ
17

Cylinder C, flange c, staples and wedges

Stack the four rings on plate I, the notched one at the bottom over rod K. Cut the flange from 12 mm plywood, a ring 304 mm across with a 154 mm hole, and bore a 16 mm hole 125 mm from its middle for the vent. Set it on the bucket's rim over the cylinder's top. Fit four stainless U-bolts through the bucket wall just under the rim, two each side, and drive two tapered hardwood wedges, 340 x 30 mm and 16 mm at their thick end, through them over the flange so it presses the cylinder down on the plates. Push the vent tube into its hole and its cover on top.

Материалы для этого шага:

Лист фанерыЛист фанеры1 штука
Скоба-хомутСкоба-хомут4 штук
Доска из твёрдой древесиныДоска из твёрдой древесины1 штука
Филамент PETGФиламент PETG1 штука

Необходимые инструменты:

ЭлектролобзикЭлектролобзик
Набор перовых свёрлНабор перовых свёрл
Аккумуляторная дрельАккумуляторная дрель
Набор свёрлНабор свёрл
Ножовка по деревуНожовка по дереву
Разводной ключРазводной ключ
18

Plunger E, rod F and arm G

Cut two 153.9 mm discs of 3 mm food-grade silicone sheet and bolt them between the plunger plates through the middle, hub up; the silicone's edge is the packing e and should slide in the cylinder with a light drag. Saw a slot in each end of a 22 mm hardwood dowel 470 mm long between pin centres and pin its lower end to the plunger's hub with a 6 mm stainless bolt. Make the arm G from hardwood 40 x 22 mm, 930 mm long, bore it 12.4 mm 30 mm from one end for the pin h and 6.4 mm 290 mm from that for rod F, then bolt it into the column's slot with a 12 mm bolt and pin rod F to it.

Материалы для этого шага:

Лист силиконовой резиныЛист силиконовой резины1 штука
Набор шестигранных болтовНабор шестигранных болтов4 штук
Самоконтрящаяся гайка с нейлоновым кольцомСамоконтрящаяся гайка с нейлоновым кольцом4 штук

Плоская шайбаПлоская шайба4 штук
Шканты из твёрдой древесиныШканты из твёрдой древесины1 штука
Доска из твёрдой древесиныДоска из твёрдой древесины1 штука

Необходимые инструменты:

НожницыНожницы
Ножовка по деревуНожовка по дереву
Аккумуляторная дрельАккумуляторная дрель
Набор свёрлНабор свёрл
Разводной ключРазводной ключ
РулеткаРулетка
19

The build in 3D

FreeCAD model of this build, cut open: the bucket on its base, the slotted plates I and J with rod K through the stuffing box, the cylinder of four rings under the flange, the wedges and staples, the vent, and the plunger on rod F worked by the arm G from the column H. Checked over the lever's whole travel and with plate J slid fully.
Файл дизайнаBLENDCC0 - Free
20

Churn

With plate J slid so all the openings are open, pour about 10 litres of heavy cream at about 15 °C into the bucket, checked with the thermometer. Work the arm about once a second, timing it. As the cream thickens, give rod K a turn now and then to close the openings a little. Lift the vent's cover now and then to let the gas out. When the butter comes, knock the wedges out, lift out the flange, the cylinder and the plunger, pour off the buttermilk, wash the butter in cold water until it runs clear, work in a pinch of salt and weigh it.

Материалы для этого шага:

Жирные сливкиЖирные сливки10 l
Крупная морская сольКрупная морская соль1 штука
ВодаВода1 штука

Необходимые инструменты:

Термометр с оставляемым щупомТермометр с оставляемым щупом
СекундомерСекундомер
Цифровые кухонные весыЦифровые кухонные весы
Большая миска из нержавеющей сталиБольшая миска из нержавеющей стали
21

Troubleshooting

Friction plunger churn troubleshooting.

Flow

Loading...
22

History and honest limits

**John J. Lehaye** of Reading, Pennsylvania, assignor to himself and John Tucker of Philadelphia, US 25,162, 16 August 1859, "Churn". He claimed the vessel B, cylinder C and plunger E in combination with means for enlarging or contracting the openings between the cylinder and the vessel. He gives no sizes, so every size here is ours; the U-bolts are his staples a, the O-ring box his stuffing box, and silicone his packing. His Fig. 4 alternative, projections on the cylinder's foot and on a ring in the vessel's bottom, turned to open or close the gaps, is not built. He also offered the machine as an egg beater and for mixing curds.

Материалы

19

Требуемые инструменты

19

Файлы дизайна

11

CC0 Общественное достояние

Этот чертёж выпущен под лицензией CC0. Вы можете свободно копировать, изменять, распространять и использовать эту работу в любых целях без запроса разрешения.

Поддержите мейкера, покупая товары через его чертёж, где он получает Комиссию мейкера установленную продавцами, или создайте новую итерацию этого чертежа и включите его как связь в свой чертёж для распределения дохода.

Обсуждение

(0)

Войти чтобы присоединиться к обсуждению

Загрузка комментариев...