ИСКУССТВО
КРАСОТА И ЗДОРОВЬЕ
РЕМЕСЛО
КУЛЬТУРА И ИСТОРИЯ
РАЗВЛЕЧЕНИЯ
ЭКОЛОГИЯ
ЕДА И НАПИТКИ
ОБРАТНАЯ ИНЖЕНЕРИЯ
НАУКИ
СПОРТ
ТЕХНОЛОГИИ
НОСИМЫЕ УСТРОЙСТВА
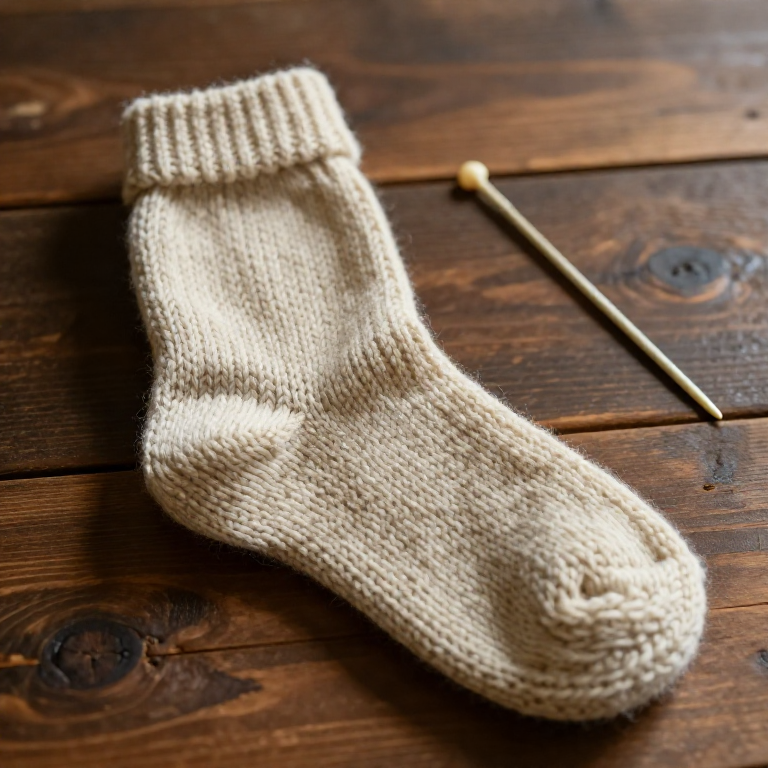


Nalbinding a Wool Sock in the Oslo Stitch — The Looped Fabric Before Knitting
Long before knitting, people made warm, hard-wearing socks and mittens by nalbinding — looping short lengths of wool with a single flat needle. Unlike knitting, which pulls loops through loops with two rods and can unravel, nalbinding passes the whole working thread through each stitch, giving a dense, felt-firm fabric that will not run. This blueprint works the simple Oslo stitch into a tube for a sock or mitten, joining new wool with a felted splice rather than a knot — exactly as the Vikings did.
Средний
4
Инструкции
1
1
Cut a short working length
Cut a short working length
Cut about an arm's length of wool yarn — not a whole ball. In nalbinding the entire length is pulled through every stitch, so you work with short pieces and splice on more as needed.
Материалы для этого шага:
 Моток шерстяной пряжи1 штука
Необходимые инструменты:
 Ножницы
2
2
Thread the flat needle
Thread the flat needle
Thread the yarn through the eye of the flat nalbinding needle. The needle is broad, blunt and eyed at one end — bone, antler or wood — and never has a hook.
Необходимые инструменты:
 Игла для нальбиндинга
3
3
Make the foundation loops
Make the foundation loops
Loop the yarn around your thumb and make a short chain of starting loops. These foundation loops are the base row that every following stitch will anchor into.
Необходимые инструменты:
Игла для нальбиндинга4
4
Work the Oslo stitch
Work the Oslo stitch
Pass the needle under the thumb loop and up through the working loop to form the Oslo stitch — the simplest nalbinding stitch. Draw each stitch snug and even, building the first row.
Необходимые инструменты:
Игла для нальбиндинга5
5
Join into a round
Join into a round
For a sock or mitten, connect the ends of the first row into a ring by stitching the last stitch into the first, so you can then work round and round to form a tube.
Необходимые инструменты:
Игла для нальбиндинга6
6
Work in a spiral
Work in a spiral
Continue in a spiral, anchoring each new Oslo stitch into the loop of the row below. Keep the tension steady so the tube grows even in width — this becomes the leg of the sock.
Необходимые инструменты:
Игла для нальбиндинга7
7
Splice in new yarn
Splice in new yarn
When the length runs short, join a new piece with a felted splice, not a knot: untwist and overlap the two wool ends, wet them, and roll them briskly between your palms until the fibres felt into one continuous thread.
Материалы для этого шага:
Моток шерстяной пряжи1 штукаНеобходимые инструменты:
Игла для нальбиндинга8
8
Shape the tube
Shape the tube
Increase by working two stitches into one loop and decrease by skipping a loop, shaping the tube — narrowing for an ankle, turning a heel, or rounding a mitten — as the piece requires.
Необходимые инструменты:
Игла для нальбиндинга9
9
Close the toe
Close the toe
At the end, decrease steadily until only a few loops remain, then pass the needle through them and draw them tight to close the toe or mitten tip.
Необходимые инструменты:
Игла для нальбиндинга10
10
Secure and trim the tail
Secure and trim the tail
Weave the final yarn tail back through several stitches on the inside to lock it, then trim it flush. Because the fabric is looped, not knitted, it cannot unravel from the cut end.
Необходимые инструменты:
Игла для нальбиндингаНожницыМатериалы
1- 1 штукаЗаполнитель
Материалы из связанных чертежей
По этому чертежу делают

Связанные чертежи
Эти чертежи делятся знаниями — техники, материалы или принципы
CC0 Общественное достояние
Этот чертёж выпущен под лицензией CC0. Вы можете свободно копировать, изменять, распространять и использовать эту работу в любых целях без запроса разрешения.
Поддержите мейкера, покупая товары через его чертёж, где он получает Комиссию мейкера установленную продавцами, или создайте новую итерацию этого чертежа и включите его как связь в свой чертёж для распределения дохода.