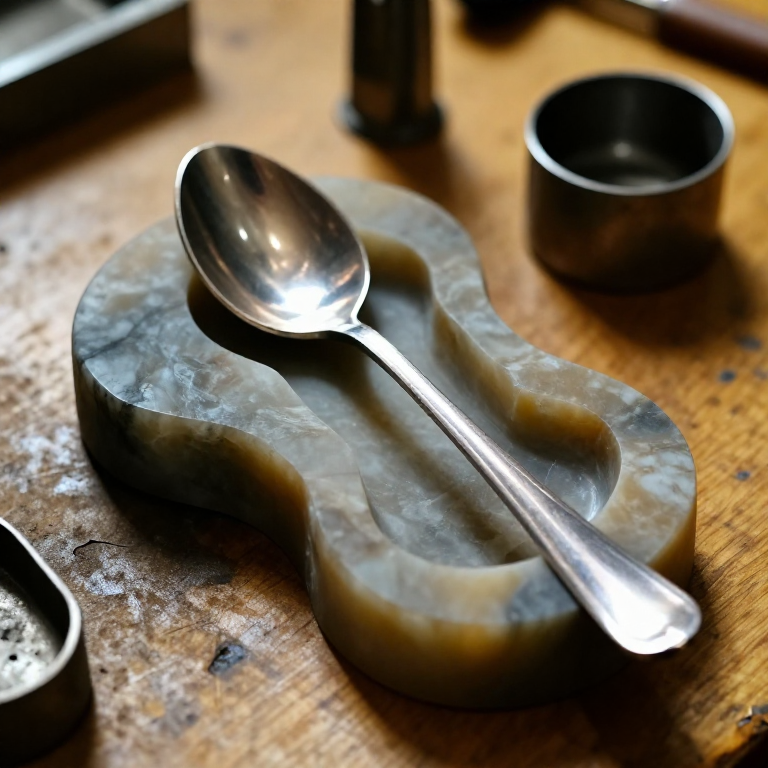
Casting a Pewter Spoon in a Soapstone Mould — Low-Temperature Metal Casting
Pewter — an alloy of roughly 92% tin with small amounts of antimony and copper — melts at just 230°C, making it the most accessible metal for casting. Medieval spoon-makers carved two-part moulds from soapstone, poured molten pewter, and finished the castings with files and burnishing. The result is a bright, food-safe utensil that lasts generations. This blueprint covers carving the soapstone mould, melting the pewter over a simple charcoal fire, casting, and finishing.
Инструкции
Select the soapstone
Select the soapstone
Материалы для этого шага:
 Soapstone Block1 штука
Flatten the mould faces
Flatten the mould faces
Draw the spoon pattern
Draw the spoon pattern
Carve the bowl cavity
Carve the bowl cavity
Необходимые инструменты:
 Wood Gouge
 Carving Knife
Carve the matching half
Carve the matching half
Carve alignment keys and pour gate
Carve alignment keys and pour gate
Pre-heat the mould
Pre-heat the mould
Melt the pewter
Melt the pewter
Материалы для этого шага:
 Pewter Ingot200 г
Необходимые инструменты:
 Steel Crucible (small)
 Crucible Tongs (long-handled)
Pour the casting
Pour the casting
Cool and open the mould
Cool and open the mould
Remove the gate and flash
Remove the gate and flash
Необходимые инструменты:
 Needle File Set
Shape and refine the spoon
Shape and refine the spoon
Burnish to a bright finish
Burnish to a bright finish
Материалы
2- 1 штукаЗаполнитель
- 200 гЗаполнитель
Требуемые инструменты
5- Заполнитель
- Заполнитель
- Заполнитель
- Заполнитель
- Заполнитель
Материалы из связанных чертежей
Связанные чертежи
Эти чертежи делятся знаниями — техники, материалы или принципы
Related blueprints
Other builds that share materials, tools, or techniques with this one.


CC0 Общественное достояние
Этот чертёж выпущен под лицензией CC0. Вы можете свободно копировать, изменять, распространять и использовать эту работу в любых целях без запроса разрешения.
Поддержите мейкера, покупая товары через его чертёж, где он получает Комиссию мейкера установленную продавцами, или создайте новую итерацию этого чертежа и включите его как связь в свой чертёж для распределения дохода.