
Сотрудничество
ИСКУССТВО
КРАСОТА И ЗДОРОВЬЕ
РЕМЕСЛО
КУЛЬТУРА И ИСТОРИЯ
РАЗВЛЕЧЕНИЯ
ЭКОЛОГИЯ
ЕДА И НАПИТКИ
ОБРАТНАЯ ИНЖЕНЕРИЯ
НАУКИ
СПОРТ
ТЕХНОЛОГИИ
НОСИМЫЕ УСТРОЙСТВА
Push Button: Normally Open Momentary Switch with a Cushioned Contact (De Reamer, GE 1939)
English
Ed

Создано

Ed

28. октябрь 2026FI
14
0
0
0
0

Push Button: Normally Open Momentary Switch with a Cushioned Contact (De Reamer, GE 1939)

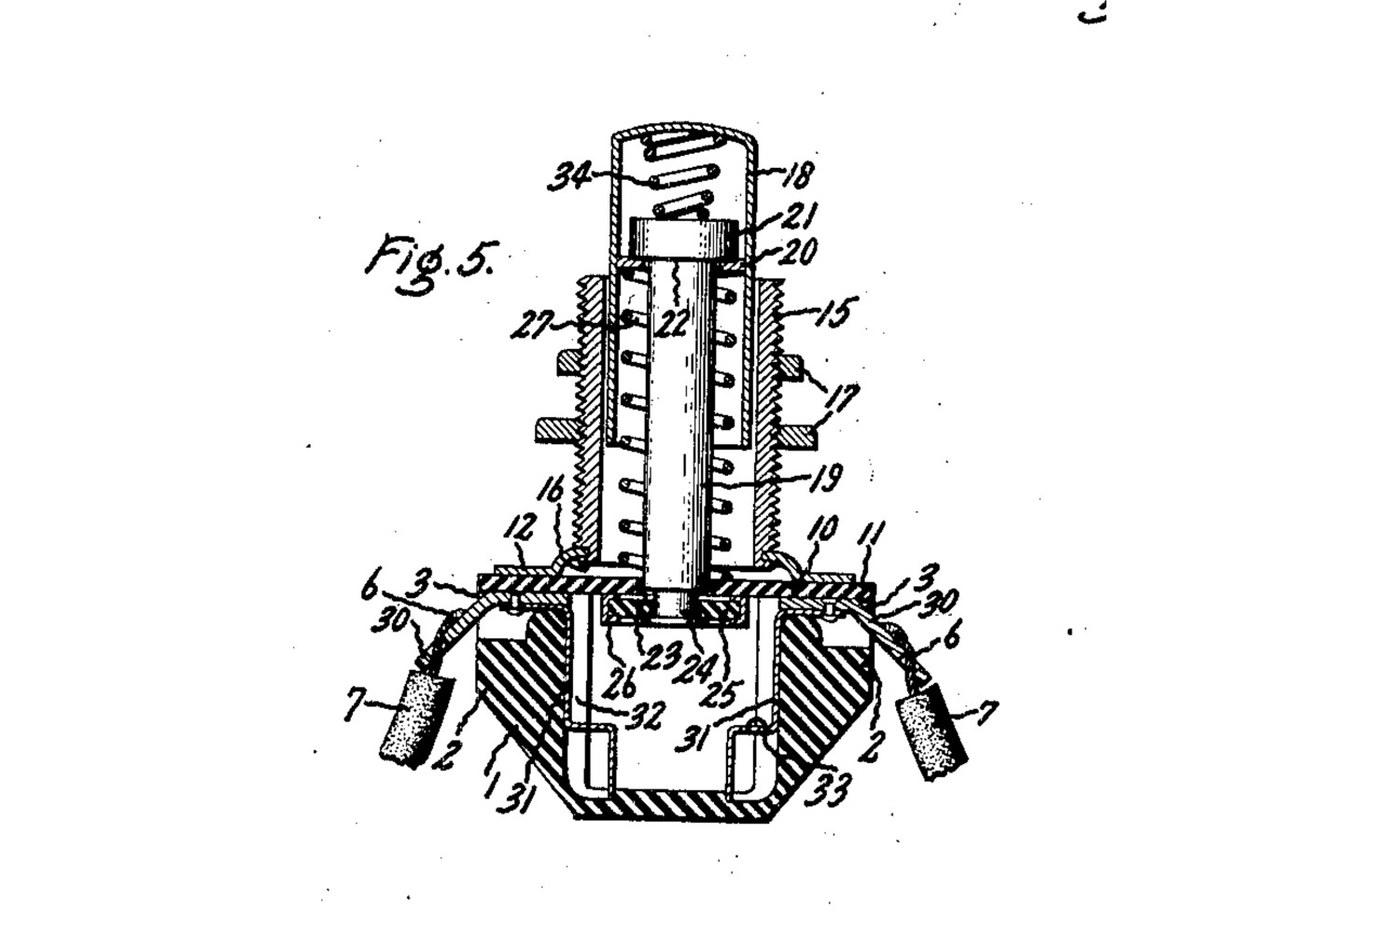
A panel push button that closes a circuit only while you press it. A spring holds the button out, and a metal rim on the end of its rod sits clear of two contacts. Press it and the rim bridges both contacts. A second spring inside the button lets the rod give, so the contacts never take more than that spring's force. Source: Frank C. De Reamer, US 2,166,803 (General Electric, 1939), Fig. 5. Unknown: the insulating material, the metals and every size. De Reamer gives none of them, so they are linked to unknown heads. The tools are ours. Picture: the patent's Fig. 5.
Продвинутый
2 days

Инструкции

1

Mould the housing

Mould a cup-shaped housing of insulating material, with a boss on each of two opposite sides, a recess in the top of each boss, a groove inside below each boss, and a bead round the top. Unknown: the material, the sizes and the moulding.

Материалы для этого шага:

Неизвестный изоляционный материалНеизвестный изоляционный материал1 as required

Необходимые инструменты:

Компрессионная пресс-формаКомпрессионная пресс-форма
Неизвестные размерыНеизвестные размеры
2

Make the terminals and contacts

Bend two angled metal strips. The upper end of each sits in a boss recess, and the lower end is a solder lug. Fix each upper end to a contact that fits the groove inside the housing, stepped at its bottom end. Unknown: the metal.

Материалы для этого шага:

Неизвестный металлНеизвестный металл1 as required

Необходимые инструменты:

Ножницы по металлуНожницы по металлу
ПлоскогубцыПлоскогубцы
Неизвестные размерыНеизвестные размеры
3

Make the sleeve, plate and cover

Turn a threaded sleeve and cut its thread. Spin its lower end over onto a metal plate with tangs. Cut a cover of insulating sheet with ears that reach over the bosses and a hole in the middle to guide the rod.

Материалы для этого шага:

Неизвестный металлНеизвестный металл1 as required
Неизвестный изоляционный материалНеизвестный изоляционный материал1 as required

Необходимые инструменты:

Токарный станок по металлуТокарный станок по металлу
Набор токарных резцов по дереву (HSS)Набор токарных резцов по дереву (HSS)
ПлашкодержательПлашкодержатель
Ножницы по металлуНожницы по металлу
ШтангенциркульШтангенциркуль
Неизвестные размерыНеизвестные размеры
4

Make the push button

Make a drawn metal tube closed at the top, and a rod with a head. Put a small coil spring in the top of the tube, then the rod's head. Wedge a washer into the tube under the head. Leave clearance so the rod can swivel a little. Turn the rod's lower end down to a smaller diameter. Unknown: the metal.

Материалы для этого шага:

Неизвестный металлНеизвестный металл1 as required
Набор пружин сжатияНабор пружин сжатия1 spring

Необходимые инструменты:

Токарный станок по металлуТокарный станок по металлу
Набор токарных резцов по дереву (HSS)Набор токарных резцов по дереву (HSS)
ШтангенциркульШтангенциркуль
Неизвестные размерыНеизвестные размеры
5

Assemble

Set the terminals in their recesses and the contacts in their grooves. Slide the button into the sleeve, with a coil spring round the rod between the cover and the wedged washer. Pass the rod's end through the cover's hole. Put on it a loose insulating washer with a metal rim round its edge. Hammer the rod's end over into a flange. Lay the cover on the housing, so its ears clamp the terminals, and bend the plate's tangs over the bead.

Материалы для этого шага:

Неизвестный изоляционный материалНеизвестный изоляционный материал1 as required
Неизвестный металлНеизвестный металл1 as required
Набор пружин сжатияНабор пружин сжатия1 spring

Необходимые инструменты:

Слесарные тискиСлесарные тиски
Слесарный молоток с шаровым бойкомСлесарный молоток с шаровым бойком
ПлоскогубцыПлоскогубцы
Защитные очкиЗащитные очки
6

Mount and wire it

Put the sleeve through a hole in the panel and clamp the panel between two nuts on the thread. Solder the bared wire ends to the two lugs.

Материалы для этого шага:

Шестигранная гайкаШестигранная гайка2 pcs
Проволочный припойПроволочный припой1 as required

Необходимые инструменты:

ПаяльникПаяльник
ПлоскогубцыПлоскогубцы
7

Check it

At rest, the rim sits against the underside of the cover and the circuit is open. Pressed, the rim meets the stepped ends of both contacts and closes it. The checking is ours: the meter reads open, then closed while pressed.

Необходимые инструменты:

МультиметрМультиметр

Материалы

5

Требуемые инструменты

13

По этому чертежу делают

Связанные чертежи

Эти чертежи делятся знаниями — техники, материалы или принципы
CC0 Общественное достояние

Этот чертёж выпущен под лицензией CC0. Вы можете свободно копировать, изменять, распространять и использовать эту работу в любых целях без запроса разрешения.

Поддержите мейкера, покупая товары через его чертёж, где он получает Комиссию мейкера установленную продавцами, или создайте новую итерацию этого чертежа и включите его как связь в свой чертёж для распределения дохода.

Обсуждение

(0)

Войти чтобы присоединиться к обсуждению

Загрузка комментариев...