التعاون
فنون
الجمال والعناية
حِرَف
الثقافة والتاريخ
ترفيه
البيئة
الطعام والمشروبات
الهندسة العكسية
العلوم
رياضة
التقنية
الأجهزة القابلة للارتداء
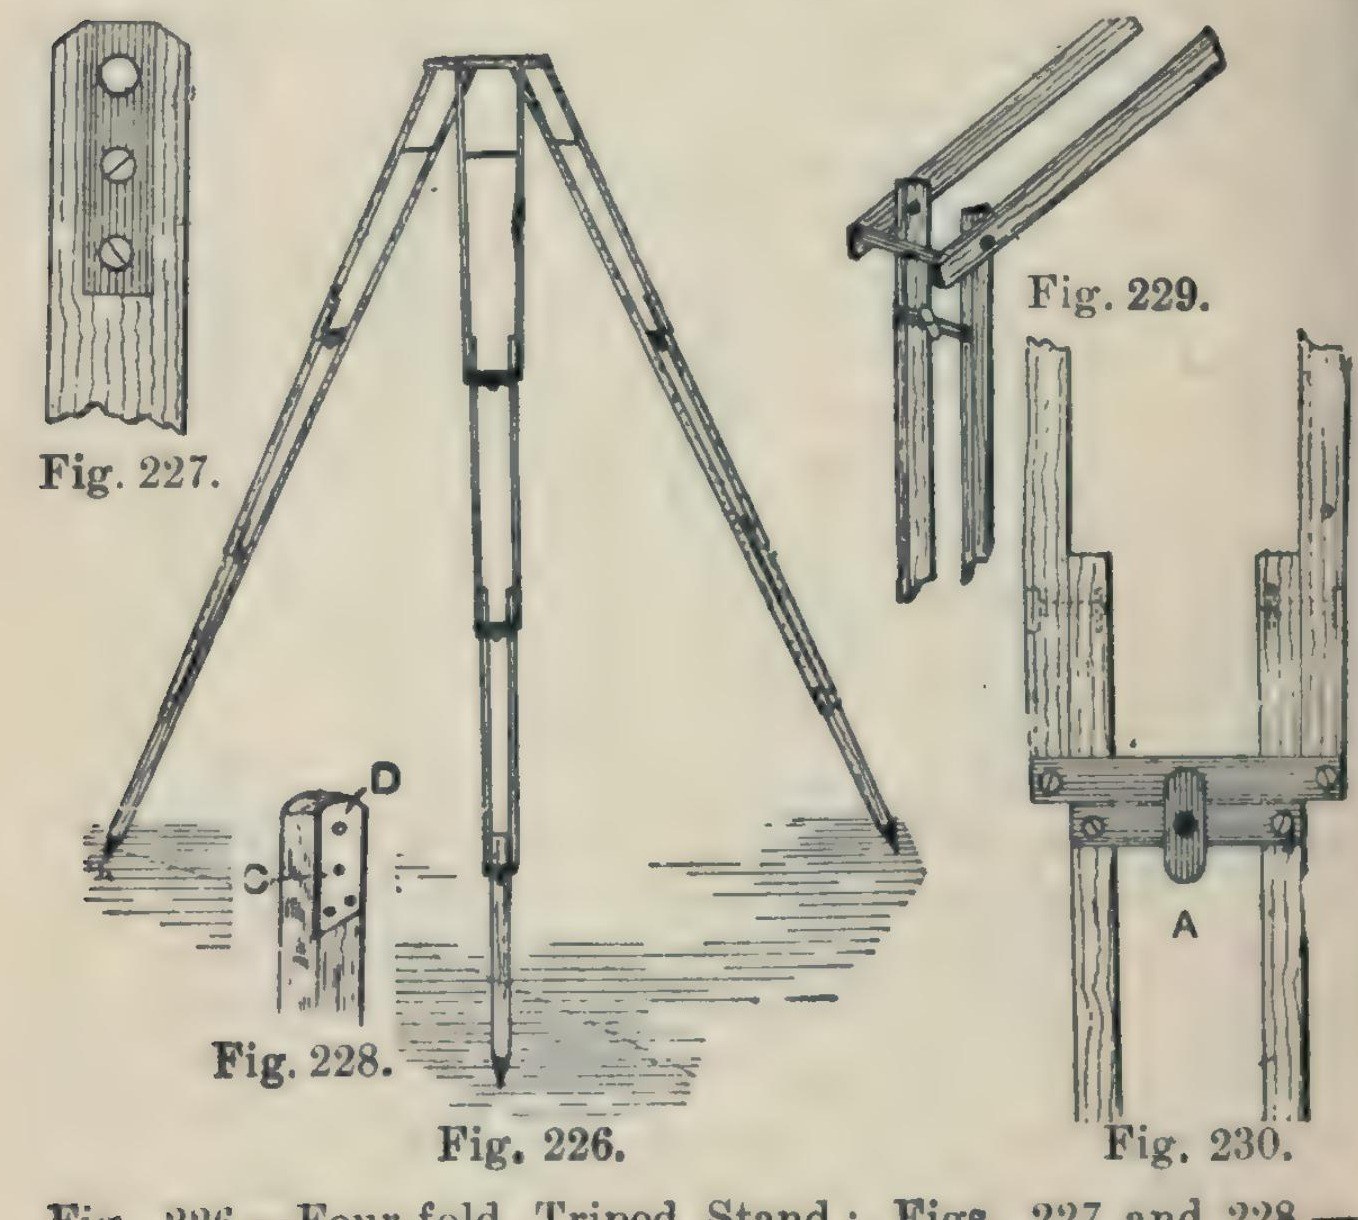


Camera Tripod: a Four-Fold Ash Tripod Stand (Hasluck, 1902)
A light, compact folding camera stand: three legs, each of seven ash laths riveted so it folds in four, locked open by brass buttons, on a triangular ash top with brass pins and a hole for the camera screw.
Hasluck says the same method makes stands that fold in three or two.
Source: Paul N. Hasluck, Photographic Cameras and Accessories (1902), pp. 153-157. Picture: Figs. 226-230 of the book.
متوسط
Unknown
التعليمات
1
1
Cut the ash laths
Cut the ash laths
Cut laths of good ash, true and square or the stand won't be rigid, and round the edges slightly: six 17 1/4 x 5/8 x 3/8 in, six 16 x 5/8 x 3/8 in, six 15 1/2 x 5/8 x 3/8 in, and three 14 x 5/8 x 5/8 in.
المواد لهذه الخطوة:
 لوح مُرّان1 21 laths
الأدوات المطلوبة:
 منشار ذو ظهر
 مسحاج كفّ
2
2
Fit the top ends and stretcher
Fit the top ends and stretcher
On each 17 1/4 in lath let in flush a 1/16 in brass plate, 1 1/4 in long, with a 3/16 in hole 1/4 in from the top, held by two countersunk brass screws; bore the wood to match and take off the top corners. On one lath of each pair cut a groove inside, about 3/16 in deep and 3 1/2 in long, starting 2 in from the top, and hinge a 1/8 in brass rod stretcher in it on a pin. On the other lath cut a curved groove 1 1/2 in long, 3/16 in wide, with a small hole at the bottom where the rod catches.
المواد لهذه الخطوة:
 صفيحة نحاس أصفر1 1/16 in plates
 براغي خشب1 small brass screws
 قضيب نحاس أصفر1 1/8 in stretcher
الأدوات المطلوبة:
 إطار منشار حديد مع نصال
 مبرد معادن
 مثقب يدوي
 أزاميل نجارة
 مفكّ مسطّح
3
3
Bore and rivet the legs
Bore and rivet the legs
Bore the rivet holes: in the long laths 1 3/4 in from the lower end, counterbored so the copper rivet head sits flush, then 1/8 in through; in the 16 in and 15 1/2 in laths 1/2 in and 1 3/4 in from the ends; in each 14 in piece 1/2 in from one end, and taper its other end for a pointed iron shoe or a steel point and ferrule. Rivet the 21 laths into three legs with 1/8 in copper rivets and washers: a 16 in lath inside each 17 1/4 in one, a 15 1/2 in lath inside that, the 14 in foot between the last pair. Rivets flush, just tight enough to fold but not loose.
المواد لهذه الخطوة:
 برشام نحاسي1 1/8 in, with washers
 معدن غير معروف3 iron shoes or steel points
الأدوات المطلوبة:
 مثقب يدوي بمقبض دوّار ولقمةمثقب يدوي
 مطرقة برشمة
4
4
Add cross strips and lock buttons
Add cross strips and lock buttons
Screw 1/16 in brass strips across the bottom ends of each pair of laths (Fig. 229). Under them screw strips carrying a small brass button riveted at the centre; turned, the button hooks over the strip above and locks the joint open (Fig. 230).
المواد لهذه الخطوة:
صفيحة نحاس أصفر1 cross strips, buttonsبراغي خشب1 قطعةالأدوات المطلوبة:
إطار منشار حديد مع نصالمبرد معادنمفكّ مسطّحمطرقة برشمة5
5
Make the top
Make the top
Plane ash to 1/2 in and draw an equilateral triangle with 8 1/2 in sides. Bisect the angles; 2 in from each corner draw a line at right angles, go 1/2 in in along the sides, and mark three rectangles 2 7/8 x 3/4 in; cut the outline (Fig. 231). Fix a 3/16 in brass rod, one end tapered, across each rectangle, bored 3/8 in from the outer edge and projecting about 1/2 in, for the legs to hang on. Bore a 1/4 in hole in the centre for the camera screw and glue felt on top.
المواد لهذه الخطوة:
لوح مُرّان1 topقضيب نحاس أصفر3 3/16 in pins لبّاد صوفي1 قطعة
 غراء حيواني1 قطعة
الأدوات المطلوبة:
مسحاج كفّمنشار ذو ظهرمثقب يدوي بمقبض دوّار ولقمةمثقب يدوي6
6
Finish
Finish
Glasspaper and varnish the wood, and lacquer the brass.
المواد لهذه الخطوة:
 ورنيش شلّاكي1 varnish
 مادة غير معروفة1 brass lacquer
الأدوات المطلوبة:
 ورق صنفرة
المواد
10- 1 topعنصر نائب
- 1 cross strips, buttonsعنصر نائب
- 1 قطعةعنصر نائب
- 3 3/16 in pinsعنصر نائب
- 1 1/8 in, with washersعنصر نائب
- 3 iron shoes or steel pointsعنصر نائب
- 1 قطعةعنصر نائب
- 1 قطعةعنصر نائب
- 1 varnishعنصر نائب
- 1 brass lacquerعنصر نائب
هذا المخطط يصنع

CC0 ملكية عامة
هذا المخطط مُصدر بموجب CC0. يحق لك نسخه وتعديله وتوزيعه واستخدامه لأي غرض، دون طلب إذن.
ادعم الصانع بشراء منتجات عبر مخططه حيث يكسب عمولة الصانع يحددها البائعون، أو أنشئ نسخة جديدة من هذا المخطط وضمّنه كرابط في مخططك لمشاركة الإيرادات.