التعاون
فنون
الجمال والعناية
حِرَف
الثقافة والتاريخ
ترفيه
البيئة
الطعام والمشروبات
الهندسة العكسية
العلوم
رياضة
التقنية
الأجهزة القابلة للارتداء
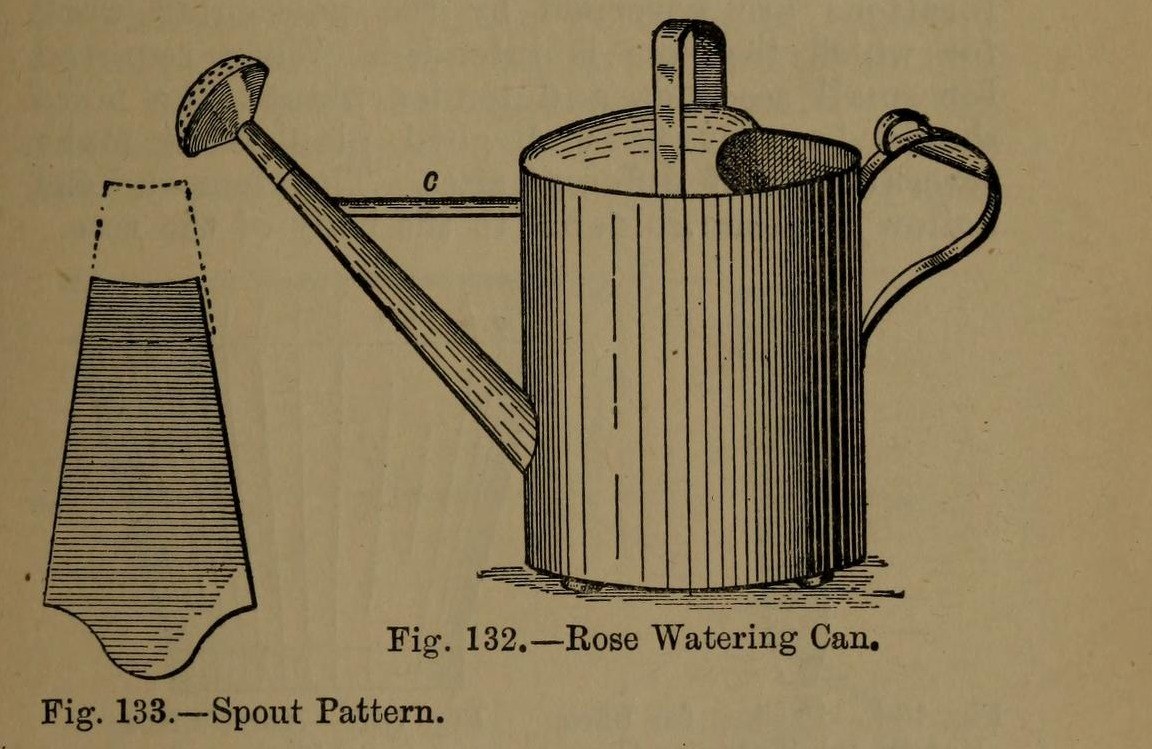


Watering Can: the Tinplate Rose Watering-Can (Hasluck, 1907)
A tinsmith's garden watering can: a round body from one sheet 2 ft 1 in x 8 1/2 in, a two-piece spout with a perforated rose, a hollowed top with a cross handle, and a back handle with a thumb ring. Tinplate or galvanised iron.
Variable: the rose. Its pattern diameter is the rose diameter x 4 / 3; finer holes for seedlings.
Source: Paul N. Hasluck, Tinplate Work (1907), pp. 54-57. Unknown: solder. Picture: Figs. 132-135 of the book.
متوسط
Unknown
التعليمات
1
1
Make the body and bottom
Make the body and bottom
Cut a sheet 2 ft 1 in by 8 1/2 in. Wire one edge, sink it in the crease iron, round it and groove the seam; solder the seam inside. Cut the spout hole opposite the seam, 2 1/2 in from the bottom. Edge the bottom to fit, beat it up and solder it from inside.
المواد لهذه الخطوة:
 صفيحة من الصفيح1 body, bottom
 سلك حديدي1 edge
 لحام قصدير-رصاص1 قطعة
الأدوات المطلوبة:
 مقصّ صفائح
 وتد
 مطرقة خشبية
 كاوية لحام كهربائية
 مساعد صهر
2
2
Make and fit the spout
Make and fit the spout
Cut the spout in two pieces (Fig. 133), bend them to shape and solder the seams. Solder the larger piece into the body. Make it longer for plants out of reach, with an elbow for plants up high. Make the stay: a taper strip as long as the gap between can and spout, bent to a half-round section and soldered in.
المواد لهذه الخطوة:
صفيحة من الصفيح1 spout, stayلحام قصدير-رصاص1 قطعةالأدوات المطلوبة:
مقصّ صفائحوتدكاوية لحام كهربائيةمساعد صهر3
3
Make the rose
Make the rose
Set out the rose body (Fig. 135): its diameter is the rose diameter x 4 / 3, so a 3 in rose needs a 4 in pattern, with lines a b at right angles. Bend it over a funnel stake and solder the seam. Hollow a disc for the front, with edges for capping on. Inside the hollow, mark circles and pierce them at intervals with a bradawl over a hard wood block; very fine for seedlings. Solder front and stem to the rose body. Several roses of different sizes are useful.
المواد لهذه الخطوة:
صفيحة من الصفيح1 roseلحام قصدير-رصاص1 قطعةالأدوات المطلوبة:
 فرجار سنّيمقصّ صفائحوتد
 مطرقة التسوية
 مِخرَز
 كتلة خشب صلبكاوية لحام كهربائيةمساعد صهر
4
4
Fit the top and handles
Fit the top and handles
Hollow the top (Fig. 134), fit it to the body, wire its inner arc and solder it on. Cross handle: a strip about 1 3/4 in wide, wired with No. 12 B.W.G., bent to shape; cut two holes in the top with a small sharp chisel and solder the ends inside and on top. Back handle (Fig. 136): wire and bend it, solder a small boss under its upper part, and solder it opposite the spout with a thumb ring at the top. Solder three small hollowed studs under the bottom.
المواد لهذه الخطوة:
صفيحة من الصفيح1 top, handles, studsسلك حديدي1 No. 12 B.W.G.لحام قصدير-رصاص1 قطعةالأدوات المطلوبة:
مقصّ صفائحمطرقة التسوية إزميل فولاذيكاوية لحام كهربائيةمساعد صهر
5
5
Clean and paint
Clean and paint
Clean with turpentine and whiting. Give two good coats of paint: red inside and green outside suit it.
المواد لهذه الخطوة:
 ألوان زيتية2 coats
الأدوات المطلوبة:
 زيت التربنتين
 كربونات الكالسيوم (الطباشير المطحون)
المواد
4- 1 top, handles, studsعنصر نائب
- 1 No. 12 B.W.G.عنصر نائب
- 4 قطععنصر نائب
- 2 coatsعنصر نائب
الأدوات المطلوبة
12- عنصر نائب
- عنصر نائب
- عنصر نائب
- عنصر نائب
- عنصر نائب
- عنصر نائب
- عنصر نائب
- عنصر نائب
- عنصر نائب
- عنصر نائب
- عنصر نائب
- عنصر نائب
مواد المخططات المرتبطة



هذا المخطط يصنع

CC0 ملكية عامة
هذا المخطط مُصدر بموجب CC0. يحق لك نسخه وتعديله وتوزيعه واستخدامه لأي غرض، دون طلب إذن.
ادعم الصانع بشراء منتجات عبر مخططه حيث يكسب عمولة الصانع يحددها البائعون، أو أنشئ نسخة جديدة من هذا المخطط وضمّنه كرابط في مخططك لمشاركة الإيرادات.