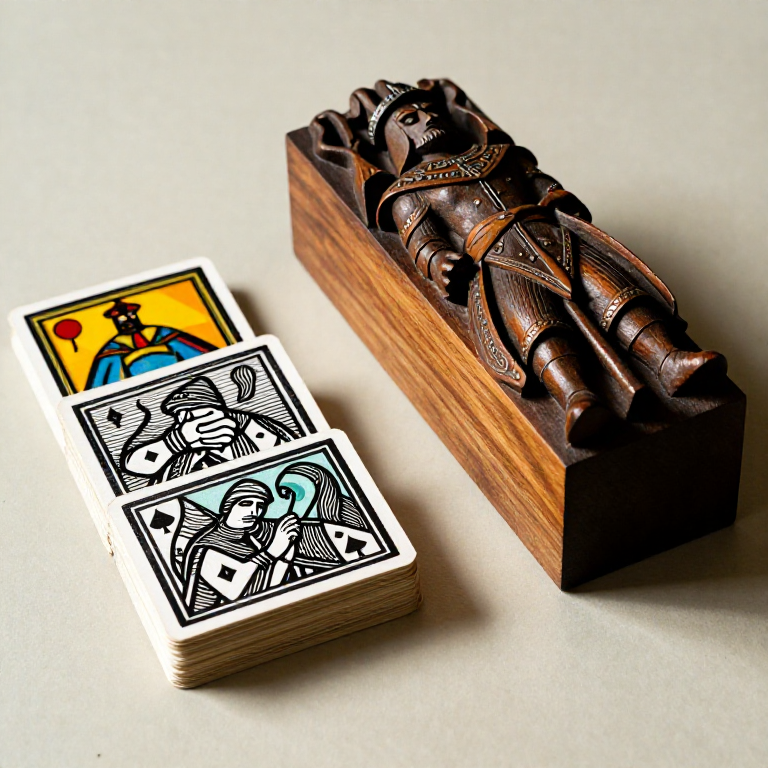


Woodblock Playing Cards
Before printing reached books, it reached cards. Between roughly 1418 and 1450 professional card makers in Ulm, Nuremberg and Augsburg were cutting relief blocks and printing decks on pasteboard, and playing cards competed with devotional images as the commonest use of the woodcut in that period.
The economics are the whole story. A hand-painted deck was a luxury object; a cut block prints a full sheet of cards as fast as you can ink it, and from about 1450 the colour went on through stencils rather than by brush. Cutting the block is a day's work that pays for itself on the second deck.
This is a relief printing job: everything you do not carve away prints. The design goes onto the block reversed, because the block prints a mirror of itself.
التعليمات
Plan the sheet, not the card
Plan the sheet, not the card
Lay out a grid of card outlines on paper — nine or twelve cards to a sheet, each 60 x 90 mm with 6 mm gaps. Early cards were printed many to a sheet and cut apart afterwards, purely for economy.
الأدوات المطلوبة:
 مسطرة
مسطرةSurface the block flat
Surface the block flat
Sand a basswood or lino block dead flat and check it against a straightedge. Any dip prints as a pale patch, and you cannot press it out later.
المواد لهذه الخطوة:
 كتلة خشب الزيزفون للحفر1 قطعة
الأدوات المطلوبة:
 ورق صنفرة
Transfer the design reversed
Transfer the design reversed
Draw the design on thin paper, lay it face down on the block and rub it off, or trace it through carbon paper mirrored. Any text or number must be cut backwards or it prints backwards.
Ink the drawing in dark line
Ink the drawing in dark line
Go over the transferred lines with black ink so you can see what to keep. On the block, black is what survives; everything unmarked is waste.
Cut the outline with a V-tool
Cut the outline with a V-tool
Cut a shallow V groove just outside every line you want to print, working around the line rather than into it. This isolates the printing lines before you clear anything.
الأدوات المطلوبة:
 طقم أزاميل نقش اللينوليوم
Clear the open areas with a gouge
Clear the open areas with a gouge
Scoop out the large blank areas 2-3 mm deep with a U gouge. Shallow clearing picks up ink at the edges and prints grey smudges in the whites.
الأدوات المطلوبة:
 إزميل مجوّف للخشب
Cut away from your hand, always
Cut away from your hand, always
Keep the non-cutting hand behind the tool and clamp the block down. A gouge that slips travels the full length of the stroke.
Take a proof and correct
Take a proof and correct
Ink the block and print one sheet on scrap. Broken lines, grey patches and missed clearings show up here and nowhere else. Recut and proof again.
المواد لهذه الخطوة:
 حبر الطباعة بالقوالب10 مل
Roll a thin even film of ink
Roll a thin even film of ink
Roll the ink out on a slab until it hisses, then charge the block in two directions. Thick ink fills the fine lines and turns the outline into a blob.
Print onto pasteboard
Print onto pasteboard
Lay the pasteboard on the inked block, hold it still, and burnish the back firmly with a spoon or baren, working in overlapping circles. Lift one corner to check before pulling the sheet.
المواد لهذه الخطوة:
 ورق مقوّى1 ورقة
Dry the sheets flat
Dry the sheets flat
Interleave the printed sheets with clean paper and dry them under light weight, 24 hours for oil-based ink.
Cut one stencil per colour
Cut one stencil per colour
Cut a stencil for each colour from oiled card or thin sheet, one colour at a time, using a printed sheet as the pattern. From about 1450 this is how woodcuts of every kind were coloured.
الأدوات المطلوبة:
 سكين حِرَفية
 حصيرة قطع ذاتية الالتئام
Register the stencil to the print
Register the stencil to the print
Cut two notches in every stencil that line up with the same two marks printed on the sheet. Without registration marks each colour lands slightly off and the deck looks drunk.
Brush colour through the stencil
Brush colour through the stencil
Hold the stencil down flat and work colour through it with a stiff, nearly dry brush, sweeping across the openings. A wet brush creeps under the edge and blurs the shape.
المواد لهذه الخطوة:
 طقم ألوان أكريليك1 طقم
الأدوات المطلوبة:
 طقم فرش رسم
Cut the cards apart
Cut the cards apart
Cut the sheet down the gaps with a straightedge and knife. Cut the long axis first on every sheet so any drift stays consistent across the deck.
الأدوات المطلوبة:
مسطرةBurnish and wax the faces
Burnish and wax the faces
Burnish each card and rub a trace of beeswax over the face. Slick cards slide against each other; unwaxed pasteboard drags and will not shuffle.
المواد لهذه الخطوة:
 حبيبات شمع العسل5 غ
History & Context
History & Context
Cards arrive, then printing arrives. Playing cards reached Europe in the late fourteenth century. Hand-painted decks survive from the fifteenth century as luxury objects, but no printed cards are known from before the 1420s. From roughly 1418 to 1450 professional card makers working in Ulm, Nuremberg and Augsburg were producing printed decks, and cards rivalled devotional prints as the most common product of the early woodcut.
Block, then engraving, then stencil. The images were drawn by hand, cut in relief on woodblocks, or — for the finest work — printed from copper engravings. Colour was applied by hand at first and by stencil from about 1450 onward. Each of those steps cut the labour per deck, and each one widened the market.
Pasteboard underneath. The stock was laminated pasteboard of three to six sheets. Stiffness let a card be dealt and shuffled; opacity stopped it being read from the back. The material is a blueprint in its own right and predates printing on it by a long way.
What we do not know. Surviving early decks are fragmentary — many known only from uncut proof sheets and from cards recycled as binding waste inside book covers, which is where a great deal of early printing survives at all. The suit systems now called German, Latin and French took shape over the fifteenth century, with the French pattern of hearts, tiles, clovers and pikes appearing around 1480 and winning out largely because its flat single-colour shapes could be stencilled in a couple of strokes. The design that survived was the one that was cheapest to colour.
Diderot, and a caution. Much of the detailed technical description of card making that gets quoted for the medieval period actually comes from Diderot's Encyclopédie in the eighteenth century. It describes a mature trade three centuries later than the first printed cards, and should not be read back onto them as if it were contemporary evidence.
المواد
5- 1 قطعةعنصر نائب
- 10 ملعنصر نائب
- 1 ورقةعنصر نائب
- 1 طقمعنصر نائب
- عنصر نائب
مواد المخططات المرتبطة

هذا المخطط يصنع
المخططات ذات الصلة
هذه المخططات تشارك المعرفة مع هذا — التقنيات والمواد والمبادئ

CC0 ملكية عامة
هذا المخطط مُصدر بموجب CC0. يحق لك نسخه وتعديله وتوزيعه واستخدامه لأي غرض، دون طلب إذن.
ادعم الصانع بشراء منتجات عبر مخططه حيث يكسب عمولة الصانع يحددها البائعون، أو أنشئ نسخة جديدة من هذا المخطط وضمّنه كرابط في مخططك لمشاركة الإيرادات.