التعاون
فنون
الجمال والعناية
حِرَف
الثقافة والتاريخ
ترفيه
البيئة
الطعام والمشروبات
الهندسة العكسية
العلوم
رياضة
التقنية
الأجهزة القابلة للارتداء
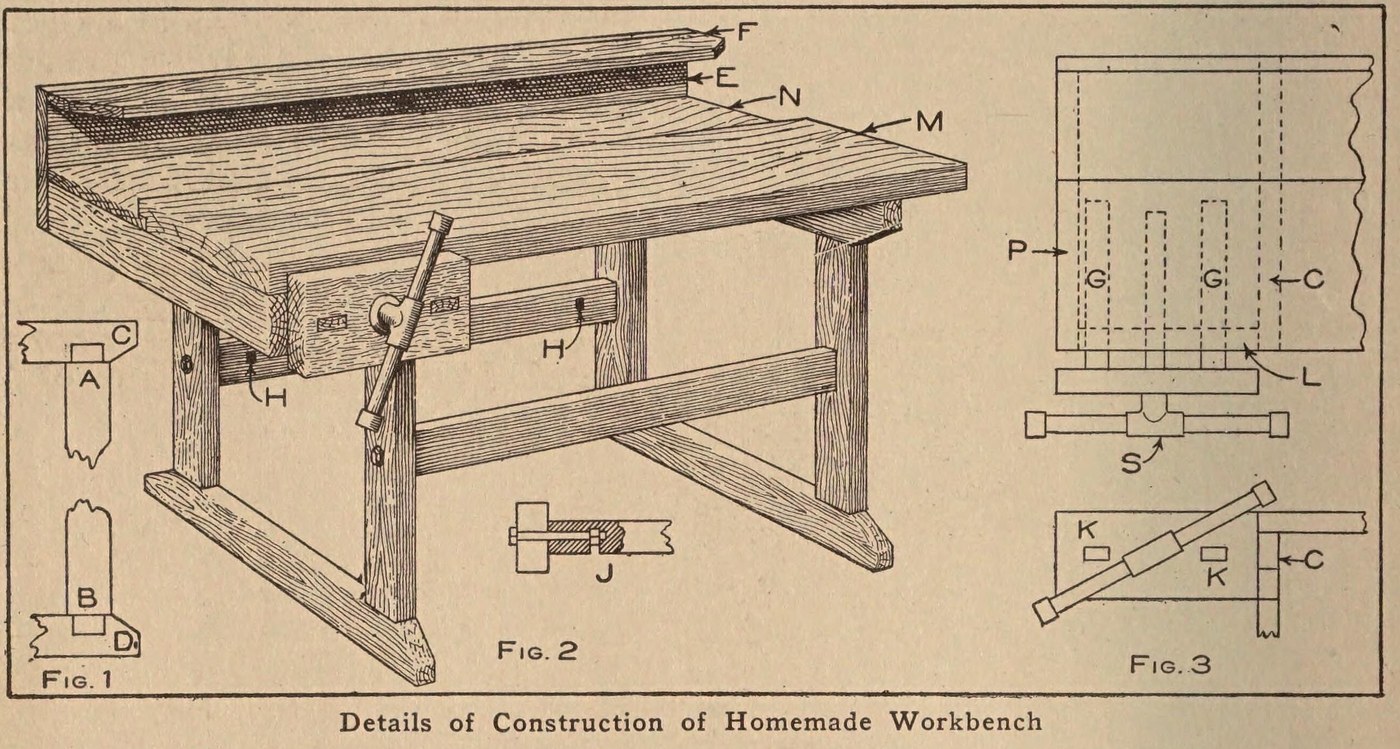


Workbench: a Pine Bench with a Laminated Maple Top and Vise (Boy Mechanic, 1913)
The same pine bench with a harder top: 14 maple strips set on edge, glued and screwed together, with a back board, a tool rack and a wooden vise on an iron bench screw.
Source: C. E. McKinney, Jr., 'Homemade Workbench', The Boy Mechanic, Book 1 (1913), pp. 442-443. Picture: Figs. 1-3 of the book.
متوسط
Unknown
التعليمات
1
1
Make the two leg frames
Make the two leg frames
Cut four 2 x 4 in pine legs 23 in long with a tenon on each end 1/2 in thick, 3 1/2 in wide and 1 1/2 in long (Fig. 1, A and B). Cut four crosspieces of the same stock 20 in long, mortised in the narrow edge 1 1/4 in from each end, and slope their corners from the leg out to the middle. Fit each pair of legs to a pair of crosspieces to make the two supports.
المواد لهذه الخطوة:
 خشب الصنوبر1 2 x 4 in: legs, crosspieces
الأدوات المطلوبة:
 منشار يدوي
 إزميل النقر
 مطرقة
2
2
Brace them together
Brace them together
Join the supports with two 2 x 4 in braces 24 in long, ends sawn square. Bore through each leg and 4 in into the centre of each brace end, bore an intersecting hole on the back of each brace for the nut, and draw each joint tight with a 3/8 x 6 in bolt (Fig. 2, J). A cross brace on the back stops rocking when planing.
المواد لهذه الخطوة:
خشب الصنوبر1 2 x 4 in: braces مسمار قلاووظ برأس مستدير4 3/8 x 6 in
الأدوات المطلوبة:
منشار يدوي مثقب يدوي بمقبض دوّار ولقمة
 مفتاح ربط قابل للضبط
3
3
Build up the maple top
Build up the maple top
Make the main top M of 14 maple strips 7/8 in thick, 2 in wide and 3 1/2 ft long, set on edge, each glued and screwed to the next, all with the grain one way so it planes smooth. Rabbet its back edge 1/2 in to take a back board N of the same length, 8 1/2 in wide and 7/8 in thick. Screw the top to the top crosspieces with long screws.
المواد لهذه الخطوة:
 مادة غير معروفة14 maple strips 7/8 x 2 in x 3 1/2 ft
 غراء خشب1 قطعة
 لوح صنوبر1 back board
 براغي خشب1 قطعة
الأدوات المطلوبة:
منشار يدوي مسحاج كفّ
 مفكّ مسطّح
4
4
Add the tool rack
Add the tool rack
Nail a board E 10 in wide to the back of the bench and fasten a 2 1/2 in board F on top of it at right angles; both 7/8 in thick and 3 1/2 ft long. Bore holes or cut notches in F to hold tools.
المواد لهذه الخطوة:
لوح صنوبر2 7/8 in, 3 1/2 ft مسامير1 قطعة
الأدوات المطلوبة:
مثقب يدوي بمقبض دوّار ولقمةمنشار يدويمطرقة5
5
Fit the vise
Fit the vise
Fasten an iron bench screw in a 2 x 6 in block 12 in long. Mortise two guide rails 7/8 x 1 1/2 in and 20 in long into the block; they slide in mortises in a 2 x 4 piece L bolted under the top, which holds the bench-screw nut between the two mortises. Nail L to a top crosspiece and to a 2 x 4 piece P bolted under the top at the end (Fig. 3).
المواد لهذه الخطوة:
خشب الصنوبر1 2 x 6 block, 2 x 4 pieces, guide rails لولب المنضدة للنحت على الخشب1 قطعةمسمار قلاووظ برأس مستدير1 for L and Pمسامير1 قطعة
الأدوات المطلوبة:
منشار يدويإزميل النقرمثقب يدوي بمقبض دوّار ولقمةمفتاح ربط قابل للضبطمطرقةالمواد
8- 1 2 x 6 block, 2 x 4 pieces, guide railsعنصر نائب
- 1 for L and Pعنصر نائب
- 14 maple strips 7/8 x 2 in x 3 1/2 ftعنصر نائب
- 1 قطعةعنصر نائب
- 2 7/8 in, 3 1/2 ftعنصر نائب
- 1 قطعةعنصر نائب
- 2 قطععنصر نائب
- عنصر نائب
هذا المخطط يصنع

CC0 ملكية عامة
هذا المخطط مُصدر بموجب CC0. يحق لك نسخه وتعديله وتوزيعه واستخدامه لأي غرض، دون طلب إذن.
ادعم الصانع بشراء منتجات عبر مخططه حيث يكسب عمولة الصانع يحددها البائعون، أو أنشئ نسخة جديدة من هذا المخطط وضمّنه كرابط في مخططك لمشاركة الإيرادات.