การทำงานร่วมกัน
ศิลปะ
ความงามและสุขภาพ
งานฝีมือ
วัฒนธรรมและประวัติศาสตร์
ความบันเทิง
สิ่งแวดล้อม
อาหารและเครื่องดื่ม
วิศวกรรมย้อนรอย
วิทยาศาสตร์
กีฬา
เทคโนโลยี
อุปกรณ์สวมใส่
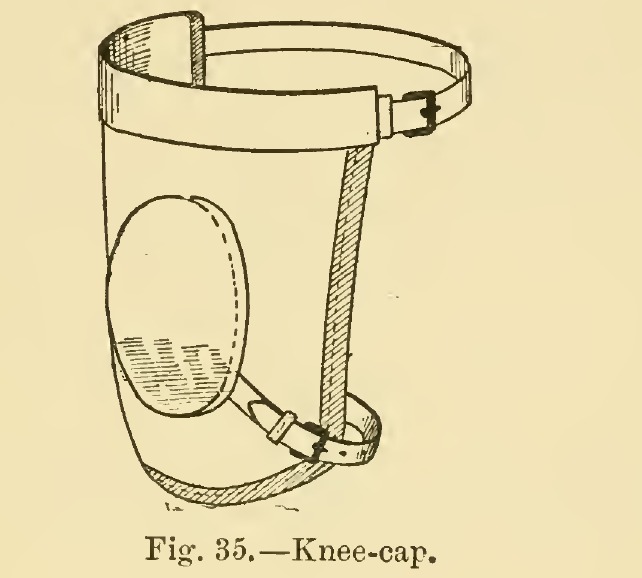


Horse Knee-Cap: Cupped Leather Block, Cloth Shield and Flock-Stuffed Chamois Roll (Hasluck, Saddlery, 1904)
A knee-cap protects a horse's knee from knocks and falls. This one is from Paul N. Hasluck's Saddlery (1904): a leather block beaten into a cup, set on a cloth or leather shield, a flock-stuffed chamois roll along the top strap, and a strap below the knee. Every size is his.
He notes it is often better to buy the pads, but shows how to make them.
ระดับกลาง
About 1 day
คำแนะนำ
1
1
Cutting list
Cutting list
กำลังโหลดสมุด Jupyter…
2
2
Read Saddlery, ch. X
Read Saddlery, ch. X
"Knee-caps are of felt, fawn rugging, kersey cloth, union, buff leather, black rubber, etc."
3
3
Beat the knee block
Beat the knee block
With no press, damp some half-curried leather and beat it, as a shoemaker beats boot soles, until it takes a hollow cup shape. Let it dry, then cut it to a wide oval about 5 in by 4 in.
วัสดุสำหรับขั้นตอนนี้:
 หนังฟอกฝาด1 ชิ้น
 น้ำจืด1 ชิ้น
เครื่องมือที่ต้องใช้:
 ค้อน
 เหล็กรองตัก
 มีดตัดหนัง
4
4
Cut and bind the shield
Cut and bind the shield
Make the cloth, kersey or leather about 8 in at the top and 9 in deep, and round the bottom. Bind all of it except the straight top with patent binding or cloth; buff leather need not be bound.
วัสดุสำหรับขั้นตอนนี้:
 แผ่นสักหลาดขนแกะ1 ชิ้น
 แถบขลิบขอบ1 ชิ้น
 ด้ายลินิน1 ชิ้น
 ขี้ผึ้ง1 ชิ้น
เครื่องมือที่ต้องใช้:
 กรรไกร
 ตลับเมตร
 เหล็กหมาด (สว่านเจาะรูมือ)
 เข็มเย็บอานม้าสองเล่ม
5
5
Fit the block
Fit the block
Put the leather block on the centre with a piece of shaped cardboard under it, paste the two together and press the cloth down into the hollow. Stitch the block to the cloth about 1-1/4 in from the top and 1-1/2 in from the bottom.
วัสดุสำหรับขั้นตอนนี้:
 กระดาษแข็งปะซ้อน1 ชิ้น
 กาวแป้งสาลี1 ชิ้นด้ายลินิน1 ชิ้นขี้ผึ้ง1 ชิ้น
เครื่องมือที่ต้องใช้:
มีดตัดหนังเหล็กหมาด (สว่านเจาะรูมือ)เข็มเย็บอานม้าสองเล่ม6
6
Make the top strap
Make the top strap
Cut a piece of leather 1-1/8 in wide and 1 in longer at each end than the cloth at the top. Make a hole at each end 1 in from the point for a 5/8 in strap. Put a chape, buckle and loop in the hole at one end and a 5/8 in strap 9 in long in the other, and stitch both firmly.
วัสดุสำหรับขั้นตอนนี้:
 หนังทำเครื่องม้า1 ชิ้น
 หัวเข็มขัดทองเหลืองมีลิ้น1 ชิ้นด้ายลินิน1 ชิ้นขี้ผึ้ง1 ชิ้น
เครื่องมือที่ต้องใช้:
มีดตัดหนัง เครื่องเจาะรูหนังเหล็กหมาด (สว่านเจาะรูมือ)เข็มเย็บอานม้าสองเล่ม
7
7
Make the padded roll
Make the padded roll
Cut chamois the same length and width as the strap. With it hanging down in front of the knee-cap and the three edges together, stitch it all along through the top leather and the cloth. Turn the chamois over the top towards the bottom and stitch it along the bottom side of the top strap, rather slack. Make two rows of stitches across the centre, leaving an opening of about 1-1/2 in exactly in the centre. Stuff both parts of the roll from each end with flock, then close the ends by stitching chamois and top leather together.
วัสดุสำหรับขั้นตอนนี้:
 หนังชามัวร์1 ชิ้น
 ใยขนแกะสำหรับยัด1 ชิ้นด้ายลินิน1 ชิ้นขี้ผึ้ง1 ชิ้น
เครื่องมือที่ต้องใช้:
กรรไกรเหล็กหมาด (สว่านเจาะรูมือ)เข็มเย็บอานม้าสองเล่ม8
8
Fit the bottom strap
Fit the bottom strap
Put a 5/8 in chape buckle and loop at the bottom of the block pad, slanting slightly downwards, with a strap 10 in long on the opposite side. For a pair, reverse the buckles so each is on the outside.
วัสดุสำหรับขั้นตอนนี้:
หนังทำเครื่องม้า1 ชิ้นหัวเข็มขัดทองเหลืองมีลิ้น1 ชิ้นด้ายลินิน1 ชิ้นขี้ผึ้ง1 ชิ้นเครื่องมือที่ต้องใช้:
มีดตัดหนังเหล็กหมาด (สว่านเจาะรูมือ)เข็มเย็บอานม้าสองเล่ม9
9
Troubleshooting
Troubleshooting
Knee-cap troubleshooting.
Flow
Loading...
10
10
History and honest limits
History and honest limits
From **Saddlery**, edited by Paul N. Hasluck, David McKay, 1904 (archive.org saddlery00hasl), chapter X, "Knee-caps and Miscellaneous Articles", pp. 81-84, Figs. 33-35; every fraction was read on the scan. He also suggests a better block cut with a tongue up under the top strap, and a fastening with two squares and a 5/8 in rubber ring; those are not shown here. The thread, the tools and the metric figures are ours.
วัสดุ
12- 1 ชิ้นตัวยึดตำแหน่ง
- 1 ชิ้นตัวยึดตำแหน่ง
- 1 ชิ้นตัวยึดตำแหน่ง
- 1 ชิ้นตัวยึดตำแหน่ง
- 5 ชิ้นตัวยึดตำแหน่ง
- 5 ชิ้นตัวยึดตำแหน่ง
- 1 ชิ้นตัวยึดตำแหน่ง
- 1 ชิ้นตัวยึดตำแหน่ง
- 2 ชิ้นตัวยึดตำแหน่ง
- ตัวยึดตำแหน่ง
- 1 ชิ้นตัวยึดตำแหน่ง
- 1 ชิ้นตัวยึดตำแหน่ง
เครื่องมือที่จำเป็น
8- ตัวยึดตำแหน่ง
- ตัวยึดตำแหน่ง
- ตัวยึดตำแหน่ง
- ตัวยึดตำแหน่ง
- 1 vendor sell this, none ship to you yetตัวยึดตำแหน่ง
- ตัวยึดตำแหน่ง
- ตัวยึดตำแหน่ง
- ตัวยึดตำแหน่ง
พิมพ์เขียวนี้สร้าง
บลูพริ้นท์ที่เกี่ยวข้อง
บลูพริ้นท์เหล่านี้แบ่งปันความรู้ — เทคนิค วัสดุ หรือหลักการ
CC0 สาธารณสมบัติ
พิมพ์เขียวนี้เผยแพร่ภายใต้ CC0 คุณสามารถคัดลอก แก้ไข แจกจ่าย และใช้งานผลงานนี้เพื่อวัตถุประสงค์ใดก็ได้ โดยไม่ต้องขออนุญาต
สนับสนุนเมกเกอร์โดยซื้อสินค้าผ่านพิมพ์เขียวของพวกเขา ซึ่งพวกเขาจะได้รับ ค่าคอมมิชชันเมกเกอร์ ที่ผู้ขายกำหนด หรือสร้างเวอร์ชันใหม่ของพิมพ์เขียวนี้และรวมเป็นการเชื่อมต่อในพิมพ์เขียวของคุณเพื่อแบ่งรายได้