การทำงานร่วมกัน
ศิลปะ
ความงามและสุขภาพ
งานฝีมือ
วัฒนธรรมและประวัติศาสตร์
ความบันเทิง
สิ่งแวดล้อม
อาหารและเครื่องดื่ม
วิศวกรรมย้อนรอย
วิทยาศาสตร์
กีฬา
เทคโนโลยี
อุปกรณ์สวมใส่
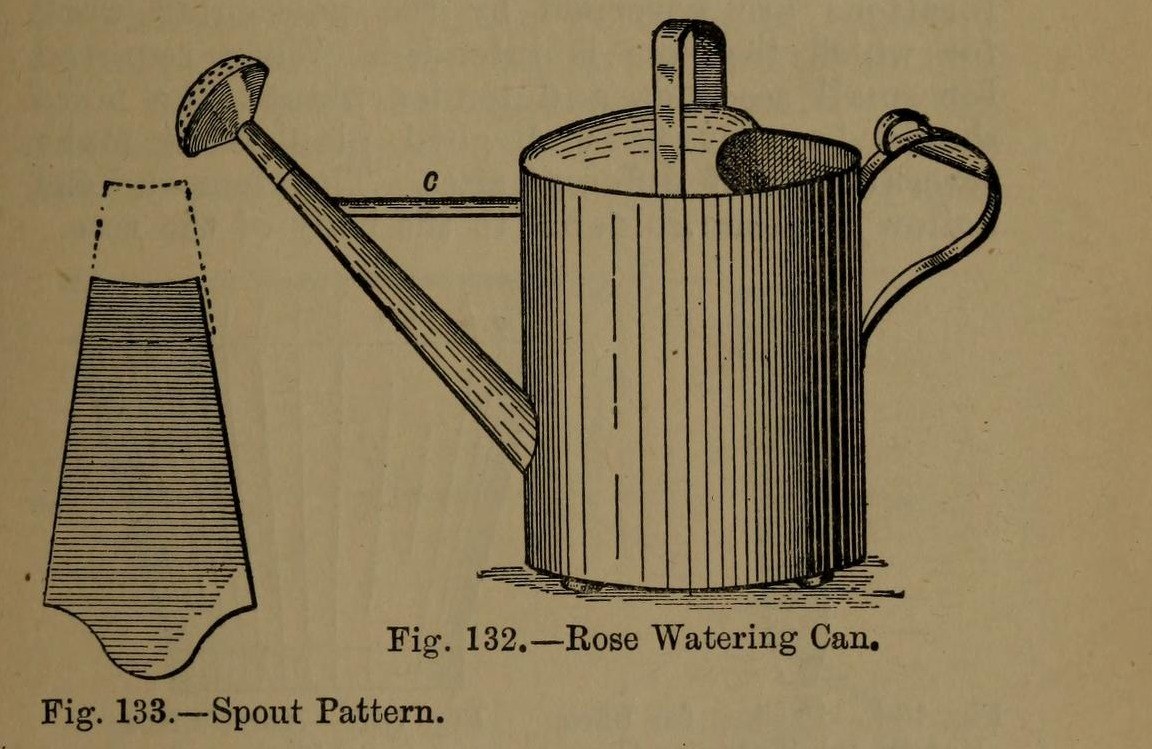


Watering Can: the Tinplate Rose Watering-Can (Hasluck, 1907)
A tinsmith's garden watering can: a round body from one sheet 2 ft 1 in x 8 1/2 in, a two-piece spout with a perforated rose, a hollowed top with a cross handle, and a back handle with a thumb ring. Tinplate or galvanised iron.
Variable: the rose. Its pattern diameter is the rose diameter x 4 / 3; finer holes for seedlings.
Source: Paul N. Hasluck, Tinplate Work (1907), pp. 54-57. Unknown: solder. Picture: Figs. 132-135 of the book.
ระดับกลาง
Unknown
คำแนะนำ
1
1
Make the body and bottom
Make the body and bottom
Cut a sheet 2 ft 1 in by 8 1/2 in. Wire one edge, sink it in the crease iron, round it and groove the seam; solder the seam inside. Cut the spout hole opposite the seam, 2 1/2 in from the bottom. Edge the bottom to fit, beat it up and solder it from inside.
วัสดุสำหรับขั้นตอนนี้:
 แผ่นเหล็กชุบดีบุก1 body, bottom
 ลวดเหล็กดัด1 edge
 ตะกั่วบัดกรีดีบุก-ตะกั่ว1 ชิ้น
เครื่องมือที่ต้องใช้:
 กรรไกรตัดแผ่นโลหะ
 หลัก
 ค้อนไม้
 หัวแร้งไฟฟ้า
 ฟลักซ์
2
2
Make and fit the spout
Make and fit the spout
Cut the spout in two pieces (Fig. 133), bend them to shape and solder the seams. Solder the larger piece into the body. Make it longer for plants out of reach, with an elbow for plants up high. Make the stay: a taper strip as long as the gap between can and spout, bent to a half-round section and soldered in.
วัสดุสำหรับขั้นตอนนี้:
แผ่นเหล็กชุบดีบุก1 spout, stayตะกั่วบัดกรีดีบุก-ตะกั่ว1 ชิ้นเครื่องมือที่ต้องใช้:
กรรไกรตัดแผ่นโลหะหลักหัวแร้งไฟฟ้าฟลักซ์3
3
Make the rose
Make the rose
Set out the rose body (Fig. 135): its diameter is the rose diameter x 4 / 3, so a 3 in rose needs a 4 in pattern, with lines a b at right angles. Bend it over a funnel stake and solder the seam. Hollow a disc for the front, with edges for capping on. Inside the hollow, mark circles and pierce them at intervals with a bradawl over a hard wood block; very fine for seedlings. Solder front and stem to the rose body. Several roses of different sizes are useful.
วัสดุสำหรับขั้นตอนนี้:
แผ่นเหล็กชุบดีบุก1 roseตะกั่วบัดกรีดีบุก-ตะกั่ว1 ชิ้นเครื่องมือที่ต้องใช้:
 วงเวียนปลายแหลมสองขากรรไกรตัดแผ่นโลหะหลัก
 ค้อนเกลาผิว
 เหล็กหมาด (สว่านเจาะรูมือ)
 ท่อนไม้เนื้อแข็งหัวแร้งไฟฟ้าฟลักซ์
4
4
Fit the top and handles
Fit the top and handles
Hollow the top (Fig. 134), fit it to the body, wire its inner arc and solder it on. Cross handle: a strip about 1 3/4 in wide, wired with No. 12 B.W.G., bent to shape; cut two holes in the top with a small sharp chisel and solder the ends inside and on top. Back handle (Fig. 136): wire and bend it, solder a small boss under its upper part, and solder it opposite the spout with a thumb ring at the top. Solder three small hollowed studs under the bottom.
วัสดุสำหรับขั้นตอนนี้:
แผ่นเหล็กชุบดีบุก1 top, handles, studsลวดเหล็กดัด1 No. 12 B.W.G.ตะกั่วบัดกรีดีบุก-ตะกั่ว1 ชิ้นเครื่องมือที่ต้องใช้:
กรรไกรตัดแผ่นโลหะค้อนเกลาผิว สิ่วเหล็กหัวแร้งไฟฟ้าฟลักซ์
5
5
Clean and paint
Clean and paint
Clean with turpentine and whiting. Give two good coats of paint: red inside and green outside suit it.
วัสดุสำหรับขั้นตอนนี้:
 สีน้ำมัน2 coats
เครื่องมือที่ต้องใช้:
 น้ำมันสน
 แคลเซียมคาร์บอเนต (ผงชอล์ก)
วัสดุ
4- 1 top, handles, studsตัวยึดตำแหน่ง
- 1 No. 12 B.W.G.ตัวยึดตำแหน่ง
- 4 ชิ้นตัวยึดตำแหน่ง
- 2 coatsตัวยึดตำแหน่ง
เครื่องมือที่จำเป็น
12- ตัวยึดตำแหน่ง
- ตัวยึดตำแหน่ง
- ตัวยึดตำแหน่ง
- ตัวยึดตำแหน่ง
- ตัวยึดตำแหน่ง
- ตัวยึดตำแหน่ง
- ตัวยึดตำแหน่ง
- ตัวยึดตำแหน่ง
- ตัวยึดตำแหน่ง
- ตัวยึดตำแหน่ง
- ตัวยึดตำแหน่ง
- ตัวยึดตำแหน่ง
วัสดุจากพิมพ์เขียวที่เชื่อมต่อ



พิมพ์เขียวนี้สร้าง

CC0 สาธารณสมบัติ
พิมพ์เขียวนี้เผยแพร่ภายใต้ CC0 คุณสามารถคัดลอก แก้ไข แจกจ่าย และใช้งานผลงานนี้เพื่อวัตถุประสงค์ใดก็ได้ โดยไม่ต้องขออนุญาต
สนับสนุนเมกเกอร์โดยซื้อสินค้าผ่านพิมพ์เขียวของพวกเขา ซึ่งพวกเขาจะได้รับ ค่าคอมมิชชันเมกเกอร์ ที่ผู้ขายกำหนด หรือสร้างเวอร์ชันใหม่ของพิมพ์เขียวนี้และรวมเป็นการเชื่อมต่อในพิมพ์เขียวของคุณเพื่อแบ่งรายได้