İşbirliği
SANAT
GÜZELLİK & SAĞLIK
ZANAAT
KÜLTÜR & TARİH
EĞLENCE
ÇEVRE
YİYECEK & İÇECEK
TERS MÜHENDİSLİK
BİLİMLER
SPOR
TEKNOLOJİ
GİYİLEBİLİR ÜRÜNLER
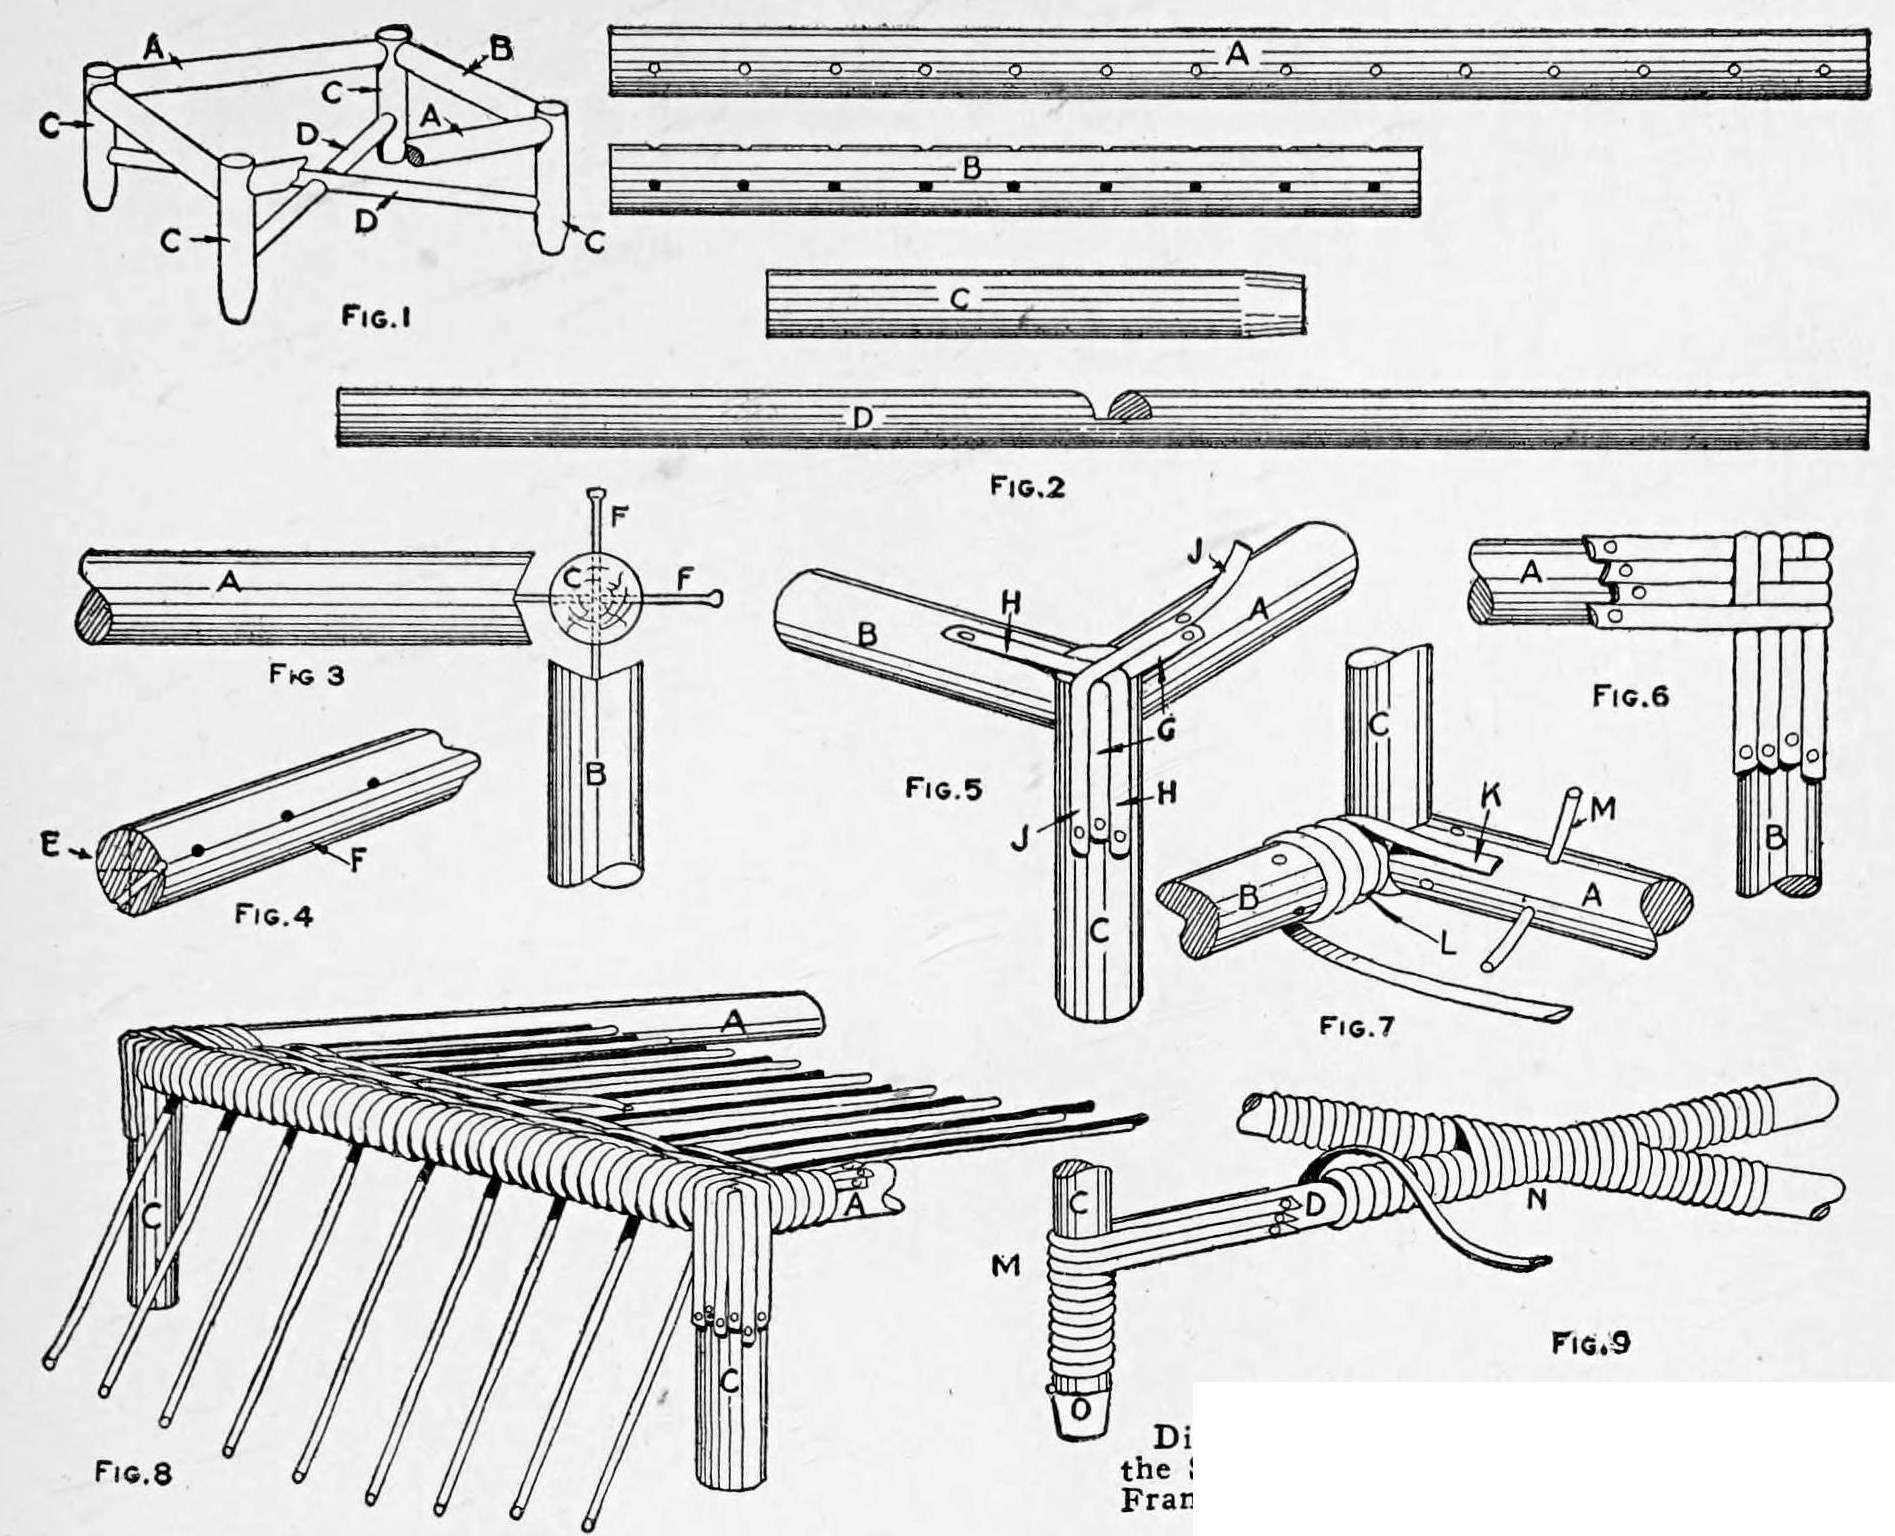


Woven-Reed Footstool: Nailed Dowel Frame, Wound Posts, Woven Top and Pairing-Weave Apron (Boy Mechanic, 1919)
Charles M. Miller's reed footstool from The Boy Mechanic, Book 3 (1919): a frame of 3/4 in dowel rails and posts with crossed 5/8 in braces, nailed through drilled holes, the posts and rails wound with flat reed, the top woven over No. 4 spokes and the apron in pairing weave, finished with a broken-down roll.
Orta
About 2 days
Talimatlar
1
1
Cut list
Cut list
Jupyter defteri yükleniyor…
2
2
Read The Boy Mechanic, Book 3
Read The Boy Mechanic, Book 3
"Each piece of reed furniture has a framework, usually of dowels." The reed sizes are those of his reed basket (Boy Mechanic, Book 2).
3
3
Cut and drill the frame
Cut and drill the frame
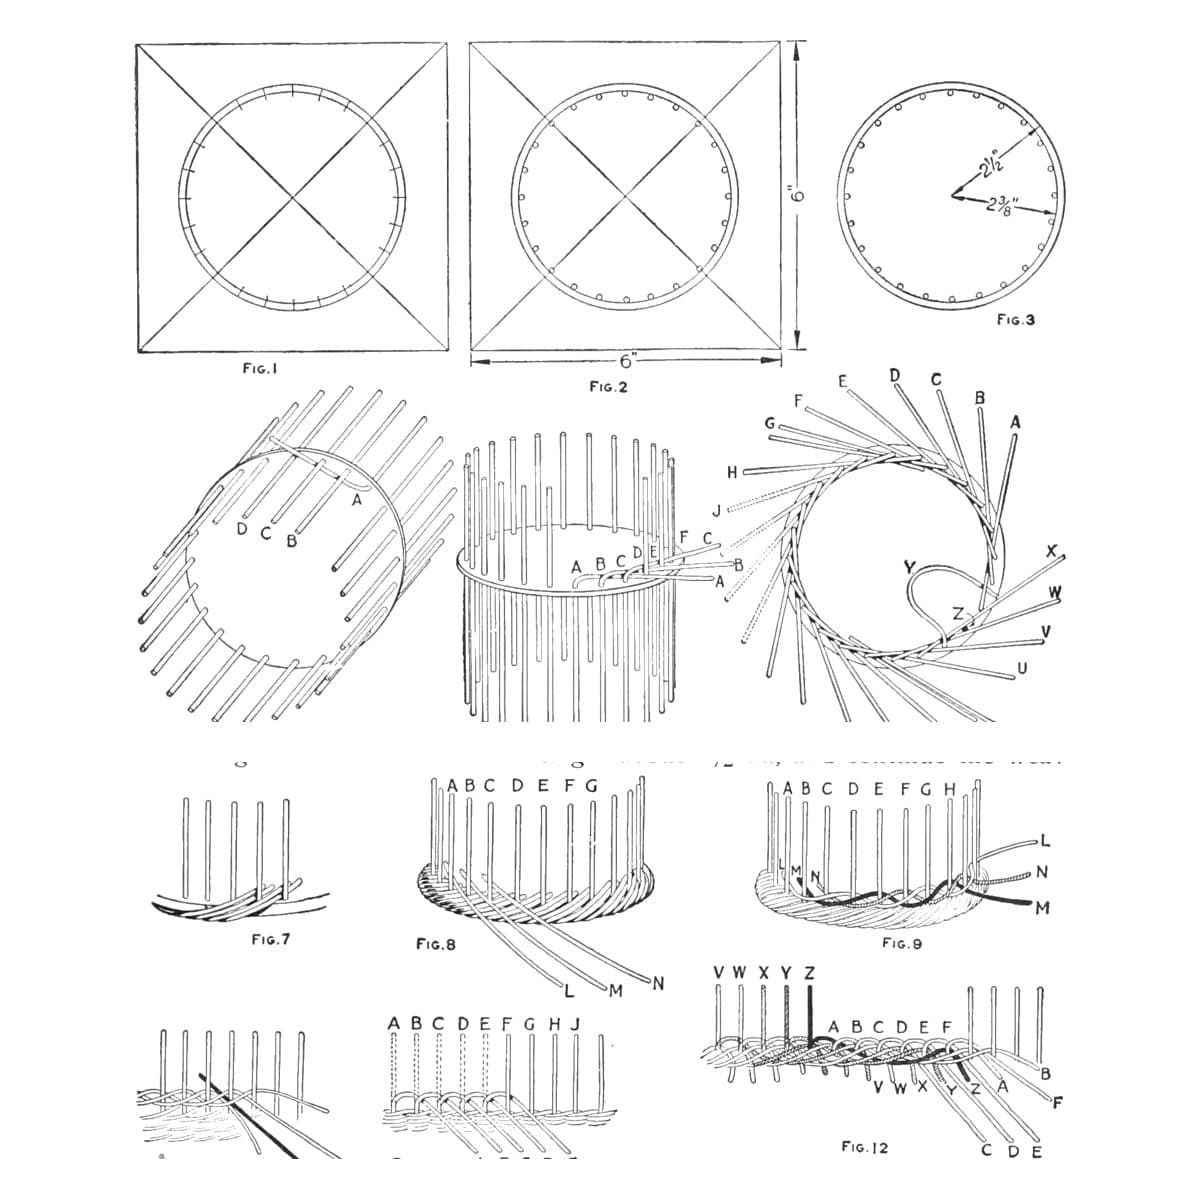
Cut two side rails 3/4 by 14 in, two end rails 3/4 by 9 in, four posts 3/4 by 7 in and two braces 5/8 by 17 in (trimmed to fit later). Notch the rail and brace ends with a coping saw to seat on the posts. Before assembly drill the spoke holes, 1/8 in for No. 4 reed, combining the top and end-side spoke holes as in Fig. 4 and drilling the side-rail holes straight (Fig. 2).
Bu adım için malzemeler:
 Ahşap Kavela Çubuğu4 adet
Gerekli aletler:
 Kıl Testere
 El matkabı
 Kurşun kalem
 Şerit Metre
4
4
Nail the frame
Nail the frame
Run the posts to the top of the frame and nail through them into the rail ends with ordinary 4-penny nails, drilling 1/16 in holes first. Set the side rails about 1/16 in below the post tops. Halve the braces at the centre on a slant so their tops lie level, try them, and nail them without pulling the frame out of square (Fig. 1).
Bu adım için malzemeler:
 Çiviler1 adet
Gerekli aletler:
El matkabı ÇekiçKıl Testere
5
5
Wind the posts and end rails
Wind the posts and end rails
Cover the post tops with short pieces of winding reed tacked on with shoemaker's tacks, crossing in turn (Figs. 5, 6). Wind the end rails, marking each hole with pencil as the winding passes it; then open each hole through the winding with a bodkin (Fig. 7).
Bu adım için malzemeler:
 Yarılmış kamış1 adet
 Kalıba çekme çivisi1 adet
Gerekli aletler:
Çekiç BizKurşun kalem
6
6
Weave the top
Weave the top
Put the 32 in No. 4 spokes through one end rail, down and out at the ends. Weave with a single No. 3 weaver, and after 3/4 in add a short extra spoke beside each spoke, weaving the pair as one; wind the weaver twice round the side rail each time. Insert the spokes in the other end rail before the weaving is within 2 or 3 in of it (Fig. 8).
Bu adım için malzemeler:
 Rattan1 adet
Gerekli aletler:
 Makas
 20 Litrelik Kova
 Sünger
7
7
Wind braces and posts, weave the apron
Wind braces and posts, weave the apron
Wind the braces and posts, three strips round the post and tacked where each brace meets it, and both braces together where they cross (Fig. 9); finish the posts with brass caps or wind to within 1/8 in of the bottom. With the stool upside down, insert short spokes in the under side of the side rails and weave the apron in pairing weave, always passing one weaver twice round each post (Figs. 10-12). Cut the extra spokes even and break down the spokes into a roll, tucking the ends inside (Figs. 13-15). Singe off stray fibres carefully with a gas flame or blowtorch.
Bu adım için malzemeler:
Yarılmış kamış1 adetRattan1 adetKalıba çekme çivisi1 adetGerekli aletler:
Makas Propan PürmüzSünger20 Litrelik Kova
8
8
Troubleshooting
Troubleshooting
Reed weaving troubleshooting.
Flow
Loading...
9
9
History and honest limits
History and honest limits
From "A Woven-Reed Footstool" by Charles M. Miller, in **The Boy Mechanic, Book 3**, Popular Mechanics, 1919 (Project Gutenberg 71856; checked on the archive.org scan boymechanic0003unse, pp. 255-258). Fig. 2 shows the hole positions without figures, and he mentions an optional chloride-of-lime bleach that we leave out. The tools and metric figures are ours.
Malzemeler
5- 4 adetYer Tutucu
- 1 adetYer Tutucu
- 1 adetYer Tutucu
- 1 adetYer Tutucu
- 1 adetYer Tutucu
Gerekli Aletler
10- Yer Tutucu
- Yer Tutucu
- 1 vendor sell this, none ship to you yetYer Tutucu
- 1 vendor sell this, none ship to you yetYer Tutucu
- Yer Tutucu
- Yer Tutucu
- Yer Tutucu
- Yer Tutucu
- Yer Tutucu
- Yer Tutucu
Bu planla yapılan
İlgili Blueprint'ler
Bu blueprint'ler bilgi paylaşır — teknikler, malzemeler veya ilkeler

CC0 Kamu Malı
Bu plan CC0 lisansıyla yayınlanmıştır. İzin almadan kopyalayabilir, değiştirebilir, dağıtabilir ve herhangi bir amaçla kullanabilirsiniz.
Planı üzerinden ürün satın alarak Maker'ı destekleyin, böylece Maker Komisyonu Satıcılar tarafından belirlenen komisyonu kazanırlar veya bu Planın yeni bir versiyonunu oluşturun ve gelir paylaşımı için kendi Planınıza bağlantı olarak ekleyin.