İşbirliği
SANAT
GÜZELLİK & SAĞLIK
ZANAAT
KÜLTÜR & TARİH
EĞLENCE
ÇEVRE
YİYECEK & İÇECEK
TERS MÜHENDİSLİK
BİLİMLER
SPOR
TEKNOLOJİ
GİYİLEBİLİR ÜRÜNLER
Pocket Morse Code Learning Board - v.1
Admiral OOM

Oluşturan

Admiral OOM

10. Kasım 2026NO
1
0
0
0
0

Pocket Morse Code Learning Board - v.1

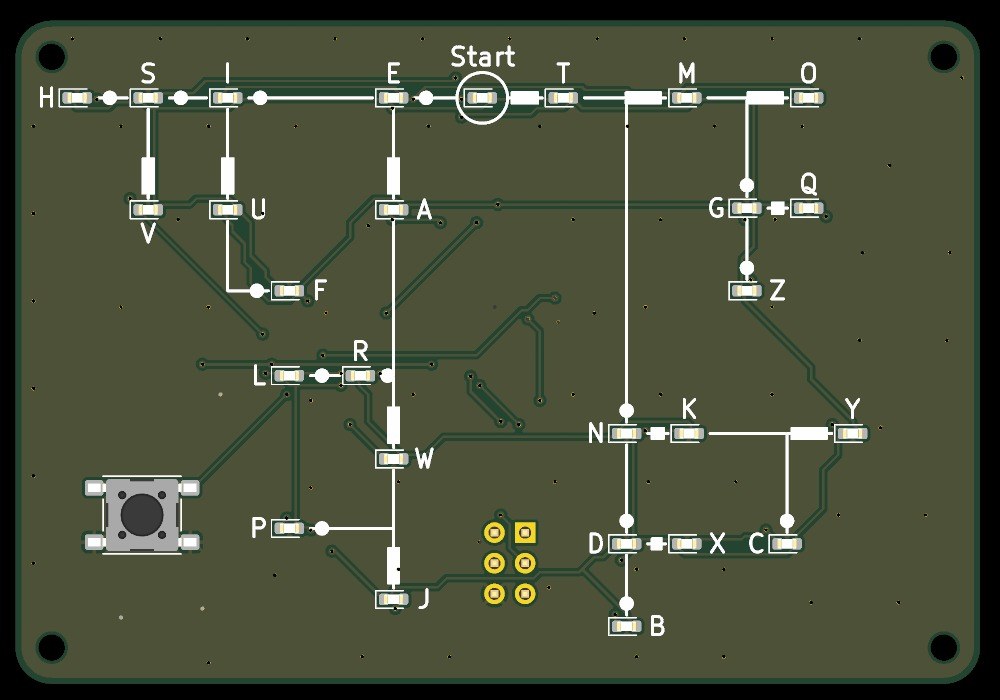
A pocket board, 80 x 55 mm, that teaches you to read Morse code. Its front is Dave Nathanson's Morse decoding chart: from Start, dots run one way and dashes the other, and every letter sits where its dots and dashes lead. Here every letter has its own LED. Press the key short for a dot and long for a dash, and the LED of the letter you have reached lights; pause, and it blinks. It runs on one CR2032 coin cell and sleeps between uses. The board was drawn with Youblob's Draw PCB, and its checks pass, but it has not been built yet.
İleri
About 1 day, plus board delivery

Talimatlar

1

LED current and keying speed

Jupyter defteri yükleniyor…
2

The code it decodes

This board reads the International Morse code letters as ITU-R M.1677-1 gives them.
3

Read the chart

Dave Nathanson (KG6ZJO) drew his decoding chart in 2010: "Start with your finger at "Start Here". Then move your finger to track the Morse dots & dashes. You will arrive at the correct letter!" On this board the LEDs do the tracking. ITU-R M.1677-1: "A dash is equal to three dots."
4

The schematic

ATmega328P on its internal 8 MHz clock, straight from the coin cell; 27 LEDs charlieplexed on PC0-PC5 through six 330 Ω resistors; the key on INT0; a 2x3 ISP footprint.

KiCanvas görüntüleyici yükleniyor...

Profesyonel PCB Tasarım Görüntüleyici

5

The board

Two layers, 80 x 55 mm. The chart, LEDs and key on the front; the chip, resistors, capacitors and cell holder on the back.

KiCanvas görüntüleyici yükleniyor...

Profesyonel PCB Tasarım Görüntüleyici

6

Order the board

Open the board in KiCad and plot Gerber and drill files (File > Fabrication Outputs). Order a two-layer board, 1.6 mm thick, from any board maker that takes Gerbers.

Bu adım için malzemeler:

Baskı devre kartıBaskı devre kartı1 adet

Gerekli aletler:

Arduino IDE Kurulu BilgisayarArduino IDE Kurulu Bilgisayar
7

Solder the parts

Back first: paste and reflow U1, R1-R7, C1-C3 and the cell holder BT1 with hot air. Then the front: the 27 red LEDs D1-D27 with pad 1 (cathode) as the board's assembly drawing shows, and the key SW1. Leave J1 empty. Clean off the flux, then test each LED's direction with the meter's diode test.

Bu adım için malzemeler:

ATmega328P mikrodenetleyiciATmega328P mikrodenetleyici1 adet
Çip LEDÇip LED27 adet
Çip dirençÇip direnç7 adet
Seramik çip kondansatörSeramik çip kondansatör3 adet
ButonButon1 adet
Pil yuvasıPil yuvası1 adet
Lehim macunu (kurşunsuz)Lehim macunu (kurşunsuz)1 adet
Lehim TeliLehim Teli1 adet

Gerekli aletler:

Sıcak hava ile onarım istasyonuSıcak hava ile onarım istasyonu
HavyaHavya
İnce uçlu cımbızİnce uçlu cımbız
DekapanDekapan
BüyüteçBüyüteç
MultimetreMultimetre
İzopropil Alkol %99İzopropil Alkol %99
8

The firmware

pocket_morse_decoder_az.ino: every timing is a named constant at the top of the sketch. Board in the Arduino IDE: Arduino Pro or Pro Mini, ATmega328P (3.3V, 8 MHz).
pocket_morse_decoder_az.inoarduino
// Pocket Morse code decoder - ATmega328P-AU, internal 8 MHz, CR2032
// Board: Arduino Pro or Pro Mini, ATmega328P (3.3V, 8MHz) - burn fuses for internal RC (see notes)
// 27 LEDs charlieplexed on A0..A5 (PC0..PC5), button on D2 (INT0) to GND.
#include <avr/sleep.h>
#include <avr/power.h>
#include <avr/interrupt.h>

// ---------------- timing constants (ms) ----------------
const unsigned long DEBOUNCE_MS       = 20;     // button debounce
const unsigned long DASH_THRESHOLD_MS = 250;    // press shorter = dot, longer = dash
const unsigned long CHAR_GAP_MS       = 700;    // silence that ends a character
const unsigned long BLINK_ON_MS       = 150;    // result blink on time
const unsigned long BLINK_OFF_MS      = 150;    // result blink off time
const uint8_t       BLINK_COUNT       = 3;      // number of result blinks
const unsigned long IDLE_SLEEP_MS     = 30000;  // idle time before power-down

// ---------------- hardware ----------------
const uint8_t BUTTON_PIN = 2;                   // INT0, internal pull-up, active low
const uint8_t LINE_PINS[6] = {A0, A1, A2, A3, A4, A5};  // charlieplex lines CP1..CP6
const uint8_t MAX_CODE_LEN = 4;

struct Node {
  const char *code;   // "" = Start
  char label;
  uint8_t anode;      // index into LINE_PINS
  uint8_t cathode;
};

const Node NODES[] = {
  {"", ' ', 0, 2},   // D1
  {"-", 'T', 2, 0},   // D2
  {".", 'E', 1, 0},   // D3
  {"--", 'M', 2, 1},   // D4
  {"-.", 'N', 5, 1},   // D5
  {".-", 'A', 4, 1},   // D6
  {"..", 'I', 0, 1},   // D7
  {"---", 'O', 1, 2},   // D8
  {"--.", 'G', 2, 4},   // D9
  {"-.-", 'K', 1, 5},   // D10
  {"-..", 'D', 5, 3},   // D11
  {".--", 'W', 1, 4},   // D12
  {".-.", 'R', 3, 1},   // D13
  {"..-", 'U', 0, 4},   // D14
  {"...", 'S', 5, 0},   // D15
  {"--.-", 'Q', 5, 2},   // D16
  {"--..", 'Z', 4, 2},   // D17
  {"-.--", 'Y', 2, 5},   // D18
  {"-.-.", 'C', 5, 4},   // D19
  {"-..-", 'X', 4, 5},   // D20
  {"-...", 'B', 3, 5},   // D21
  {".---", 'J', 4, 3},   // D22
  {".--.", 'P', 3, 4},   // D23
  {".-..", 'L', 1, 3},   // D24
  {"..-.", 'F', 4, 0},   // D25
  {"...-", 'V', 0, 3},   // D26
  {"....", 'H', 3, 0},   // D27
};
const uint8_t NODE_COUNT = sizeof(NODES) / sizeof(NODES[0]);
const int8_t START_NODE = 0;

// ---------------- state ----------------
char seq[MAX_CODE_LEN + 2];
uint8_t seqLen = 0;
bool seqInvalid = false;
bool charPending = false;
bool btnStable = false;          // true = pressed
bool btnLastRaw = false;
unsigned long btnRawChange = 0;
unsigned long pressStart = 0;
unsigned long lastRelease = 0;
unsigned long lastActivity = 0;

void ledsOff() {
  for (uint8_t i = 0; i < 6; i++) {
    pinMode(LINE_PINS[i], INPUT);
    digitalWrite(LINE_PINS[i], LOW);
  }
}

void ledOn(int8_t idx) {
  ledsOff();
  if (idx < 0 || idx >= NODE_COUNT) return;
  uint8_t a = LINE_PINS[NODES[idx].anode];
  uint8_t c = LINE_PINS[NODES[idx].cathode];
  digitalWrite(c, LOW);
  pinMode(c, OUTPUT);
  digitalWrite(a, HIGH);
  pinMode(a, OUTPUT);
}

int8_t findNode(const char *code) {
  for (uint8_t i = 0; i < NODE_COUNT; i++) {
    if (strcmp(NODES[i].code, code) == 0) return i;
  }
  return -1;
}

void blinkNode(int8_t idx) {
  for (uint8_t k = 0; k < BLINK_COUNT; k++) {
    ledsOff();
    delay(BLINK_OFF_MS);
    ledOn(idx);
    delay(BLINK_ON_MS);
  }
  ledsOff();
  delay(BLINK_OFF_MS);
}

bool rawPressed() { return digitalRead(BUTTON_PIN) == LOW; }

// returns +1 on debounced press, -1 on debounced release, 0 otherwise
int8_t pollButton(unsigned long now) {
  bool raw = rawPressed();
  if (raw != btnLastRaw) { btnLastRaw = raw; btnRawChange = now; }
  if (raw != btnStable && (now - btnRawChange) >= DEBOUNCE_MS) {
    btnStable = raw;
    return raw ? 1 : -1;
  }
  return 0;
}

void resetSequence() {
  seqLen = 0;
  seq[0] = 0;
  seqInvalid = false;
  charPending = false;
}

ISR(INT0_vect) {
  EIMSK &= ~_BV(INT0);   // one-shot wake interrupt
}

void waitForRelease() {
  unsigned long t = millis();
  while (true) {
    if (rawPressed()) t = millis();
    if (millis() - t >= DEBOUNCE_MS) break;
  }
  btnStable = false; btnLastRaw = false;
}

void goToSleep() {
  ledsOff();
  set_sleep_mode(SLEEP_MODE_PWR_DOWN);
  cli();
  EICRA &= ~(_BV(ISC01) | _BV(ISC00));   // INT0 on low level (works in power-down)
  EIFR = _BV(INTF0);
  EIMSK |= _BV(INT0);
  sleep_enable();
  sleep_bod_disable();
  sei();
  sleep_cpu();
  sleep_disable();
  EIMSK &= ~_BV(INT0);
  // woken by the button: this press only wakes the board
  waitForRelease();
}

void wakeUp() {
  resetSequence();
  ledOn(START_NODE);
  lastActivity = millis();
}

void setup() {
  ADCSRA = 0;
  power_adc_disable();
  power_spi_disable();
  power_twi_disable();
  power_usart0_disable();
  power_timer1_disable();
  power_timer2_disable();
  ACSR = _BV(ACD);                 // analog comparator off
  DIDR0 = 0x3F;                    // digital input buffers off on PC0..PC5 (outputs only)
  for (uint8_t p = 0; p <= 13; p++) pinMode(p, INPUT_PULLUP);  // unused pins defined
  pinMode(BUTTON_PIN, INPUT_PULLUP);
  ledsOff();
  delay(5);
  btnLastRaw = btnStable = rawPressed();
  wakeUp();
}

void loop() {
  unsigned long now = millis();
  int8_t ev = pollButton(now);

  if (ev == 1) {                         // press
    pressStart = now;
    lastActivity = now;
  } else if (ev == -1) {                 // release: classify
    unsigned long dur = now - pressStart;
    char sym = (dur < DASH_THRESHOLD_MS) ? '.' : '-';
    if (seqLen < MAX_CODE_LEN) {
      seq[seqLen++] = sym;
      seq[seqLen] = 0;
    } else {
      seqInvalid = true;
    }
    int8_t idx = seqInvalid ? -1 : findNode(seq);
    if (idx < 0) { seqInvalid = true; ledsOff(); }
    else ledOn(idx);
    charPending = true;
    lastRelease = now;
    lastActivity = now;
  }

  if (charPending && !btnStable && (now - lastRelease) >= CHAR_GAP_MS) {
    int8_t idx = seqInvalid ? -1 : findNode(seq);
    if (idx >= 0) blinkNode(idx);
    else blinkNode(START_NODE);
    resetSequence();
    ledOn(START_NODE);
    lastActivity = millis();
  }

  if (!charPending && !btnStable && (millis() - lastActivity) >= IDLE_SLEEP_MS) {
    goToSleep();
    wakeUp();
  }
}
9

Set the fuses and upload

Do not use Burn Bootloader: the Pro board setting expects a crystal, and this board has none. Hold an ISP programmer's 2x3 pins on J1 and set the internal 8 MHz clock: avrdude -c usbasp -p m328p -U lfuse:w:0xE2:m -U hfuse:w:0xD9:m -U efuse:w:0xFF:m. Then, in the Arduino IDE, use Sketch > Upload Using Programmer.

Gerekli aletler:

AVR ISP programlayıcıAVR ISP programlayıcı
Arduino IDE Kurulu BilgisayarArduino IDE Kurulu Bilgisayar
10

Print the back shell

An open-front shell, 84.8 x 59.8 x 8.9 mm, with four standoffs for M2 screws, a slot to slide the cell out and a window under J1. PLA, 0.2 mm layers, 20 % infill, printed on its floor.
Tasarım DosyasıSTLCC0 - Free
11

Fit the shell

The shell leaves 5.0 mm for the back parts: measure your cell holder with a cell in it before you print. Check the holder's open side faces the board's left edge, where the shell's cell slot is. Slide in a CR2032 and screw the board into the shell with four M2 self-tapping screws.

Bu adım için malzemeler:

PLA filamentPLA filament1 adet
Kendinden kılavuzlu vidaKendinden kılavuzlu vida4 adet
CR2032 düğme pilCR2032 düğme pil1 adet

Gerekli aletler:

FDM 3B yazıcıFDM 3B yazıcı
KumpasKumpas
Hassas tornavida takımıHassas tornavida takımı
12

Troubleshooting

Pocket Morse decoder troubleshooting.

Flow

Loading...
13

History and honest limits

The chart is **Dave Nathanson**'s (KG6ZJO), drawn in 2010 and shared as copyleft; his post says it is a novel way to decode by following a path. The letter codes are ITU-R M.1677-1's. The board, sizes, parts and timings are ours, drawn with Youblob's Draw PCB: its ERC and DRC pass with no errors and every LED's wiring was checked against the firmware by script, but it has not been built, flashed or tested.

Malzemeler

12

Gerekli Aletler

12

Tasarım dosyaları

1

CC0 Kamu Malı

Bu plan CC0 lisansıyla yayınlanmıştır. İzin almadan kopyalayabilir, değiştirebilir, dağıtabilir ve herhangi bir amaçla kullanabilirsiniz.

Planı üzerinden ürün satın alarak Maker'ı destekleyin, böylece Maker Komisyonu Satıcılar tarafından belirlenen komisyonu kazanırlar veya bu Planın yeni bir versiyonunu oluşturun ve gelir paylaşımı için kendi Planınıza bağlantı olarak ekleyin.

Tartışma

(0)

Giriş yapın tartışmaya katılmak için

Yorumlar yükleniyor...