Співпраця
МИСТЕЦТВО
КРАСА ТА ЗДОРОВ'Я
РЕМЕСЛО
КУЛЬТУРА ТА ІСТОРІЯ
РОЗВАГИ
СЕРЕДОВИЩЕ
ЇЖА ТА НАПІЇ
ЗБОРНА ІНЖЕНЕРІЯ
НАУК
СПОРТ
ТЕХНОЛОГІЯ
НОСИМО
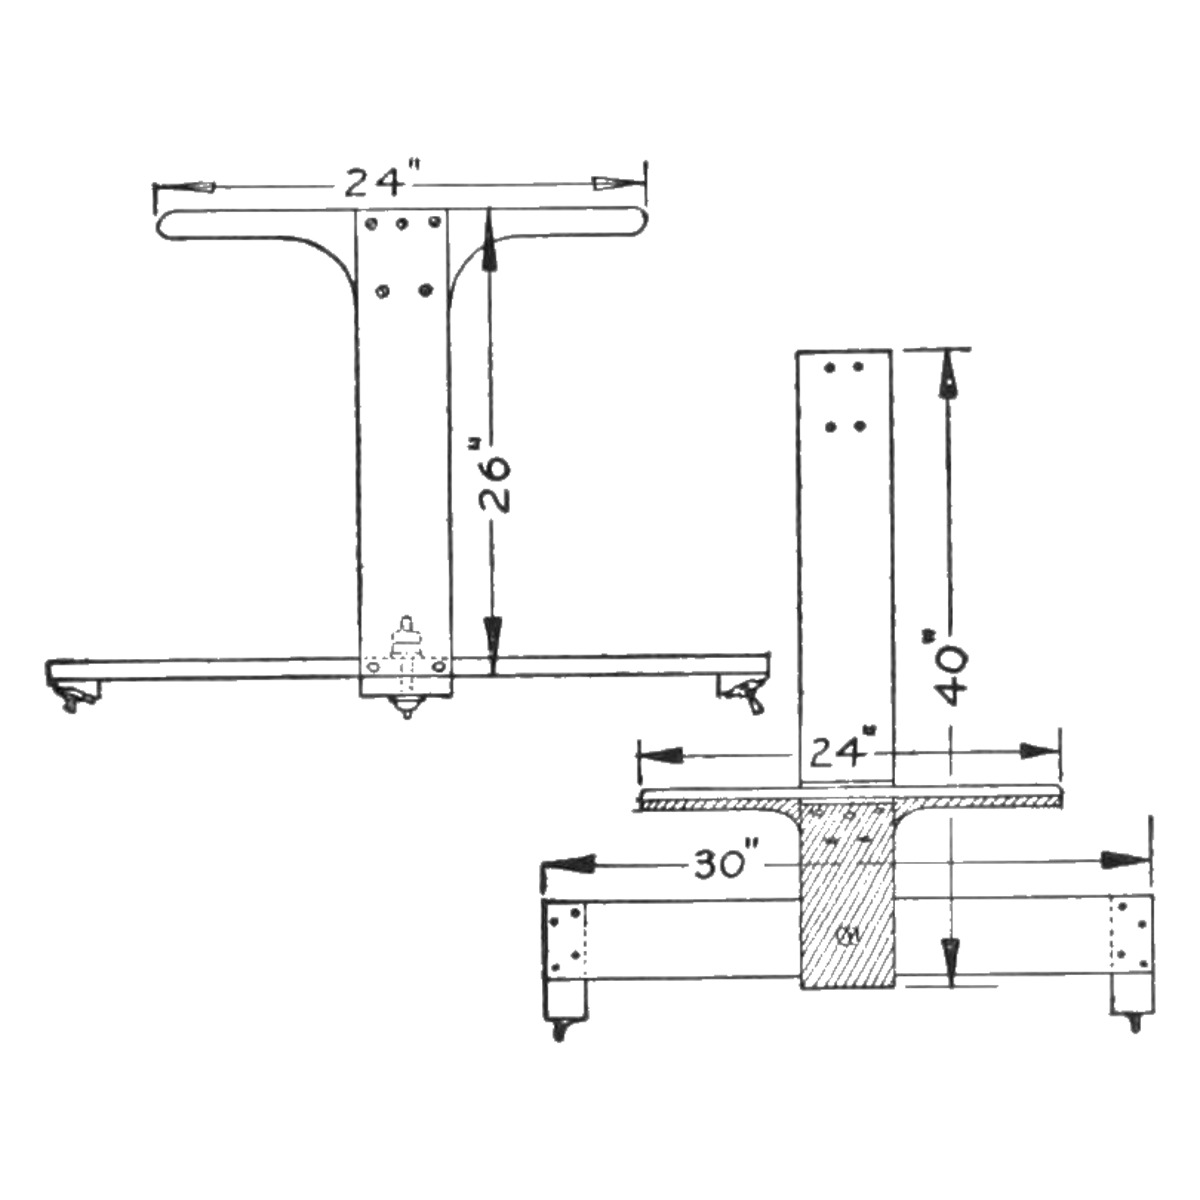


Ice Glider: Three-Skate Push Scooter With a Steering Crosspiece and Spiked Pusher (Boy Mechanic, 1915)
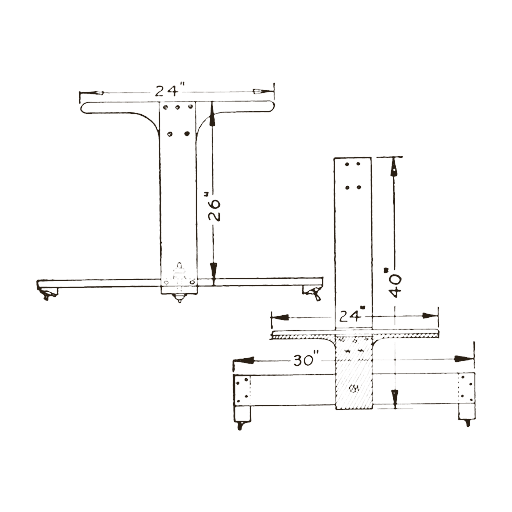
Mildred E. Thomas's ice glider from The Boy Mechanic, Book 2 (1915), "similar to an ice yacht, only a great deal smaller": a 40 in rear board on one skate, bolted to a 30 in front crosspiece on two skates tilted about 30 deg, with a 26 in upright and a handle to steer. It is pushed along with a spiked block strapped to one shoe.
Початківець
About 1 day
Інструкції
1
1
Her sizes, and the skate angle
Her sizes, and the skate angle
Завантаження блокнота Jupyter…
2
2
Read The Boy Mechanic, Book 2
Read The Boy Mechanic, Book 2
"The enthusiastic pushmobilist need not put aside his hobby during the winter, as an amusement device for use on ice, which will surpass the very best pushmobile, can be easily made as shown in the illustration."
3
3
Make the front crosspiece
Make the front crosspiece
Cut the front crosspiece 30 in long and about 8 in wide, with its front and back edges cut on a slant. Fasten a tapering block to each end so that the skates on them stand at an angle of about 30 deg, edges outward, and fix a skate to each block with screws through holes drilled in the top plates (or with straps).
Матеріали для цього кроку:
 Соснова дошка1 штука
 Дошка з твердої деревини1 штука
 Ковзани2 штук
 Шурупи по дереву1 штука
Необхідні інструменти ({count})
 Ручна пилка
 Ручний рубанок
 Транспортир
 Ручний дриль
 Олівець
 Рулетка
4
4
Build the upright and handle
Build the upright and handle
In the centre of the crosspiece build an upright 26 in high: nail a piece to its front and back edges so that, on the slanted edges, they stand sloping toward the rear. Fasten a handle 24 in long between the two uprights at the top.
Матеріали для цього кроку:
Соснова дошка1 штукаДошка з твердої деревини1 штука Цвяхи1 штукаШурупи по дереву1 штука
Необхідні інструменти ({count})
Ручна пилка МолотокРучний дриль
5
5
Make the rear board and join it
Make the rear board and join it
Cut the rear board 8 in wide and 40 in long and fasten the third skate in a perfectly straight position on its rear end. Bore a hole in the front end of the board and bolt it to the centre of the front crosspiece, so the crosspiece turns to guide the glider.
Матеріали для цього кроку:
Соснова дошка1 штукаКовзани1 штука Болт із півкруглою головкою1 штука
 Плоска шайба2 штукШурупи по дереву1 штука
Необхідні інструменти ({count})
Ручна пилка Коловорот із перкоюРучний дриль
6
6
Make the pusher
Make the pusher
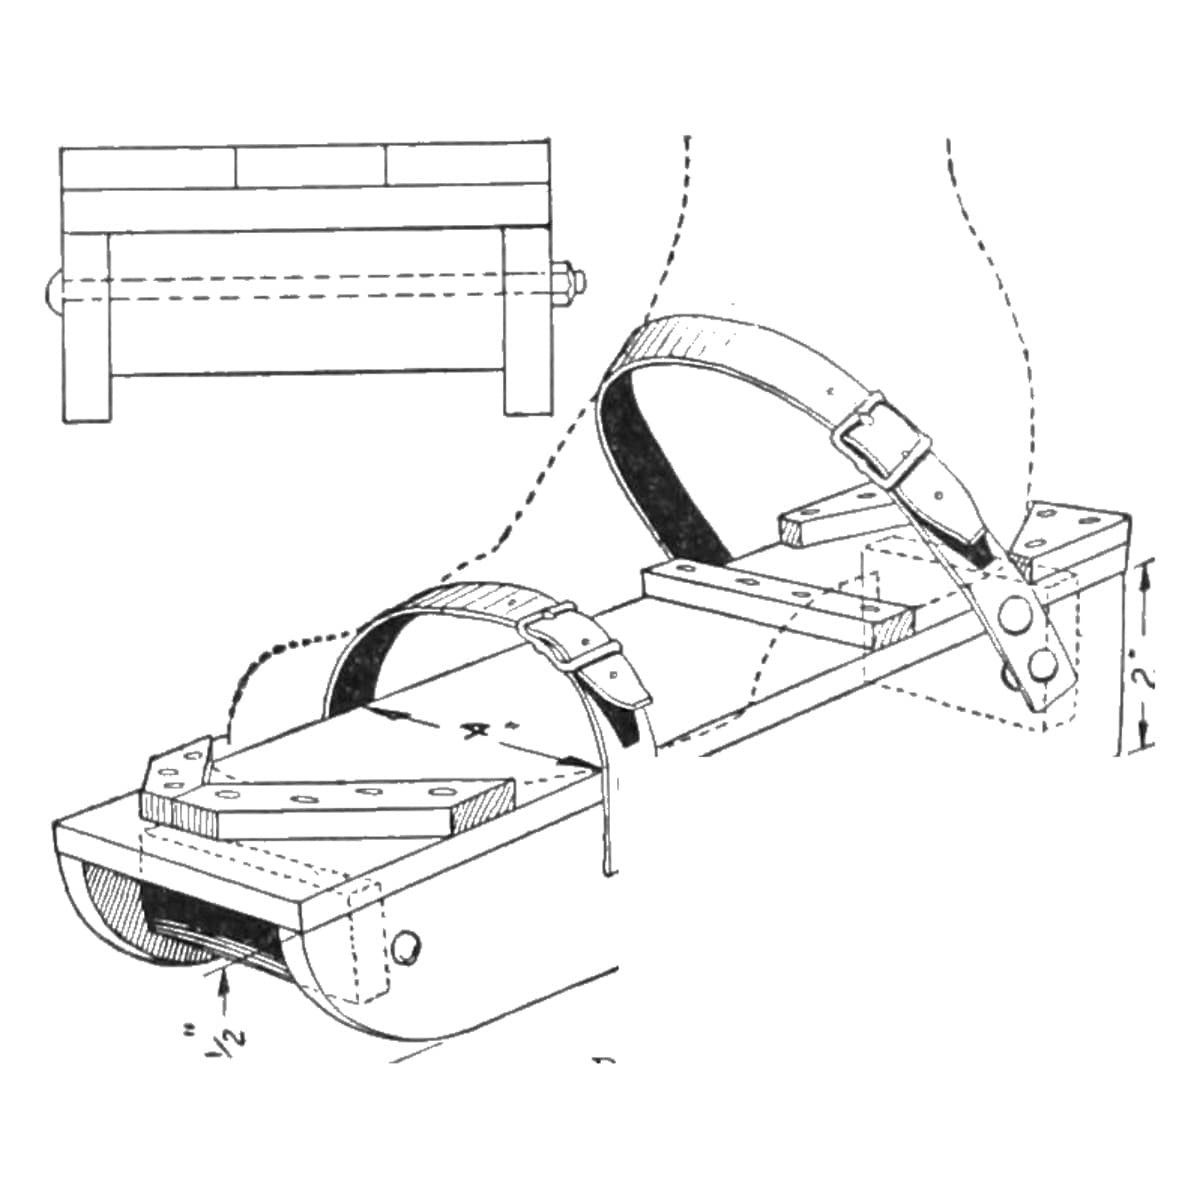
Drive nails through a block of wood so their points project on the underside, and strap the block to one shoe. Or use sole leather instead of the block, with small slots cut in the sides for the straps and nails driven through so the points project. Push the glider along like a pushmobile.
Матеріали для цього кроку:
Дошка з твердої деревини1 штукаЦвяхи1 штука Шкіряний ремінець1 штука
Необхідні інструменти ({count})
Ручна пилкаМолоток7
7
Troubleshooting
Troubleshooting
Ice glider troubleshooting.
Flow
Loading...
8
8
History and honest limits
History and honest limits
From "An Ice Glider" by Mildred E. Thomas, in **The Boy Mechanic, Book 2**, Popular Mechanics, 1915 (Project Gutenberg 44585; checked on the archive.org scan boymechanicbook200chic2, pp. 31-32). She gives no board thicknesses, bolt size or block taper, only the 30 deg skate angle. The tools and metric figures are ours.
Матеріали
8- 1 штукаЗаповнювач
- 1 штукаЗаповнювач
- 2 штукЗаповнювач
- 3 штукЗаповнювач
- 2 штукЗаповнювач
- 1 штукаЗаповнювач
- 2 штукЗаповнювач
- 1 штукаЗаповнювач
За цим кресленням виготовляють
Пов'язані креслення
Ці креслення діляться знаннями — техніки, матеріали або принципи
CC0 Суспільне надбання
Це креслення випущено під ліцензією CC0. Ви можете вільно копіювати, змінювати, поширювати та використовувати цю роботу для будь-яких цілей без запиту дозволу.
Підтримайте мейкера, купуючи продукти через його креслення, де він отримує Комісію мейкера встановлену вендорами, або створіть нову ітерацію цього креслення та включіть його як зв'язок у власне креслення для розподілу доходу.