Building a Roman Screw Press for Wine — Extracting Every Drop from the Grape
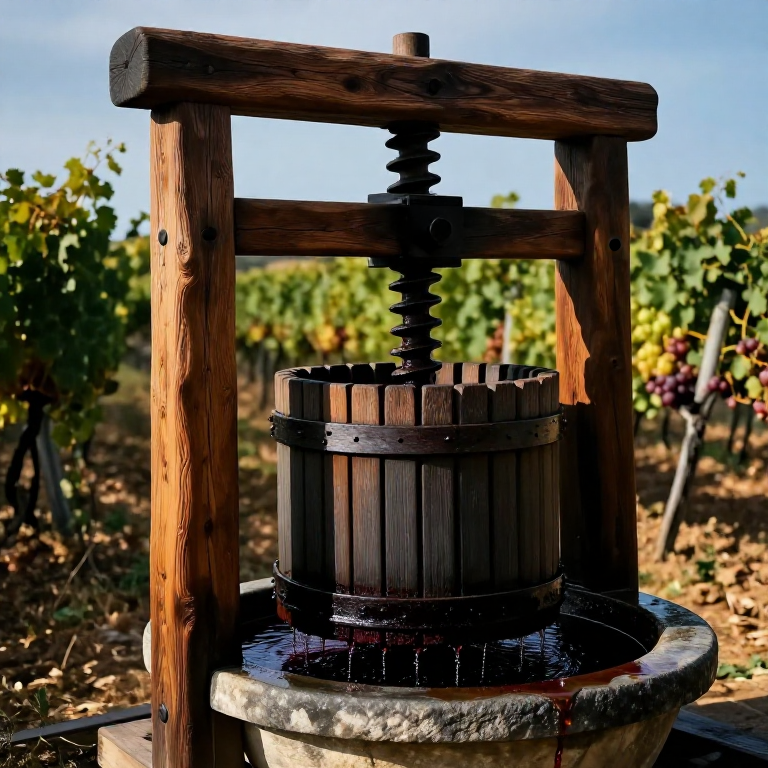
The screw press (prelum) was the dominant industrial pressing technology of the Roman world, used for extracting wine from grape pomace and oil from olive pulp throughout the Mediterranean. It represents a decisive improvement over the earlier beam press (a horizontal lever that required massive counter-weights or ropes at the free end to generate pressing force): the screw converts the rotary effort of pushing a long horizontal bar into a controlled, uniform vertical pressing force on the mass below, multiplied by the mechanical advantage of the screw thread.
The mechanical advantage of a screw press is calculated from the thread geometry: MA = (2π × lever arm length) / thread pitch. For a screw with a 10 cm pitch (the vertical distance between adjacent thread turns) and a lever arm of 2 metres (the bar used to turn the screw), MA = (2π × 200 cm) / 10 cm ≈ 126. This means a single person pushing 50 kg force at the end of the lever generates 50 × 126 = 6,300 kg of pressing force on the grape mass. Two workers operating the same lever together apply 12,600 kg — over 12 tonnes of pressing force from human muscle effort alone.
The Romans used the screw press in vast vineyards throughout Italy, Gaul, North Africa, and Spain. The volcanic ash-preserved wineries at Pompeii and Herculaneum contain multiple intact pressing bays, each with stone pressing basins (lacus), upright frame posts (arbores), and iron anchor rings for the press screw's lower end still visible in the masonry. Roman wine production at industrial scale — the amphora trade that shipped millions of litres annually across the Empire — was made possible by the screw press's force advantage. The same screw thread principle appears in the printing press (Gutenberg, 1440 CE), the bookbinder's press, the coin-stamping press, and ultimately the modern hydraulic press, which replaced the mechanical screw advantage with hydraulic pressure multiplication.
Інструкції
Design the press for grape volume and pressing force
Design the press for grape volume and pressing force
A Roman farm-scale screw press was designed to process one or two loads of grape pomace per pressing cycle. One load (a cartload of crushed grapes, post-treading) typically weighed 200–400 kg and occupied roughly 0.5 × 0.5 × 0.4 m of volume in the pressing basket. Scale the press accordingly: the pressing plate diameter should be at least 10 cm wider than the grape basket diameter on each side, so 70–80 cm pressing plate diameter for a 50 × 50 cm basket.
The pressing force requirement: to extract the last 15–20% of juice from heavily treaded grape pomace requires approximately 8–15 kg/cm² of pressing pressure on the pomace surface. For a 50 × 50 cm = 2,500 cm² pomace surface, this requires 8 × 2,500 = 20,000 kg minimum pressing force. The calculated 12,600 kg from a 2-metre lever and 10 cm pitch screw (see introduction) is marginal for this pressure — extend the lever to 2.5 metres to achieve 15,750 kg, or reduce pitch to 8 cm to achieve 15,700 kg. Real Roman winery screws had pitches of 8–12 cm and lever arms of 2–3 metres, matching this calculation.
Select and fell the oak timber for the screw shaft
Select and fell the oak timber for the screw shaft
The main screw shaft is the most critical and most demanding component. It must be a straight-grained hardwood log — oak (Quercus robur or Q. petraea) is the traditional material for its combination of strength, hardness, and workability. Select a log at least 15 cm in diameter and 2 metres long (plus 30 cm on each end for the pivot tops and bottom anchor fittings). The log must be absolutely straight — a slight bend in the screw shaft causes the thread to bind against the nut on one side as the press is loaded, resulting in the screw seizing under pressure.
Let the log air-dry for at least 6 months before threading — green oak shrinks significantly as it dries (up to 10% tangentially) and a thread cut in green wood will loosen and distort as the wood seasons. If working timber must be used immediately, bark the log and apply pine tar to the cut ends to slow moisture loss and reduce checking (radial cracks from differential drying). Hew the log to a consistent octagonal cross-section with an adze, then round it to a consistent cylinder with a drawknife, checking straightness along its full length with a stretched cord.
Матеріали для цього кроку:
 Hardwood Block5 штук
Необхідні інструменти ({count})
 Hand Saw
 Sharp Knife
Mark and cut the helical thread on the oak screw
Mark and cut the helical thread on the oak screw
To mark a consistent 10 cm pitch helix on the rounded oak shaft, use the paper triangle method: cut a right-angle triangle of stiff paper with the short leg equal to the shaft circumference (π × shaft diameter; for a 13 cm diameter shaft = π × 13 = 40.8 cm) and the long leg equal to the pitch (10 cm). Wrap the triangle around the shaft with the right angle at the bottom — the hypotenuse traces the helix path. Trace this helix all the way around the shaft with a marking knife, repositioning and re-wrapping the triangle for each turn of the helix.
Once the full helix path is marked along the working length of the screw, cut the thread groove using a wide chisel and mallet. The groove should be 2 cm wide × 2 cm deep, with perpendicular walls (the thread profile is square — a square-thread screw, not a V-thread). The thread crest (the raised helical ridge between adjacent groove turns) must be 2 cm wide and flat-topped. Square thread screws are mechanically superior for press applications: they transmit vertical load with no lateral component that would try to push the nut sideways, unlike V-thread which has an inherent wedging action that wastes pressing force in radial expansion of the nut.
Необхідні інструменти ({count})
 Hammer (2 kg)
 Awl
AwlBuild the nut (female thread) in the press crossbeam
Build the nut (female thread) in the press crossbeam
The crossbeam (the horizontal timber through which the screw passes) contains the nut — the female thread that the screw rotates in. The crossbeam is a massive timber, typically 20 × 20 cm cross-section and long enough to span between the two upright press posts with substantial bearing length on each post (30 cm minimum on each side). Through the centre of the crossbeam, bore a hole equal to the screw shaft diameter (13 cm for a 13 cm shaft) — this requires a large auger or a series of small-auger borings with chisel dressing to remove material between holes.
Inside the bored hole, cut the female thread: use the male screw itself as the tapping tool (called 'screwing the nut'). Force the screw shaft into the bored hole with mallet blows, rotating slightly with each blow — the thread crests on the male screw score their mirror image into the softer wood of the crossbeam hole. Continue advancing and rotating until the screw passes completely through the crossbeam. The resulting female thread is an exact match to the male screw. Lubricate liberally with tallow during this process — driving an unlubricated hardwood screw through a hardwood nut risks splitting the crossbeam under the wedging action of the thread.
Матеріали для цього кроку:
Hardwood Block4 штукErect the upright post frame
Erect the upright post frame
The press frame consists of two massive upright posts (arbores) planted firmly in the earth or set in stone sockets, braced at top and bottom. Each post must resist the horizontal forces from the pressing operation — as the screw is turned under load, it tries to rotate the entire crossbeam-and-post assembly rather than simply pressing downward. To resist this, the upright posts must be keyed to the stone pressing basin below and braced to a wall or additional transverse members above.
Set the post bases in stone sockets filled with lead (the Romans poured molten lead around the post bases to fix them rigidly in stone anchor blocks — an expensive but very permanent method) or in deep earthen post holes tamped with compacted stone rubble. Space the posts so that the crossbeam, when laid across them at mid-height, sits directly above the pressing basin with the screw centreline over the basin centre. The posts must be plumb vertical — use a plumb bob to verify. A tilted post causes the screw to press off-centre, applying uneven pressure to the grape mass and potentially toppling the press under full load.
Матеріали для цього кроку:
Hardwood Block6 штук Iron Nails40 штук
Build the stone pressing basin with drainage channel
Build the stone pressing basin with drainage channel
The pressing basin (lacus) collects the wine expressed from the grape pomace. In Roman wineries, the lacus was carved from a single block of local limestone or tuff, approximately 120 × 80 × 30 cm, with a slightly sloped floor (1–2° toward one corner) and a drainage hole at the lowest corner leading to an underground collection vessel (dolia — large ceramic jars sunk in the floor). For a field-built press without a carved stone basin, construct a wooden basin from 5 cm thick planks sealed with pitch, or use a watertight stone-and-mortar structure.
The drainage channel from the basin's low corner must be sloped to carry wine by gravity into the collection vessel. The channel should be smooth-surfaced (polished stone, fired clay, or bronze pipe) to prevent wine absorption into porous material — grape juice is acidic and reacts with limestone and common mortars, picking up undesirable mineral flavours and discolouring the wine. The Romans lined their wine basins with a thin coat of the waterproofing mortar (opus signinum — crushed terracotta fragments mixed into lime mortar) specifically to prevent this reaction.
Необхідні інструменти ({count})
 Shovel
Build the pressing plate from hardwood planks
Build the pressing plate from hardwood planks
The pressing plate (orbis) is a circular or square hardwood disc that sits on top of the grape basket and transmits the screw's vertical force evenly across the entire pomace surface. Build it from two layers of 5 cm hardwood planks (oak or beech), with the grain of the upper layer oriented perpendicular to the lower layer — this cross-lamination prevents warping and splitting when the plate is stressed unevenly by the screw pressing at the centre. Glue and nail the two layers together with iron nails at 15 cm spacing.
The pressing plate must be slightly smaller than the inside dimension of the collecting basin so that it can descend as pressing progresses without binding against the basin walls. Fit the upper face of the pressing plate with a central iron fitting (a pivot cup) that receives the rounded bottom end of the screw shaft, allowing the screw to press down while rotating without dragging the pressing plate around with it. This pivot cup is critical: without it, the rotating screw would carry the pressing plate in a circle rather than pressing it straight down.
Матеріали для цього кроку:
Hardwood Block3 штукIron Nails50 штукFit the operating bars into the screw top
Fit the operating bars into the screw top
Two or four horizontal wooden bars (vectes) pass through mortised holes in the top of the screw shaft, allowing workers to turn the screw. The bars should be 250–300 cm long so that workers can apply maximum force at the greatest possible radius from the screw centreline, maximising mechanical advantage. Taper the bar ends for grip and round all surfaces to prevent blistering hands during extended pressing sessions.
Roman mosaics and sculptural reliefs show screw press workers (torcularii) walking in circles around the press while pushing the bars — the same motion as a capstan. With two bars at right angles (forming a cross) and four workers each at one bar end, all four push in the same rotational direction simultaneously. The total force available: 4 workers × 70 kg push per worker × 250 cm lever arm / 10 cm pitch = 4 × 70 × 2π × 250 / 10 ≈ 44,000 kg of pressing force. This force — 44 tonnes — can fracture the oak screw or split the crossbeam nut if the grape basket is too full and incompressible. Limit the initial loads and build up gradually, monitoring the screw and nut for cracking sounds that indicate overstress.
Матеріали для цього кроку:
Hardwood Block2 штукPrepare the grape pomace and pressing cloth
Prepare the grape pomace and pressing cloth
The grape pomace (vinaccia — the skins, stems, and seeds remaining after treading) is loaded into the press in a structured way to maximise juice extraction. Do not press the pomace loose — individual grape skins and seeds are too small and will be forced through the drainage holes by the pressing pressure. Instead, fold the pomace into a series of pressing mats: layers of grape pomace (5–8 cm thick) sandwiched between squares of coarse esparto grass matting or woven rush matting approximately 60 × 60 cm.
Stack 5–8 layers of pomace-matting sandwiches in the pressing basin, building a column called a 'cheese'. The matting holds the small particles in place while allowing liquid to drain freely through its open weave. Place the pressing plate on top of the cheese and lower the screw until it just contacts the plate. Begin turning the screw slowly — the first juice to run off (the secondary run or 'sec') is of lower quality than the free-run juice that drained during treading but is still commercially valuable. Press slowly and continuously for 1–2 hours to complete the extraction.
Execute the pressing in stages
Execute the pressing in stages
Operate the screw press in three stages for maximum yield. Stage 1 (light press, 0–30 minutes): turn the screw until the pressing plate contacts the cheese firmly, then advance by one full turn every 10 minutes. Wine runs freely during this stage — 60–70% of the total yield comes out at low pressure, flowing clear and golden or red. Stage 2 (hard press, 30–90 minutes): advance the screw by one turn every 15 minutes, applying maximum worker effort. The juice flow slows and the pomace compacts visibly. Stage 3 (release and redress, 90–120 minutes): back off the screw fully, remove the pressing plate, redistribute the compressed cheese (break it apart and re-stack it with the outer dried layers moved to the centre where pressure was lower), and press again. This second pressing (segunda pressa) yields an additional 10–15% of juice of slightly lower quality.
Monitor the screw and nut threads during Stage 2 for any cracking or creaking that indicates overstress. If the screw shows stress signs, stop pressing — a cracked screw under full load fails suddenly and catastrophically. The Romans occasionally reinforced their press screws with iron rings shrunk around the thread crests to prevent splitting under maximum loads — a practice visible on the Pompeii press remains.
Wash and maintain the press after each use
Wash and maintain the press after each use
After pressing, flush the pressing basin, drainage channel, and collection vessel with clean water immediately. Grape juice begins fermenting within hours in warm weather, and the acetic acid produced by fermenting residues is corrosive to both wood and stone — corroding the iron fittings, softening the wood surfaces, and building up a bacterial biofilm that taints the next pressing. Scrub the basin and matting with fresh water and allow to dry in the sun before the next use.
Re-lubricate the screw threads with fresh tallow after each pressing. The high pressing forces squeeze lubricant out of the thread contact surfaces during operation, leaving the threads metal-on-metal (or wood-on-wood) for the next pressing. Without re-lubrication, the thread wears rapidly and unevenly, causing the screw to bind and possibly seize under load. Store the pressing mats flat in a dry location — wet mats develop mould that contaminates the next pressing and weakens the mat fibres. Replace mats when they show tears that would allow pomace particles to escape into the wine.
Calculate wine yield and press efficiency
Calculate wine yield and press efficiency
A Roman screw press of the scale described (2-metre lever, 10 cm pitch, 50 × 50 cm pressing area) should extract approximately 60–70% of the total juice content from a fully treaded grape load. For a 300 kg load of mixed white or red grape pomace (post-treading), the juice content is roughly 70 litres per 100 kg of pomace, or 210 litres total. The press should extract 60–70% of this = 126–147 litres per pressing cycle. The balance (65–85 litres) remains bound in the cell walls of the grape skins and cannot be released by pressing alone.
The Romans measured their press efficiency by what they called the torcularium yield: the ratio of amphora filled per modius of grapes pressed. The standard Roman amphora held approximately 26 litres; the modius was a dry-measure unit of approximately 8.7 litres of grain equivalent. A good press yield was considered 1 amphora (26 litres) per 50 kg of pressed grapes — matching the 126–147 litre yield for 300 kg calculated above. Press efficiency below 50 litres per 100 kg of pomace indicated worn pressing mats (allowing small particles to clog the drainage paths) or an undersized pressing plate (not covering the full pomace area). Improving pressing mat quality and pressing plate coverage are the primary yield-improvement interventions available within the screw press design.
Матеріали
2- 20 штукЗаповнювач
- 90 штукЗаповнювач
Необхідні інструменти
5- Заповнювач
- Заповнювач
- Заповнювач
- Заповнювач
- Заповнювач
Матеріали з пов'язаних креслень
Пов'язані креслення
Ці креслення діляться знаннями — техніки, матеріали або принципи
Related blueprints
Other builds that share materials, tools, or techniques with this one.
CC0 Суспільне надбання
Це креслення випущено під ліцензією CC0. Ви можете вільно копіювати, змінювати, поширювати та використовувати цю роботу для будь-яких цілей без запиту дозволу.
Підтримайте мейкера, купуючи продукти через його креслення, де він отримує Комісію мейкера встановлену вендорами, або створіть нову ітерацію цього креслення та включіть його як зв'язок у власне креслення для розподілу доходу.