Співпраця
МИСТЕЦТВО
КРАСА ТА ЗДОРОВ'Я
РЕМЕСЛО
КУЛЬТУРА ТА ІСТОРІЯ
РОЗВАГИ
СЕРЕДОВИЩЕ
ЇЖА ТА НАПІЇ
ЗБОРНА ІНЖЕНЕРІЯ
НАУК
СПОРТ
ТЕХНОЛОГІЯ
НОСИМО
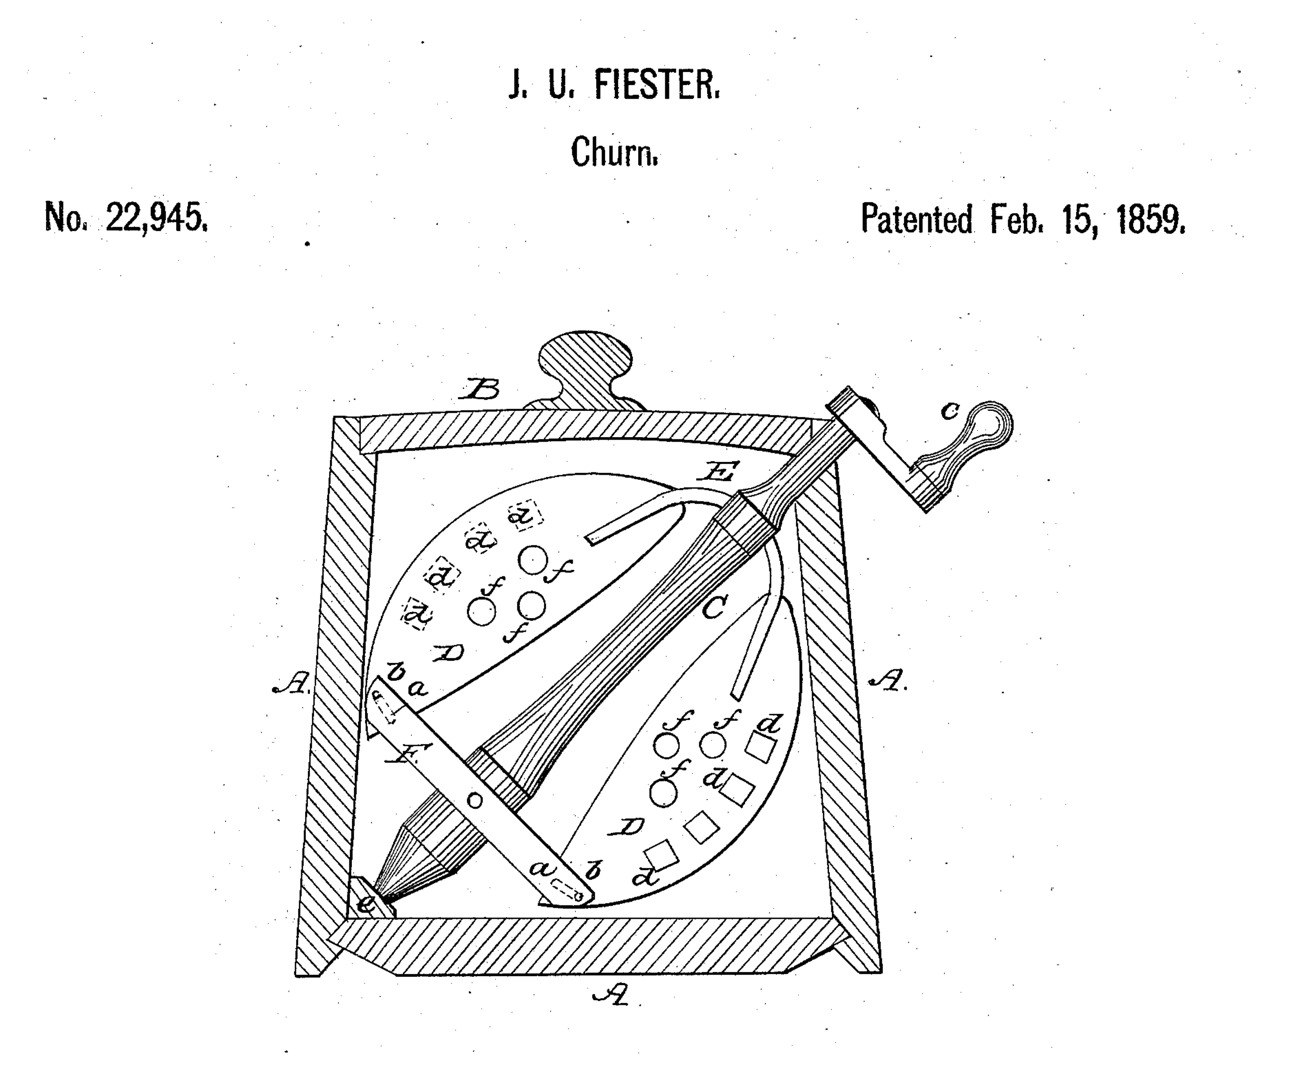


Sprung-Blade Inclined-Dasher Churn: The Blades Close to Pass the Narrow Top and Spread to Fill the Wide Bottom
John U. Fiester of Winchester, Ohio, received US 22,945 in February 1859 for a churn with a slanting dasher in a tub wider at the bottom than the top, so it is hard to tip over. The dasher's two blades are held to the spindle by a yoke spring and guided by pins in the slots of a cross tie: they close to pass the narrow top and spread to fill the wide bottom. Holes let the cream through the blades, and square pockets cut part way in carry air down into it.
This rung builds it in pine and hardwood with a crank.
Середній
About 8 hours, plus printing
Інструкції
1
1
Tub, fill and the blades' reach
Tub, fill and the blades' reach
Завантаження блокнота Jupyter…
2
2
Holed beaters, before it
Holed beaters, before it
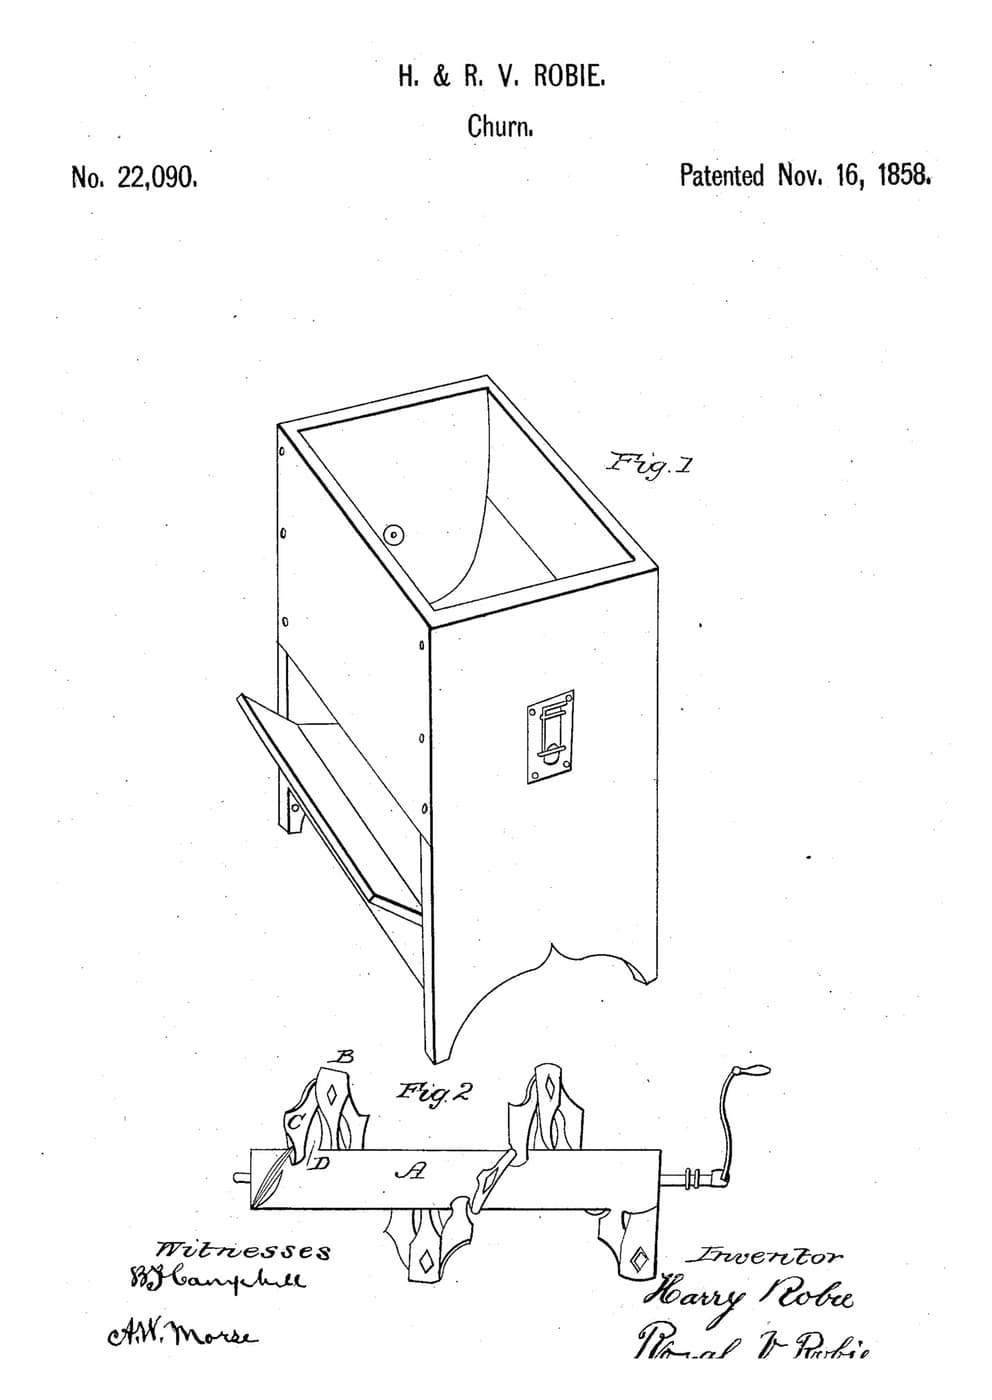
The Robies' beaters pass the cream through holes. Fiester's blades also have pockets that carry air down.
3
3
Read US 22,945
Read US 22,945
"... the yoke spring E and slots (a) allow the dasher blades to be forced easily into the smaller opening in the top of the tub, and when in to expand and fill the larger space at the bottom."
4
4
Print the journal box e
Print the journal box e
The block with the seat for the spindle's point. PETG, 0.2 mm layers, 40 % infill, 4 walls; wash before first use.
5
5
Print the yoke collar
Print the yoke collar
The collar on the spindle that holds the yoke spring. PETG, 0.2 mm layers, 40 % infill, 4 walls; wash before first use.
6
6
Tub A and lid B
Tub A and lid B
From 18 mm pine cut a floor 460 x 336 mm, two ends 400 mm wide at the foot, 320 mm at the top and 400 mm tall, and two sloping sides 336 mm wide that join them. Glue and screw the ends and sides on the floor so the tub is 400 mm wide inside at the floor and 320 mm at the top, 300 mm front to back. Cut a lid 374 x 336 mm with a turned dowel knob. Drill a 42 mm hole through the right side where the spindle meets it, about 345 mm above the inside floor.
Матеріали для цього кроку:
 Соснова дошка3 штук
 Столярний клей1 штука
 Шурупи по дереву40 штук
 Шканти з твердої деревини1 штука
Необхідні інструменти ({count})
 Ручна пилка
 Електролобзик
 Акумуляторний дриль
 Набір кільцевих пилок
 Струбцини
 Транспортир / кутомір
 Наждачний папір
 Набір викруток
 Рулетка
7
7
Spindle C and journal e
Spindle C and journal e
Cut a 40 mm hardwood dowel 641 mm long and whittle or plane one end to a point over 30 mm. Screw the journal box in the left corner of the floor, against the sloping side. Cut a half-lap notch 30 mm wide and 12 mm deep across the spindle 85 mm from its point for the cross tie.
Матеріали для цього кроку:
 Філамент PETG1 штукаШканти з твердої деревини1 штукаШурупи по дереву4 штук
Необхідні інструменти ({count})
 3D-принтер FDMРучна пилка
 Стамески
 Напилки (ручний напилок)Набір викруток
8
8
Blades D, tie F and yoke E
Blades D, tie F and yoke E
Draw an oval 340 x 220 mm on 16 mm hardwood and cut it in two along its length, then take 4 mm off each straight edge so the halves clear the spindle. Drill four 20 mm holes f in each blade and chisel four 20 mm square pockets d, 8 mm deep with bevelled sides, facing the same way. Glue a 9 mm dowel pin b into each blade 31 mm from its straight edge, 30 mm from its lower end. Cut a hardwood cross tie F 190 x 30 x 16 mm with a 10 mm slot 30 mm long near each end, glue it into the spindle's notch, and drop the pins into its slots. Slide the collar onto the spindle above the blades and screw two spring steel strips 15 x 1.5 mm, 42 mm long, from the collar to each blade's top end.
Матеріали для цього кроку:
 Дошка з твердої деревини1 штукаШканти з твердої деревини1 штукаСтолярний клей1 штука
 Смуга пружинної сталі1 штука
 Машинні гвинти8 штук
 Самоконтрувальна гайка з нейлоновим кільцем8 штук
Необхідні інструменти ({count})
ЕлектролобзикАкумуляторний дриль Набір перових сверделСтамески
 Ножівка по металуНапилки (ручний напилок)Наждачний папірНабір викруток
9
9
Fit the dasher and crank
Fit the dasher and crank
Pass the spindle's top out through the hole in the right side, squeeze the blades together through the tub's top and let them spread, and seat the point in the journal box. Fix a hardwood crank arm 130 mm long on the spindle outside the tub with a screw across, and glue in a 24 mm dowel handle 100 mm long.
Матеріали для цього кроку:
Дошка з твердої деревини1 штукаШканти з твердої деревини1 штукаСтолярний клей1 штукаШурупи по дереву1 штукаНеобхідні інструменти ({count})
Ручна пилкаАкумуляторний дрильНабір перових сверделНабір викруток10
10
The build in 3D
The build in 3D
FreeCAD model of this build, the near half of the tub cut away: the sloping tub, the journal box, the slanting spindle with its two holed blades, the cross tie with its slots and pins, the yoke collar and springs, and the crank outside.
11
11
Churn
Churn
Pour in about 12 litres of heavy cream at about 15 °C, checked with the thermometer, and put the lid on. Turn the crank steadily and time it: the blades dip in and out of the cream, the pockets carrying air down. When the butter comes, pour off the buttermilk, wash the butter in cold water until it runs clear, work in a pinch of salt and weigh it.
Матеріали для цього кроку:
 Жирні вершки12 l
 Крупна морська сіль1 штука
 Вода1 штука
Необхідні інструменти ({count})
 Термометр зі щупом, що лишається в страві
 Секундомір
 Цифрові кухонні ваги
 Велика миска з нержавкої сталі
12
12
Troubleshooting
Troubleshooting
Sprung-blade churn troubleshooting.
Flow
Loading...
13
13
History and honest limits
History and honest limits
**John U. Fiester** of Winchester, Guernsey County, Ohio, US 22,945, "Churn": the drawing reads 15 February 1859, the text 25 February 1859. A tub wider at the top can be overset; his is wider at the bottom, and the sprung, guided blades still fill it. He claimed the adjustable dasher with its yoke spring, slotted cross tie and pins, holes and air pockets. He gave no sizes or materials: ours are a pine tub, hardwood dasher and steel springs.
Матеріали
12- 3 штукЗаповнювач
- 3 штукЗаповнювач
- 45 штукЗаповнювач
- 1 штукаЗаповнювач
- 1 штукаЗаповнювач
- 1 штукаЗаповнювач
- 1 штукаЗаповнювач
- 8 штукЗаповнювач
- Заповнювач
- 12 lЗаповнювач
- 1 штукаЗаповнювач
- 1 штукаЗаповнювач
Необхідні інструменти
18- Заповнювач
- 1 vendor sell this, none ship to you yetЗаповнювач
- 1 vendor sell this, none ship to you yetЗаповнювач
- Заповнювач
- Заповнювач
- Заповнювач
- Заповнювач
- Заповнювач
- 1 vendor sell this, none ship to you yetЗаповнювач
- Заповнювач
- Заповнювач
- Заповнювач
- Заповнювач
- Заповнювач
- Заповнювач
- Заповнювач
- Заповнювач
Файли дизайну
3За цим кресленням виготовляють


Пов'язані креслення
Ці креслення діляться знаннями — техніки, матеріали або принципи



CC0 Суспільне надбання
Це креслення випущено під ліцензією CC0. Ви можете вільно копіювати, змінювати, поширювати та використовувати цю роботу для будь-яких цілей без запиту дозволу.
Підтримайте мейкера, купуючи продукти через його креслення, де він отримує Комісію мейкера встановлену вендорами, або створіть нову ітерацію цього креслення та включіть його як зв'язок у власне креслення для розподілу доходу.